Nauli Kriya is an ancient yogic purification practice that has recently become a viral crazy yoga technique called “alien yoga.”
As a modern yogi, you probably know all the popular poses like mountain, tree, and warrior. I bet you can sun salute with the best of them. (Which, way to go!)
Ancient yogis also practiced a set of techniques meant specifically to purify the body. In fact, one major yogic text, Hatha Yoga Pradipika, outlined six purification procedures.
I’ll cover one purification process, Nauli Kriya, in this post.
What is Nauli Kriya?
Nauli Kriya is one of the six shatkarmas. This practice is essentially a hands-free, self-administered abdominal massage via suction. Suction? That’s right. More on that later. It is practiced with the belief that it stimulates and cleanses the internal organs and digestive tract plus strengthens the abdominal muscles.
Shatkarmas (the Sanskrit word shat means ‘six’ and karma means ‘action’) are yoga practices that focus on different systems of the body. When all are practiced, they are a deep cleanse for your entire body. It’s believed that these procedures aid your body in the removal of impurities to prevent disease. They also help to prepare your body and mind to become more alert and allow pranayama and meditation to be easier and possibly more effective.
Benefits of Nauli Kriya
Nauli Kriya is believed to have a wide range of health benefits.
The concentrated abdominal activity physically massages the internal organs and brings in fresh blood. It also stimulates the nerves and glands of the navel region, aka the Solar Plexus (Manipura Chakra). When this stimulation occurs, you can feel direct effects on your prana (energy) throughout your body.

The Solar Plexus is an important chakra. It is the power center of your body. Not only does it have authority on your digestive fire and health but the solar plexus is also associated with your personal power, willpower, and self-confidence. Any solar plexus blockages will negatively impact each of those areas. Any work you do to strengthen your solar plexus will have huge returns on your ability to stand in your own power gracefully.
If you’re curious to learn more ways to work with this amazing chakra, I’d love for you to join me in Uplifted where you can explore the Manipura Chakra in my Solar Plexus Chakra Course.
When you practice Nauli Kriya, you can begin to feel energy being directed up to your brain. This work to ignite and strengthen your solar plexus fuels the rise of kundalini energy up your spine through the chakras.
Regular practice of Nauli Kriya will also help you prepare for pranayama and meditation techniques. It aids mental clarity and supports the ability to perform breath retention.
It’s believed that Nauli Kriya is a great technique to
- flush out toxic substances,
- support your immune system,
- relieve constipation,
- and support the proper functioning of your digestive system.
When you perform this kriya the organs in your abdominal cavity like the liver, colon, gallbladder, and large and small intestine get a compression which helps support their function. It will also enable you to create a stronger connection to your core muscles. Your abdominal wall control will increase and in asana poses you will have better management of these muscles. You’ll feel so light on your mat that you may just float into crow pose!
Contraindications of Nauli Kriya
Nauli Kriya should only be performed on an empty stomach. For this reason, most people practice Nauli Kriya in the morning before ingestion of any food or liquids. If this isn’t possible, aim for at least 3 hours to pass after a meal before you attempt the kriya.
Nauli Kriya is an advanced technique and an intense practice for your abdominal area because it creates a lot of pressure. Due to this, there are many conditions to be aware of that make Nauli Kriya inappropriate for practitioners.
Some conditions for which Nauli Kriya is contraindicated are
- pregnancy,
- menstruation,
- recent abdominal surgery,
- high blood pressure,
- heart disease,
- hernia,
- ulcer,
- and gallstones.
People with digestive issues such as IBS and reflux should also be mindful and not practice when symptoms are present.
If you are unsure, check with an experienced yoga teacher or your doctor before you attempt the kriya.
How To Do Nauli Kriya Breathing Exercise
First things first, Nauli Kriya is an intense practice for your abdomen. It is considered an advanced practice and if you are new to Nauli Kriya it is recommended that you practice it under the guidance of an experienced teacher.
Nauli Kriya is broken out into 5 progressive steps. This kriya will take a lot of time and practice to accomplish because you’ll want to get really good at each one before you move on to the next step. This means you may spend a few days to a few weeks of focused practice on each step, and that’s ok! You may also take more time to master one but adopt the others more quickly. Be open to the process and allow it to be a new way to understand your mind/body connection.
It can be helpful to think about the practice as a massage for your digestive organs. You don’t need to focus on how you look in the mirror, your goal isn’t to emulate “the look” but to find how it FEELS in your own body. This is ultimately a practice of conscious control of your breath, diaphragm, abdominals, and pelvic floor that stimulates your internal organs.
I’m not going to lie, Nauli Kriya is complicated (I’ll walk you through the steps) and will likely take a lot of practice. However, you may have an advantage if you are already familiar with Uddiyana Bandha.
Step 1: Uddiyana Bandha
Remember how I said that you’d have an advantage if you were already familiar with Uddiyana Bandha? That’s because this abdominal lock is the first step in Nauli Kriya!
I’ve also compiled my best tips here to help you access Uddiyana Bandha (it’s tricky and will take time, so don’t stress!). Let’s walk through them together.
This will take practice. Once you get it, it’s like riding a bike and you’ll be able to quickly find your way back.
Uddiyana Bandha Tips
I promised you tips! Here are some of my favorites.
If you’d like to learn more, consider training with me in Kundalini University where I go into this and other Bandhas in more detail.

Wide-Leg Forward Fold
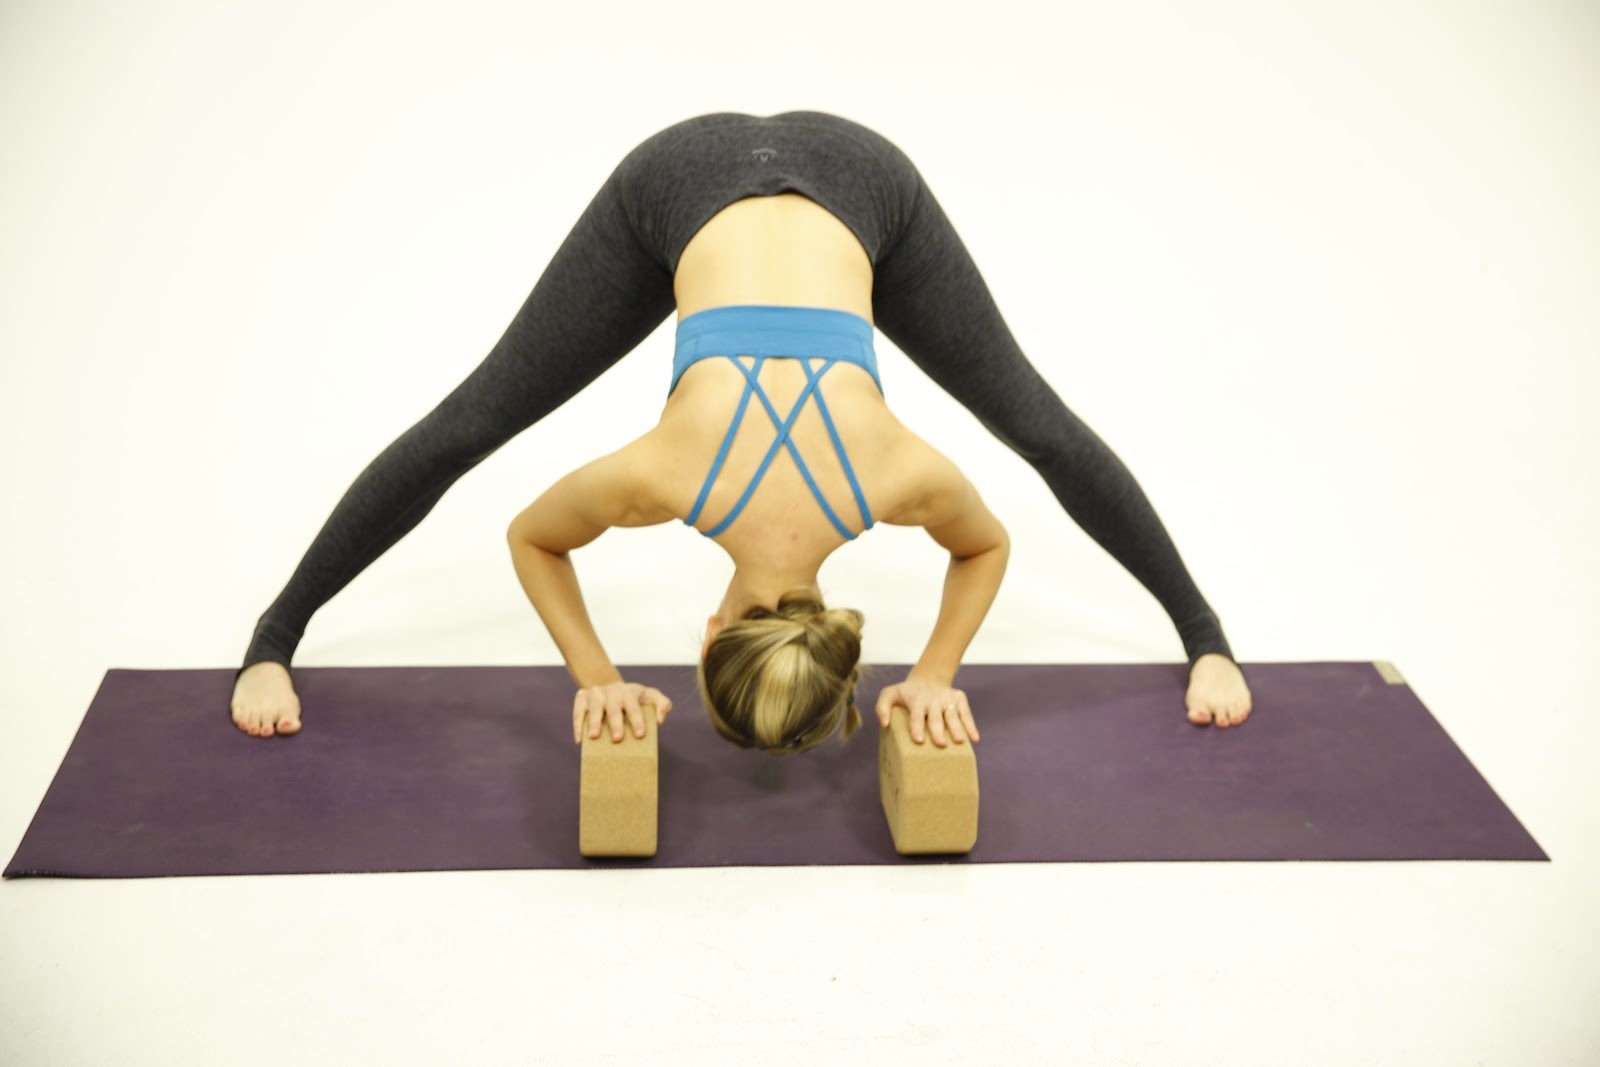
My favorite way to activate Uddiyana Bandha is in a wide-leg forward fold (Prasarita Padottanasana). To practice:
- In wide-leg forward fold, inhale half lift. Exhale and fold.
- Hold out all the air, arch your upper back slightly, and come into half lift. Activate suction from your jugular notch to activate Uddiyana Bandha.
RelaxEd belly
A relaxed belly is integral to this posture. Here are some exercises to try.
Option 1
This practice relaxes the diaphragm.
- Sit in rock pose (Vajrasana) or on a cushion.
- Take a few deep breaths.
- Inhale, retain the breath, pump your navel 8 times as you would in Breath of Fire (Kapalabhati).
- Exhale all breath out. Hold breath out, pump your navel 8 times as you would in Breath of Fire.
- Relax, take a few rounds of natural breath.
- Repeat 3-5 rounds.
Now, attempt Uddiyana Bandha. Take a deep breath, exhale all air out. Relax your abdomen and attempt suction. Release when you need to.
Option 2
This approach oxygenates your system.
- Sit in an easy seat, hands on your thighs.
- Begin Breath of Fire for one minute.
- Inhale and activate Mula Bandha. Exhale when you’re ready.
- Inhale, exhale, at the bottom of your exhale, put your hands on your thighs and lean forward, relax your belly, and suction from the jugular notch to activate Uddiyana Bandha.
Explore
Play with these techniques.
Everyone will look different based on many different factors. Some yogis with thinner bodies may look more hallowed out while thicker bodies may see little inward movement. You’ll feel gentle pressure at the throat. That feeling is a good indicator that you’re on the right track.
Be patient with yourself. It may take days, weeks, or months to properly engage this Bandha. The more you practice, the more progress you’ll make. Ensure you are capable and comfortable with Uddiyana Bandha before moving on to step 2.
Step 2: Agnisara Kriya
Agni, Sanskrit for ‘fire’, and sara which means ‘essence’. This kriya ignites fire energy. It fuels a rise of kundalini energy up the spine through your chakras and it sends so much energy up to the brain.
Believe me, three to five minutes of Agnisara Kriya practice in the morning is so powerful that it has the potential to change your day-to-day outlook and energy. Agnisara Kriya is also an incredible detoxifier and organ polisher.
How to practice Agnisara Kriya:
- Stand feet hip-width apart.
- Slide your butt back slightly, bend your knees. Bend forward from your waist, hands on thighs.
- Activate Uddiyana Bandha.
- With Uddiyana Bandha activated and your breath still exhaled, relax your abdomen. Your stomach will distend.
- Contract your abdomen back to the starting position.
- Repeat this relaxation and contraction of your abdomen as many times as feels comfortable. Continue to hold your breath out.
- When you feel the need to inhale, do. Release Uddiyana Bandha and take a few natural breaths before you come to stand.
If you have trouble with the release of your abdomen, imagine a slight release in your throat. Pick it up again with an internal gasp and then release it again.
When you are new to Agnisara Kriya use slow, controlled movements. As you progress you can begin to move more quickly. At this stage, the practice will look like your belly flaps as it moves quickly in and out while you hold your breath out of your lungs.
Keep in mind that when you do the practice at this faster pace, your belly should not become hard. It will remain soft and should flap. The stomach flap means your abs aren’t engaged. The movement is suction. You will likely feel tension in the area of your collarbone. Like Uddiyana Bandha, this activity is heavily instigated in your jugular region.
Beginners try 3 slow rounds of 3-10 flaps. Gradually build up the number of flaps and the speed at which you move.
When you feel you have mastered Agnisara Kriya, move on to step 3.
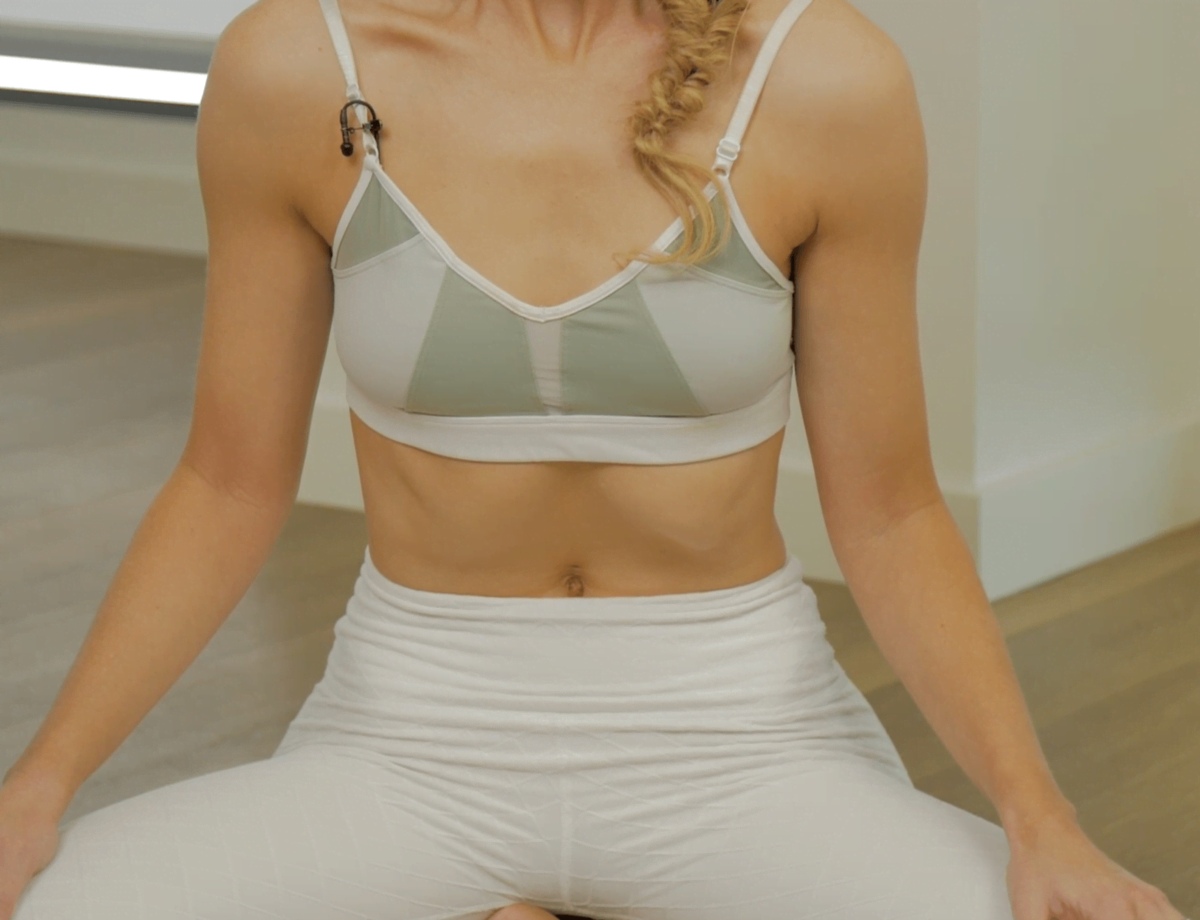
Step 3: Madhyama (Middle) Nauli
Now that you have more awareness and control let’s focus on concentrated contractions of the abdominal muscles.
In Madhyama Nauli, you will practice voluntary contraction that causes your rectus abdominis muscles to protrude forward. Your rectus abdominis muscles are the top layer of your abdominal muscles, aka your 6-pack.
It is easier to perform Madhyama Nauli if you stand but as you progress you can also practice in an easy seat.

How to practice Madhyama Nauli:
- Stand feet hip-width apart.
- Slide your butt back slightly, bend your knees. Bend forward from your waist, hands on thighs.
- Activate Uddiyana Bandha.
- With Uddiyana Bandha activated and your breath exhaled, arms straight, push your hands into your thighs. This pressure will cause your abdominals to create suction on the sides, pushing your rectus abdominis muscles forward.
- Hold for 3-10 seconds and release. Stay in your folded forward position for a few natural breaths and then stand up.
With your hands on your thighs, you can also visualize that you bring your torso down towards your legs. As your torso mentally moves (it won’t actually move) resist the movement with your hands pushed into your thighs. This extra visual may help create the resistance needed to activate and push out the central part of your abdomen.
This protrusion will look different on varied body types. Some may look more defined, potentially very hallowed at the sides and very pushed out in the center. Others with less density will have a smaller protrusion. How it looks on your body will also depend on the size of your rectus abdominis muscles. No need to compare yourself to others.
Try Madhyama Nauli daily. One day it will suddenly click and once it does, you’re ready for step 4!
Step 4: Vama (Left) & Dakshina (Right) Nauli
Vama and Dakshina Nauli are the next progression of concentrated abdominal contractions. Instead of focusing on the middle of the rectus abdominal muscles, you will strengthen your ability to move the left and right sides in isolation.

How to practice Vama Nauli and Dakshina Nauli:
- Stand feet hip-width apart.
- Slide your butt back slightly, bend your knees. Bend forward from your waist, hands on thighs.
- Activate Uddiyana Bandha.
- With Uddiyana Bandha activated and your breath still exhaled, arms straight, push your hands into your thighs.
- Instead of putting the same pressure onto each thigh as you did in Madhyama Nauli focus first on putting more pressure onto your right hand/thigh (Dakshina Nauli). You can lift the left hand if this helps you focus the pressure. This will cause the muscles on your right side to engage and protrude.
- Now, alternate sides.
- Push your left hand into your left thigh with pressure. You can lift the right hand if needed. This will cause the muscle on your left side to engage and protrude (Vama Nauli).
- Continue to practice each side. Hold each for one second.
- When you are ready, release the posture and take a few natural breaths before coming up to stand.
- Repeat 3-5 rounds.
Once you can isolate each side, move on to step 5.
Step 5: Nauli Kriya
It’s time to combine all the steps and practice Nauli Kriya!
Like you did in Vama Nauli and Dakshina Nauli, in Nauli Kriya you will use your upper body weight to shift from one hand to another. The difference in Nauli Kriya is that this motion will become more rhythmic, circular, and wave-like. You will naturally incorporate hip-rolling movement. It may feel a bit like you are using a hula hoop due to the circular motion.
As you first start to practice Nauli Kriya, it can be helpful to think of a 12-hour clock face and you are the clock hands. Pay special attention to the positions of 12 o’clock, 3 o’clock, 6 o’clock, and 9 o’clock.
How to perform Nauli Kriya:
- Stand feet hip-width apart.
- Slide your butt back slightly, bend your knees. Bend forward from your waist, hands on the thighs.
- Activate Uddiyana Bandha.
- With Uddiyana Bandha activated and your breath still exhaled, arms straight, push your hands into your thighs.
- Start with Madhyama Nauli. Consider this 6 o’clock. I like to make this association since your middle belly is pointed down at the floor, similar to how 6 is at the bottom of a clock face.
- Go to the right (9 o’clock) with an application of pressure on the right thigh.
- Imagine a hula hoop and roll your hips back (through 12 o’clock) and move your weight to the opposite hand/thigh (3 o’clock).
- Perform 1-3 circles. When you need to, release and take a few natural breaths before you come up to stand.
- When you’re ready, come back into the posture and perform 1-3 circles going in the opposite direction. Exit the pose when you need to, take a few natural breaths, and come to stand.
Work up to 5 rounds.
Start this sequence slowly. Over time it will get easier and you’ll achieve a wavelike motion in your abdomen.
When you begin this practice it will probably feel disjointed with separate steps but over time you will be able to remain still in your legs/trunk and make the movements with muscle coordination.
Closing Thoughts
Remember, don’t worry too much about what it looks like. Feel it. Think about how this kriya aids you in a massage of your organs and solar plexus. Feel into your own body and focus on what you want to accomplish. The movements will click into place.
Next Steps
- Love Kundalini? Refine your tune in (the Adi Mantra) with me in this free chanting masterclass.
- Experience my Kundalini Dance Party and elevate your mood in 8 minutes.
- Enroll in my Kundalini Demystified training course. Let’s demystify the “mystery” of this ancient science and INSTANTLY reap the benefits!

YOU MIGHT ALSO LIKE
- What Is a Kundalini Awakening?
- Do I Need to Be Certified to Teach Kundalini Yoga?
- Kundalini Yoga vs Hatha Yoga: What’s the Difference?
- Is Kundalini Yoga Safe? What You Need to Know
- What Is Kundalini Yoga? A Beginner’s Guide
- Practicing Kundalini For Anxiety: Move Energy To Feel Balanced
- Trauma-Informed Kundalini Yoga: A Heart-Centered Approach to Healing
- Harnessing the Power of Kundalini Divine Feminine for Transformation
- Kundalini for Feminine Energy: Ignite Your Creative Power and Passion
- Mastering the Sufi Grind: Benefits and Techniques for All Levels
- Kundalini Yoga for Chakras: An Uplifted Guide to Energy Balance
- Discover the Benefits of the Gobinday Mukunday Mantra for Well-Being
- Nabhi Kriya: Ignite Your Inner Fire and Personal Power
- Ek Ong Kar Sat Gur Prasad: Kundalini Mantra For Manifestation
- Tantric Har Chant: How It Fuels Prosperity and Inner Power
Trauma-Informed, Feminine Kundalini Starter Pack [Free Download]