yoga for self love

You have so much love to give, and you give it in so many ways!!! Perhaps by cleaning up after your family, cooking for them, holding them, or making an extra stop on the way to work and picking up a coffee for your friend because you know it’s her favorite. You are beautiful in the way you love others. But, how do you love yourself?

yoga and self love

What Is Self Love?

I’m sure you’ve seen people all over the wellness industry talk about “self love” and how important it is. But, has anyone actually defined it for you? Or are you just assuming it’s the same as self-care, like bubble baths, massages, and whatnot? It’s not!

So, what is it exactly? According to The Brain and Behavior Foundation, “Self-love is a state of appreciation for oneself that grows from actions that support our physical, psychological and spiritual growth.” This could look different for everyone, here are some examples of self love:

  • Holding to your morals/principles
  • Setting healthy boundaries to maintain a positive headspace
  • Positive self-talk(tell yourself how amazing your are, even if you don’t fully believe it)
  • Listening to your body(you DO NOT need to earn rest!)
  • Nurturing your body in healthy ways
  • Trusting yourself/self acceptance
  • Forgiving yourself for mishaps
  • Taking time to connect with yourself, those around you, and your higher power
  • Prioritizing YOUR needs 
  • Avoiding people who lower your vibration
  • Pursuing your own interests/wants
  • Holding yourself accountable

I could keep going but I think you get the idea. 

How Yoga Cultivates Self Love

What the science says: Yoga helps improve your perception of yourself. A study was done amongst college women comparing self esteem and how they viewed themselves before and after, and separating them into different activity groups. It found that the yoga group had a significant increase in self awareness, feeling good about themselves, and troubleshooting their own physical/emotional problems.

Another study done on high school students found similar results. By having a greater awareness of yourself, science shows you experience self love more freely. Not surprising, since according to yoga, your true nature is bliss. So the more you become self aware, the more blissed out you will be.

brett-larkin-yoga-kundalini-love-arms-heart

The Uplifted Perspective: Self love means connecting to the part of you that is brahman (source, or universal consciousness). Instead of fully identifying with your individual identity, what the yogis called jiva-atman, you connect to the part of you that is unchanging, universal, interconnected with everyone and everything, your paramatman (your eternal soul). The fastest route to achieve this is through kriya yoga from the Yoga Sutras, an amazing trifold practice to increase your self awareness and lead you to awakening. I make this practical in my Yoga for Self Mastery course. We have module upon module about self-awareness, self care and self love, as this is the foundation for any spiritual endeavor.

When it comes to increasing self love, the physical practice, or heart opening yoga poses, may not be enough. Instead, I invite you to think of self love in two ways:

  1. Svadhyaya – self study. This is having the self awareness to know how to nourish yourself and calibrate your nervous system. Knowing these things about yourself is a HUGE step towards self love.
  • Brainstorm the things that nourish you(make you feel lit up!) and do them!
  • Determine the things/activities you feel you NEED to survive vs. the fun things that make you feel nourished and happy
  • Find what habits prevent you from doing these things(hello reality TV!!!)
  • Pay attention to your thought patterns(“There’s not enough time”, “I don’t deserve that”, etc. – stories you tell yourself that ARE NOT TRUE!)
  • Examine your inherited beliefs(“I must achieve to be loved” – is this really true, or is this a belief holding you back?)
  • Work through these and forgive yourself or others for any negative patterns that may have served you in the past.

Don’t worry if you’re having difficulty identifying these things. A lot of people do. That’s why I created Yoga for Self Mastery. To guide you through this process.

yoga for self mastery
  1. Tapas – discipline. Challenge your nervous system to become stronger by doing the things that may seem uncomfortable. 
  • This is where inner work comes into play(as awkward as it might seem, start with something like affirmations)
  • Do the hard work to heal from your traumas(seek outside help from a professional if you need to)
  • Face your fears
  • Set boundaries with yourself and those around you
  • Make lifestyle changes(work on not overindulging in things that aren’t good for you. Bring in a more yogic lifestyle)

You NEED to know how to nourish yourself. You NEED to know how to challenge yourself to be more authentic and be the embodiment of love that is your true essence. And you NEED to know when each kind of self love is needed. Do you need to push yourself forward? Or nurture yourself where you are? Do you need to use effort or surrender in a particular moment in order to best honor your needs? This is a complex, but beautiful practice to explore.

Think of the dual-pronged approach to self love this way: A mother embraces and holds her child when they are hurt, scared or feeling less than. But she also holds boundaries and encourages her child to do new things, like learn to swim or ride a bike. Even if it’s scary.

This is the polarity of self love. True healing through the practice of yoga occurs when you learn to embody it. 

Looking for a self love yoga practice? Whether you’re a yoga teacher or just an avid at home practitioner, here are two of my favorite sequences for self love that I’m honored to share with you: 

YouTube video

I also recommend this yoga class, if you’re holding onto something: Women’s Yoga for Emotional Release | YOGA FOR EMOTIONAL PAIN

My Top Yoga for Self Love Poses

1. Child’s Pose (Balasana)

Child's-Pose
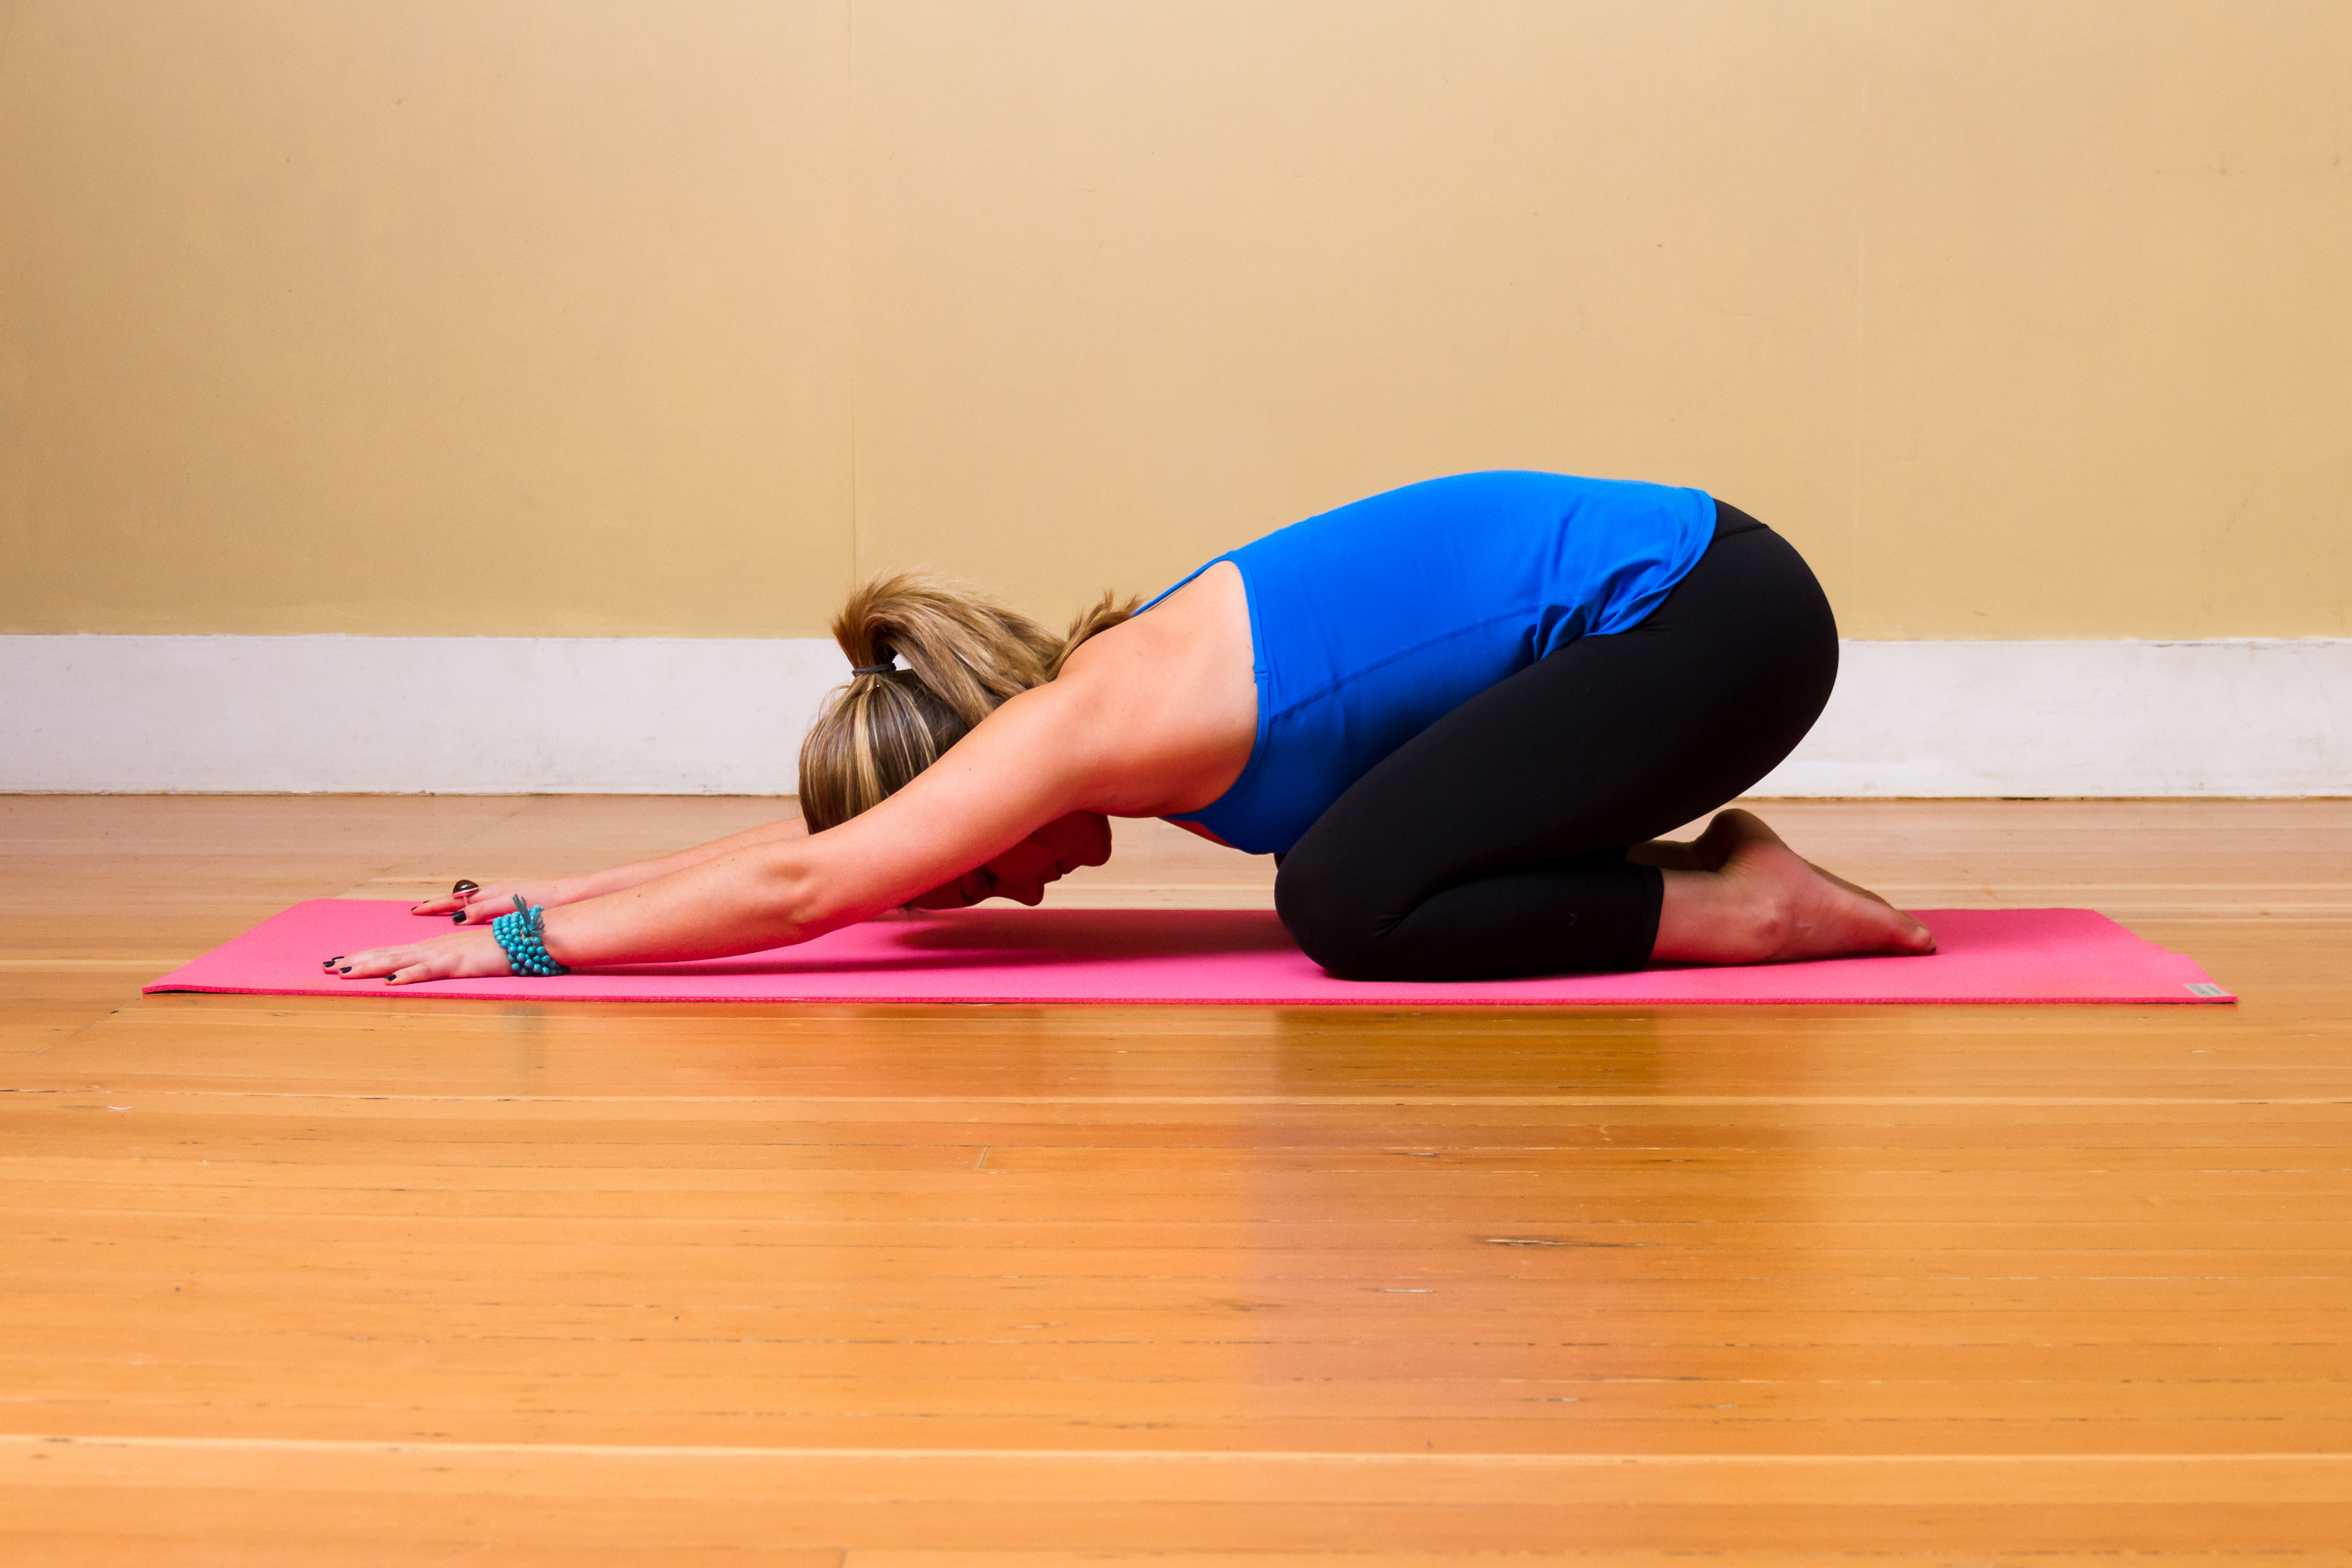
  • Step 1: Begin on hands and knees, take your hips back to your heels. Knees can be touching or as wide as the mat.
  • Step 2: Rest the forehead to the mat, close your eyes.
  • Step 3: Soften the upper body and extend the arms in front of you. 
  • Step 4: Simply inhale rise back to all fours to come out of the pose.

Variations: Hug a bolster to make this more restorative. Another great variation is to place a block under the seat between the heels or under the forehead. You can play with the position of your arms too!

Benefits: Balasana opens the back body and releases the glutes and hips. This pose brings focus inward, cooling the body and relieves stress soothing the nervous system. Child’s pose increases mindfulness as well which can help increase self esteem and nurture your self love journey.

How To Incorporate Svadhyaya (self awareness) or Tapas (loving discipline):

  • See how to fully nourish yourself in this pose with the special yoga classes in my At Home Yoga Retreat
  • Add tapas to this pose by placing the hands on blocks, or working to release trauma. Add in affirmations like, “I survived.” “I am strong”.

2. Standing Forward Fold (Uttanasana)

yoga for weight loss
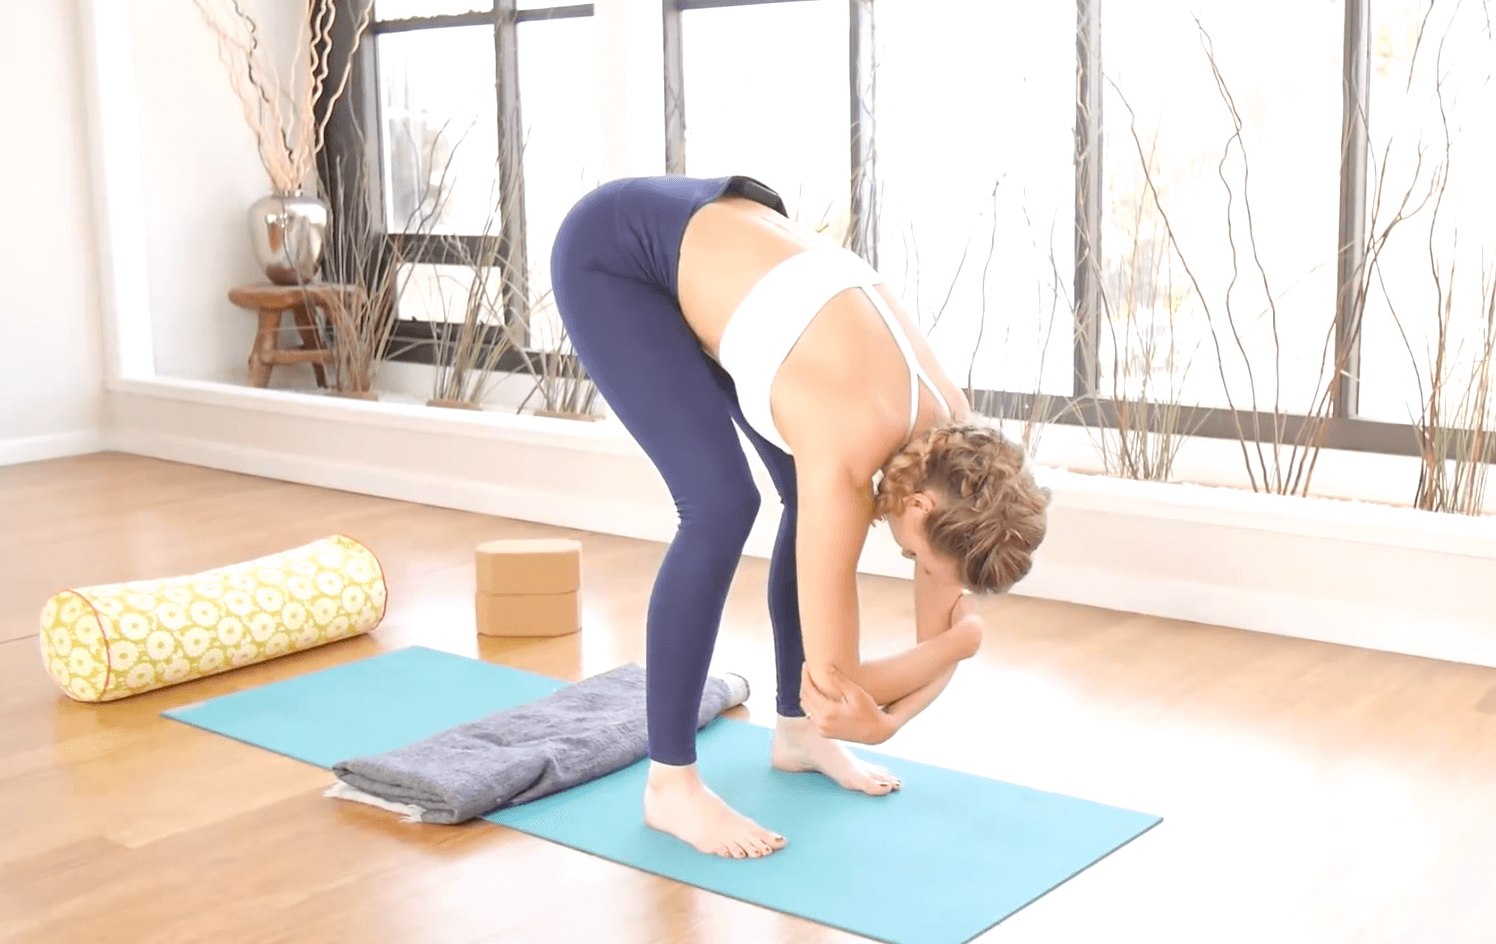
  • Step 1: Stand tall, feet hip width apart. Inhale as the arms sweep up overhead.
  • Step 2: Exhale, with a slight bend in the knees, hinge forward at the hips, let the arms float down to the floor as you fold forward.
  • Step 3: Gravity can have your head but not your shoulders. Stay here for several breaths.
  • Step 4: To come out, inhale, bend the knees and sweep the arms up to stand. Exhale as the arms return down to your sides.

Variations: Bend the knees deeply or take the feet wider. Place the hands on blocks, clasp opposite elbows to hang, or use a chair or table to assist you by placing the hands on one and only coming halfway down. Go deeper on this pose with this post!

Benefits: Forward fold increases blood circulation, lowers blood pressure, eases headaches. and pain in the backside of the body. This pose puts gentle pressure on the gut and massages the digestive organs and brings focus inward.

How To Incorporate Svadhyaya (self awareness) or Tapas (loving discipline):

  • Make this a seated forward fold with some cushions and fully relax into it to nurture your body and mind. Release, surrender, let go, and observe yourself from the outside in (svadhyaya).
  • Add in some spinal twists to test your boundaries: Bend the left knee generously, left hand to mat, as you inhale bringing the right arm up and open up the right side. This will invite more clarity and aid in emotional release too (tapas).

3. Wind Relieving Pose (Pavanamuktasana)

Wind Relieving Pose
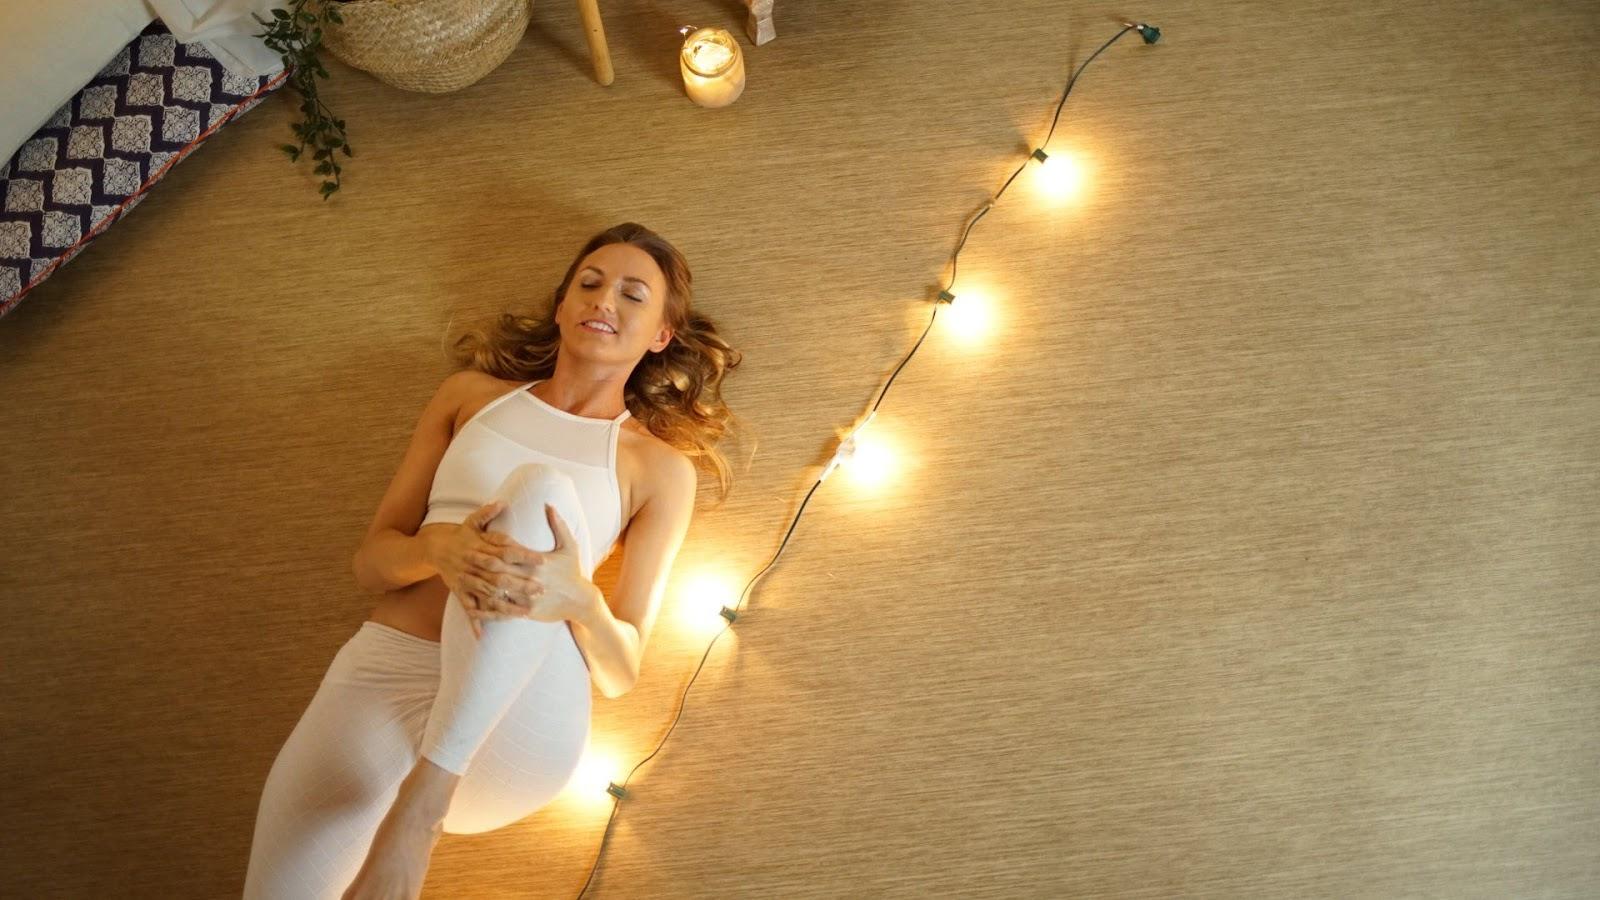
  • Step 1: Lay on your back. Pull left knee into the chest.
  • Step 2: Breathe deep here for several rounds and completely relax.
  • Step 3 : Exhale release the leg long laying back completely flat. 
  • Step 4: Repeat on the other side.

Variations: You can have both knees bent into the chest and make this a knees to chest pose if having one leg long doesn’t feel so great on your low back.

Benefits: This pose gets the digestive system moving! Helps relieve bloat and gas, stretches the glute, de-stresses and helps calm the body. It energizes you and just really makes you feel good.

How To Incorporate Svadhyaya (self awareness) or Tapas (loving discipline):

  • Create a juicier stretch and encourage greater nourishment and relaxation by placing a block under the hips (svadhyaya).
  • This pose can be a little more fiery by pulling both knees in as you bring your forehead to meet them. This will fire up your abs and frankly it doesn’t always feel the greatest but it makes that moment when you relax back down so much sweeter (tapas).

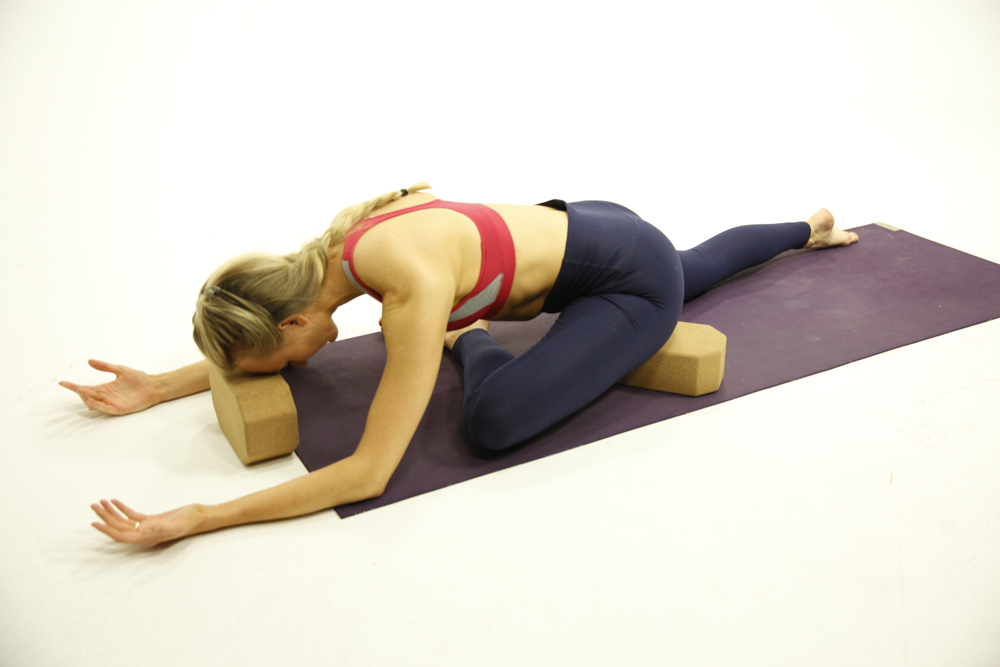
4. Puppy Pose (Uttana Shishosana)

puppy pose Uttana Shishosana
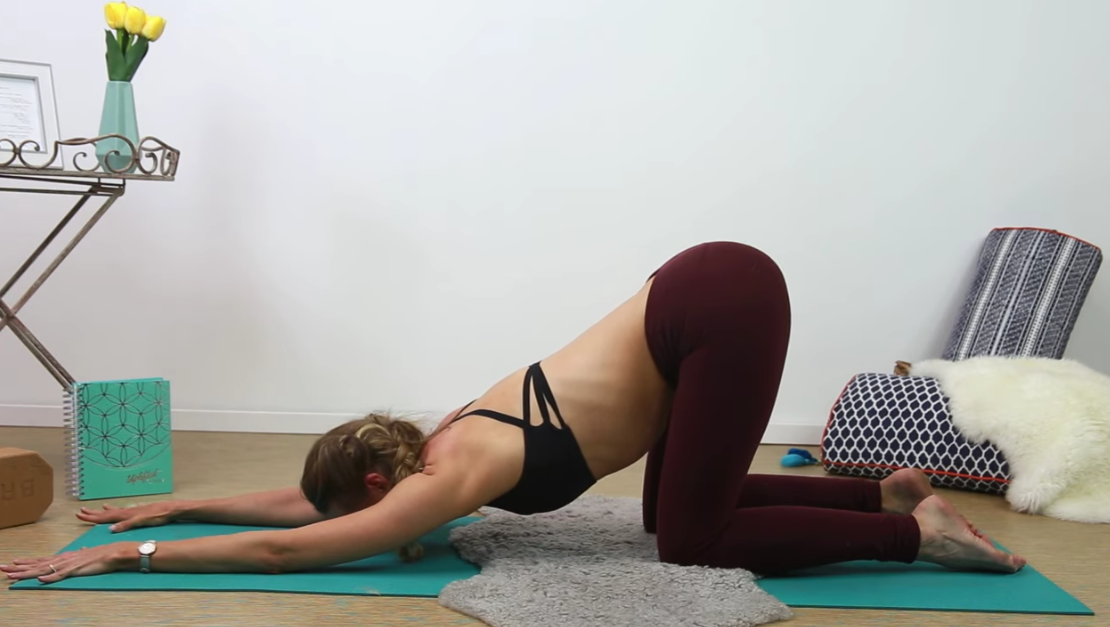
  • Step 1: Come to a tabletop position, shoulders over wrists and hips over the knees. You can curl or uncurl the toes.
  • Step 2: Walk both hands in front of you a few inches. Exhale, shift your hips back so that they stay directly over the knees. Fingers spread wide, grip the mat.
  • Step 3: Press your chest toward the ground, both arms active. Ears come in line with biceps, and elbows stay off of the ground.
  • Step 4: Breathe, draw your hips toward your heels and stretch through the chest and arms.
  • Step 5: To come out, slowly walk both hands toward you as you lift back up to a neutral tabletop.

Variations: Use a blanket underneath the knees if they feel uncomfortable. Rest the forehead on a block or folded blanket to bring the intensity down or aid if you cannot bring the forehead to the ground.

Benefits: Puppy pose increases flexibility in the shoulders, stretches the spine, opens the chest and breath, and promotes introspection.

How To Incorporate Svadhyaya (self awareness) or Tapas (loving discipline):

  • Straddle a bolster and place a pillow under your head for a restorative version of this pose. Take a deep breath and enjoy the present moment in this position (svadhyaya).
  • Build self confidence when you extend one leg out to the side to add some challenge and hip opening to this posture (tapas).

Make your yoga practice 2x more potent in HALF the time (usually $47) FREE 👇

X
Make your yoga practice 2x more potent in 1/2 the time. FREE two-hour Yoga Transformation Portal (usually $47) [Claim it Free Here]

    5. Goddess Pose (Utkata Konasana)

    Goddess Pose
    • Step 1: From mountain pose, heel-toe your feet out wide. Toes turn out to a 45-degree angle.
    • Step 2: Inhale, take your arms overhead. Exhale, drop your hips and bend your knees to 90 degrees. Make sure the knees are stacked over the ankles.
    • Step 3: Pull the navel up and in as you broaden the chest and cactus the arms.
    • Step 4: To come out simply push through feet to stand, heel-toe your feet back to your neutral, letting the arms come to your sides. 

    Variations: Bring your hands to the heart’s center or your hips if having the arms up aggravates the shoulders. You can always hold onto the back of a chair for support as well. If you want to make it harder, lift your heels to test your balance.

    Benefits: Tap into your inner goddess and divine feminine with this yoga pose. Boost self-esteem and make yourself feel powerful. This yoga pose grounds and works your stabilizing muscles to improve posture, build strength, and release tension in the hips.

    How To Incorporate Svadhyaya (self awareness) or Tapas (loving discipline):

    • Remind yourself and/or students how powerful you are in this posture. Combat your negative self talk and add in some nice simple affirmations (“I am strong/I am powerful”).
    • Challenge yourself to hold this posture for several breaths. Pay attention to how you talk to yourself once it starts getting hard. This could clue you in on some patterns you need to work on in your self love journey.

    6. Camel Pose (Ustrasana)

    camel pose
    • Step 1: Kneel, but keep your hips elevated instead of sitting back on the feet.
    • Step 2: Make sure your knees, hips and shoulders are stacked. If you’re not sure, make sure that your right knee is directly below the right hip and that your left knee is directly below your left hip. Keep your spine erect.
    • Step 3: Bring hands to the lower back with fingertips pointing downward, palms pressed into your back.
    • Step 4: Push the hips and upper body forward and simultaneously lift your heart toward the sky
    • Step 5: As you lean back, you have an option to relax your neck and to grab your heels with your palms. If this is uncomfortable to you, keep your chin tucked so that your neck is in line with your spine. 
    • Step 6: Lift yourself back to kneeling.

    Variations: Put blocks behind you to grab instead of your feet. You can lean all the way back and bring your hands to the mat behind you instead. Or, don’t even reach back at all. Just remain in your kneeling position leaning back slightly to engage those core muscles.

    Benefits: Camel Pose is a deep heart opener that will release blockages in your Heart Chakra. It stretches the entire front body, including your chest, hip flexors and throat as well as your thighs and ankles. It strengthens the back muscles and helps to improve bad posture.

    How To Incorporate Svadhyaya (self awareness) or Tapas (loving discipline):

    • Add a beautiful mild spinal twist to this posture: You can reach your left arm back and grab your left foot and bring your right hand to the sky while you gently look over your left shoulder
    • Make this your peak pose and build to it throughout your flow by beginning with more gentle heart openers(cow, cobra, updog).

    7. Dancer’s Pose (Natarajasana)

    Natarajasana pose
    • Step 1: From Mountain pose (Tadasana), right arm releases by side, palm turned out, left hand comes onto left hip. Root into the left foot, bend the right knee, lift heel and come onto right tip toes. Focus your gaze slightly down and a few feet in front of you. 
    • Step 2: Bend right knee deeply, lift the leg, bring the right foot toward the right glute. Right hand holds onto the inside of the right foot or ankle.
    • Step 3: Inhale, left arm sweeps up toward the ceiling. Low abs firm in an up, knit front ribs to find length in the front, sides and back of torso.
    • Step 4: Exhale, torso moves forward and slightly toward the floor, right foot kicks back and up. 
    • Step 5: Breath is steady, legs, abdominals and arms energized and engaged, chin dips slightly, jaw is relaxed.
    • Step 6: To come out, inhale using your abdominal muscles, torso rises back to upright, right leg releases back onto mat, both arms by sides. Prepare for the second side.

    Variations: Practice with one hand on wall (balance issues). Practice using a strap around the foot. Remain upright

    Benefits: Dancer promotes mental clarity. Improves balance. Opens shoulders and chest, strengthens the core, legs and ankles and will relieve stress.

    How To Incorporate Svadhyaya (self awareness) or Tapas (loving discipline):

    • A more nourishing version of this pose would be to take it to the wall and hold the heel to glute rather than pushing the bent leg up and away (svadhyaya).
    • This is already a challenging pose(tapas) but, if you’re ready, you can challenge yourself further by bringing both arms overhead to grab the foot (tapas).

    8. Upward Facing Dog (Urdhva Mukha Svanasana)

    upward facing dog
    • Step 1: Lay on your belly. Plant palms directly underneath the shoulders. Uncurl the toes, so that the tops of the feet are face down on the mat.
    • Step 2: Engage arms and core. Inhale, gently lift your torso forward and then up off of the ground. Straighten the arms, as you move the collarbones back in space.
    • Step 3: Bring a slight dip in the chin, so that it stays in line with the spine. Thighs are active, find internal rotation to lift. Knees rise up off of the ground.
    • Step 4: Evenly distribute weight through the hands pressing through the fingers, knuckles, and wrists. Take shoulders over elbows, elbows over wrists.
    • Step 5: To come out of this posture, exhale, slowly lower back down or to move to the next position

    Variations: Place a block between your thighs to engage the legs or bring blocks under the palms. Take Cobra Pose (Bhujangasana) instead. If you hyperextend in the elbows, micro bend them.

    Benefits: Upward facing dog improves posture and increases spine flexibility. Strengthens the glutes, hamstrings, spinal extensors, rhomboids, and trapezius. It also opens up the chest and builds strength in the core muscles.

    How To Incorporate Svadhyaya (self awareness) or Tapas (loving discipline):

    • If it feels good, add some side stretching by leaning the right shoulder towards the right hip and then the left shoulder to the left hip.
    • If you need more challenge, pull those deep core muscles up and in and practice lifting one foot off the ground, and then the other.

    9. Pigeon Pose (Eka Pada Rajakapotasana)

    pigeon pose variation
    • Step 1: From hands and knees, carry your right leg to the front of the mat. Place the shin to the mat across the front of your body. Note: The shin does not need to be a perfect right angle or parallel to the mat. Play with the placement, bring it closer or further away from your body, flex and relax the foot, to see what feels best in YOUR OWN body.
    • Step 2: Send the back leg out in a straight line behind you; make sure it stays in line with the hip.
    • Step 3: Square the hips to make sure your weight is evenly distributed. Inhale lengthen through the spine and exhale as you bend forward over the front leg. Great opportunity for a few moments of deep breathes here.
    • Step 4: Inhale, press through the hands to rise and gently roll onto the right hip to bring the left leg back around to meet the right and end in an easy seat.
    • Step 5: Repeat on the other side.

    Variations: Use a block or bolster under the front side of your body if going to the floor feels uncomfortable. Place a folded blanket under the front thigh if there is a lot of space between the hip and the floor. If this version doesn’t work for you at all then try the ankle to knee version on your back.

    Benefits: Pigeon pose provides a deep physical stretch through the lower half of your body. When you do pigeon you stretch through all the major muscles of the hips and upper legs.

    Pigeon is also nice for balancing the second chakra. When the second chakra is balanced you can embrace change more readily and accept the fluidity of life.

    How To Incorporate Svadhyaya (self awareness) or Tapas (loving discipline):

    • Be mindful of transitioning in and out of this posture. Give yourself or your students plenty of time to move slowly to prevent injury.
    • Pad your hips with a blanket and hug a bolster to hold this pose for a while. Let it soothe and release your hips and low back inducing deep relaxation.
    • Hold your top half upright, keep the hips square and activate the inner thighs to increase difficulty.

    10. Warrior II (Virabhadrasana II)

    Warrior II (Virabhadrasana II)
    • Step 1: Stand at the top of mat. Exhale, take a big step back with your left foot, bring hands to hips.
    • Step 2: With your front foot pointed toward the top of the mat and the back foot parallel to the back edge of the mat align your heel of front foot with arch of back foot
    • Step 3: Bend your front knee, stack knee over ankle, thigh parallel to floor, rotated externally. Lengthen your back thigh, engage your muscles, ground through the outer edge of the back foot.
    • Step 4: Hips are square to the side edge of mat, abs are firm, in and up, knit front ribs to find length in the front, sides and back of torso.
    • Step 5: Shoulders stacked over hips, inhale arms up over head, exhale arms parallel to floor, inline with shoulders, palms face down. Gentle Gaze over the front middle finger. Shoulder blades yearn down the back.
    • Step 6: To come out of the pose, heal toe your back foot in to shorten stance, step back to the top of the mat. Prepare for the second side.

    Variations: Put your hands on your hips if you have shoulder issues or put your back against a wall to keep a straight spine.

    Benefits: Warrior II strengthens and stretches legs and hips. Improves balance and concentration, opens the shoulders and chest. Strengthens muscles, energizes the body and strengthens the will. This is one of those amazing power poses. It literally makes you a warrior, which will combat low self esteem/self doubt

    How To Incorporate Svadhyaya (self awareness) or Tapas (loving discipline):

    • Make this a heart opener by putting arms in goal post position and drawing the elbows back in space, allowing loving healing energy to nurture your heart space.
    • Build heat, inhale, straighten the front leg as arms sweep overhead, exhale back down to warrior. Flow this way for several rounds.

    Self love isn’t just bubble baths. It’s a commitment to living with your kundalini awakening and dedication to unearthing your true self. Practicing unconditional love means challenging yourself AND nourishing yourself. Give yourself a big hug and watch your whole world change when you put these practices into action.

    Next Steps

    • Check out my YouTube channel and find some yoga classes that you can try out for yourself!
    • Download my Yoga Calendars for an at-home practice, guided by me on YouTube!
    • Join Uplifted for exclusive content that you can access right from the app. Take a deep dive into your practice with me this year!
    yoga for self mastery
    X
    FREE Chakra Balancing Audio Track + Journaling Prompts

      Find more yoga sequences by benefit.

      YOU MIGHT ALSO LIKE

      X
      Learn how to do 11 of the most popular yoga poses correctly. Free video + PDF download.