The dreaded bloat!
Ugh, one of the worst feelings is when your stomach is full and tight and uncomfortable. And what’s worse, it can be so hard to figure out the cause sometimes!

Bloating can be caused by a number of different foods you eat or a big meal, it can be a symptom of a larger issue, or it can even be brought on by hormone fluctuations (thanks Aunt Flo 🙄).
Whenever I start to feel that uncomfortable swell in my stomach, I turn to my cure-all yoga practice for relief. I know, I know, most people will tell you to just drink a bunch of water but I KNOW for a FACT from experience that doing certain yoga poses relieves bloating. In fact, I’m so confident yoga can ease “the bloat” that I created this class for you to try.
Yoga for Bloating
What the science says: Did you know that the brain and gut are directly connected? How cool is that! This means the more we mentally relax, the more we physically relax helping our digestion. Science tells us too that exercise keeps water retention down and helps the digestive system move. Studies have actually shown that yoga decreases digestive system symptoms like IBS (irritable bowel syndrome). This proves that yoga is a great practice for gas and bloating.
The Uplifted Perspective: When your mind’s going a mile a minute and you are super stressed, you can exacerbate unwanted digestive symptoms (constipation, bloating or diarrhea). Plus you probably aren’t making the wisest decisions for your gut health in these moments, am I right? Let your yoga practice take care of you. Whether it be meditation, restorative, or yin, most types of yoga relax and reset the nervous system. And since we now know about the mind gut connection we can see how this would help. Slowing down empowers you to make positive decisions for your body.
Vinyasa is all about movement and the more you move your body the more you move your digestive tract. That’s why you have better digestion during yoga.
Ever had the urge to release trapped gas in the middle of class? That’s why!
Even chanting is a fabulous practice to help your gut! Have you noticed how when you are chanting you pull your belly in? This stimulates digestion! Isn’t it amazing how when we are chanting and stimulating our third eye we are automatically stimulating the gut too?
This further proves that mind gut connection. A great way to try all of these modalities is with my Detox Yoga Fusion plan in the Uplifted Membership. It has the perfect combination of these different styles to empower you on your self healing journey.
Specific types of movement I love to sequence when doing yoga for bloating (do these or use these too if you are a yoga teacher):
- Spiral movements
- Abdominal massage (lie on a rolled up blanket)
- Pairing simple movements with diaphragmatic breaths
- Simple inversions like Downward Dog, or Wide Leg Forward Fold
- Twists
Looking for more specific yoga poses to relieve gas? I’ve compiled some just for you!
Or hey! Maybe you don’t feel like reading. That’s cool too. Just go straight to this class if you need some quick relief.
Top Yoga Poses for Bloating
1. Child’s Pose (Balasana)
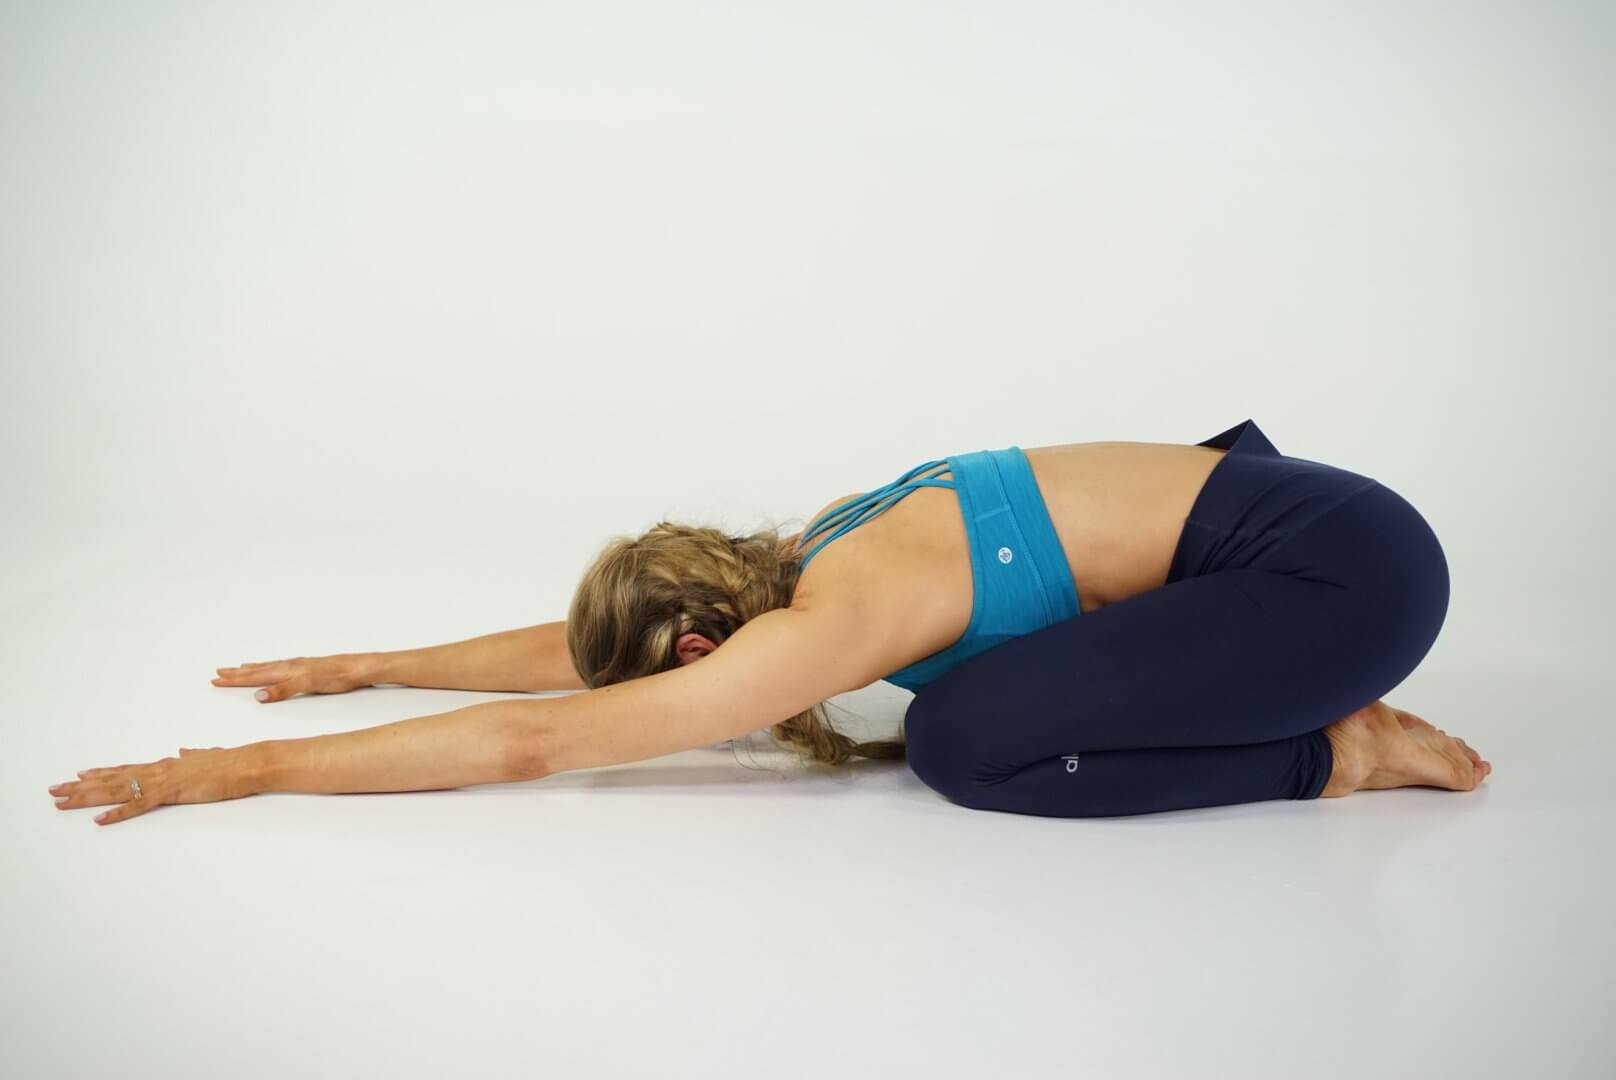
- Step 1: Start on hands and knees, take your hips back to your heels. Knees can be touching or as wide as the mat.
- Step 2: Rest the forehead to the mat, close your eyes.
- Step 3: Soften the upper body and extend the arms in front of you.
- Step 4: Simply inhale rising back to all fours to come out of the pose.
Variations: Make this more restorative by hugging a bolster to your chest. Another great variation is to place a block under the seat between the heels or under the forehead. You can play with the position of your arms too!
Benefits: Child’s pose opens the back body and releases the glutes and hips. This pose also takes our attention inward, cooling the body and soothing the nervous system.
Pro Tips for Yoga Teachers:
- Have students ball their fists and place them just above the hips to massage the internal organs to relieve bloat or cramps. Or place a rolled up blanket over their thighs.
- Start out in a child’s pose to calm students’ and bring their attention inward before flowing. This will make them more mindful and present throughout the flow and they’ll get the most out of the experience! (Learn more about mindfulness.)
2. Forward Bend Pose (Uttanasana)
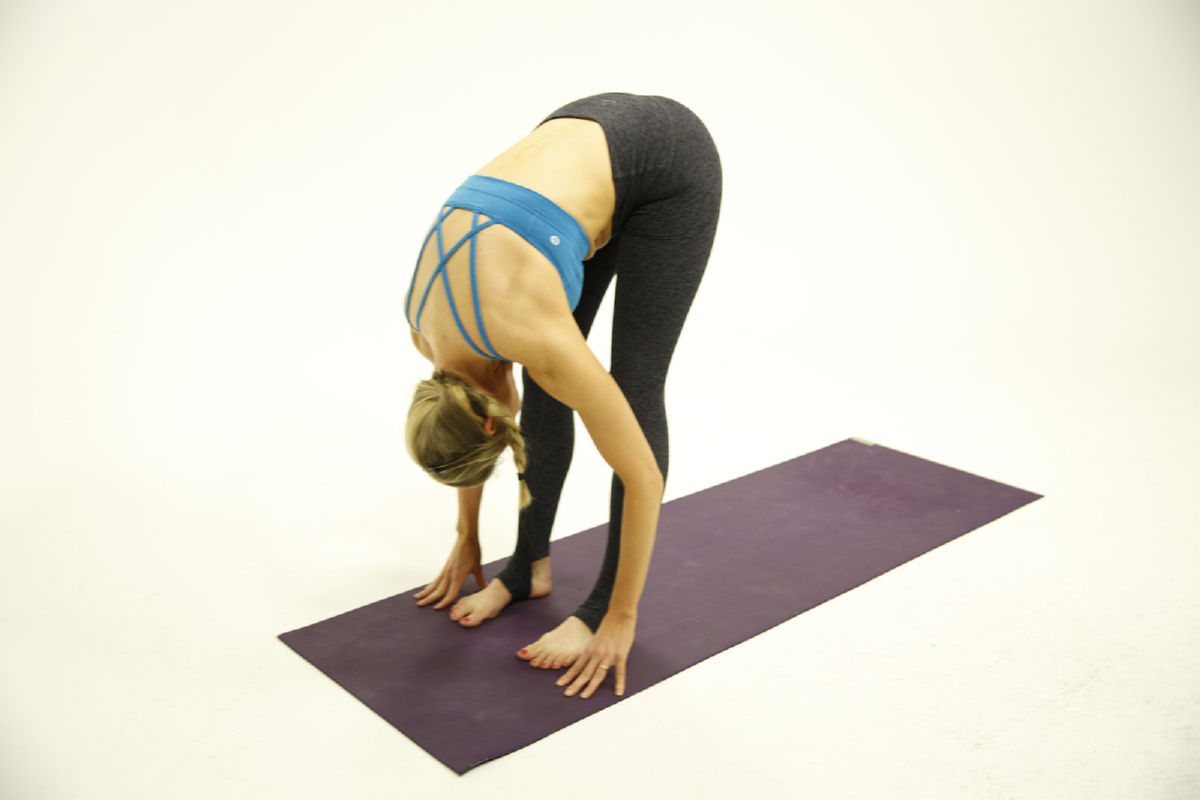
- Step 1: From a standing position. Inhale as the arms sweep up overhead.
- Step 2: Exhale, with a slight bend in the knees, hinge forward at the hips letting the arms float down to the floor
- Step 3: Let gravity have your head but not your shoulders. Stay here for several breaths.
- Step 4: To come out, inhale, bend the knees and sweep the arms up to standing. Exhale as the arms return down to your sides.
Variations: You don’t have to have straight legs in a forward fold! Create a more gentle stretch by bending the knees deeply or taking the feet wider. Place the hands on blocks, clasp opposite elbows to hang, or use a chair or table to assist you by placing the hands on one and only coming halfway down.
Benefits: This is an inversion, increasing blood circulation, lowering blood pressure, helping to ease headaches and pain in the backside of the body. This pose also puts gentle pressure on the gut and massages the digestive organs.
Pro Tips for Yoga Teachers:
- Direct students to keep their knees bent and hold onto their calves rather than trying to overreach going for the floor or their toes. It’ll make those who can’t feel more comfortable and maybe give those who can a new way to feel this posture.
- This is a good pose to have students do a mental check in. Give them a moment in their first fold to see how their body and mind feels and then again in the last fold of the flow.
3. Garland Pose (Malasana)

- Step 1: From standing, heel toe out the feet wider than hip width apart.
- Step 2: Inhale sweep the arms up overhead bringing the palms to touch. Exhale the palms to the heart’s center as you drop the hips down between the shins.
- Step 3: Broaden across the chest, press the elbows into the thighs, and keep length in the back of the neck as you breathe.
- Step 4: To come out, inhale as you press through the soles of your feet to rise. Or you can place your hands behind you and bring your seat to the mat coming into an easy seat.
Variations: Place a block under your seat if it’s uncomfortable to drop the hips so low. You can also use a cushion or come to the edge of a small chair to assist you in this pose.
Benefits: Garland pose releases stagnant energy in the midsection and assists with elimination. It brings energy down through the intestines helping relieve gas and ease bloating. I know this pose definitely helps me go when things feel a little backed up.
Pro Tips for Yoga Teachers:
- Watch out for students whose shoulders and chest are collapsing. They might need you to bring them a block for under their seat so they aren’t rounding in this posture.
- Make this more grounding by guiding students to visualize pulling the energy of earth up from under their feet.
4. Bridge Pose (Setu Bandha Sarvangasana)
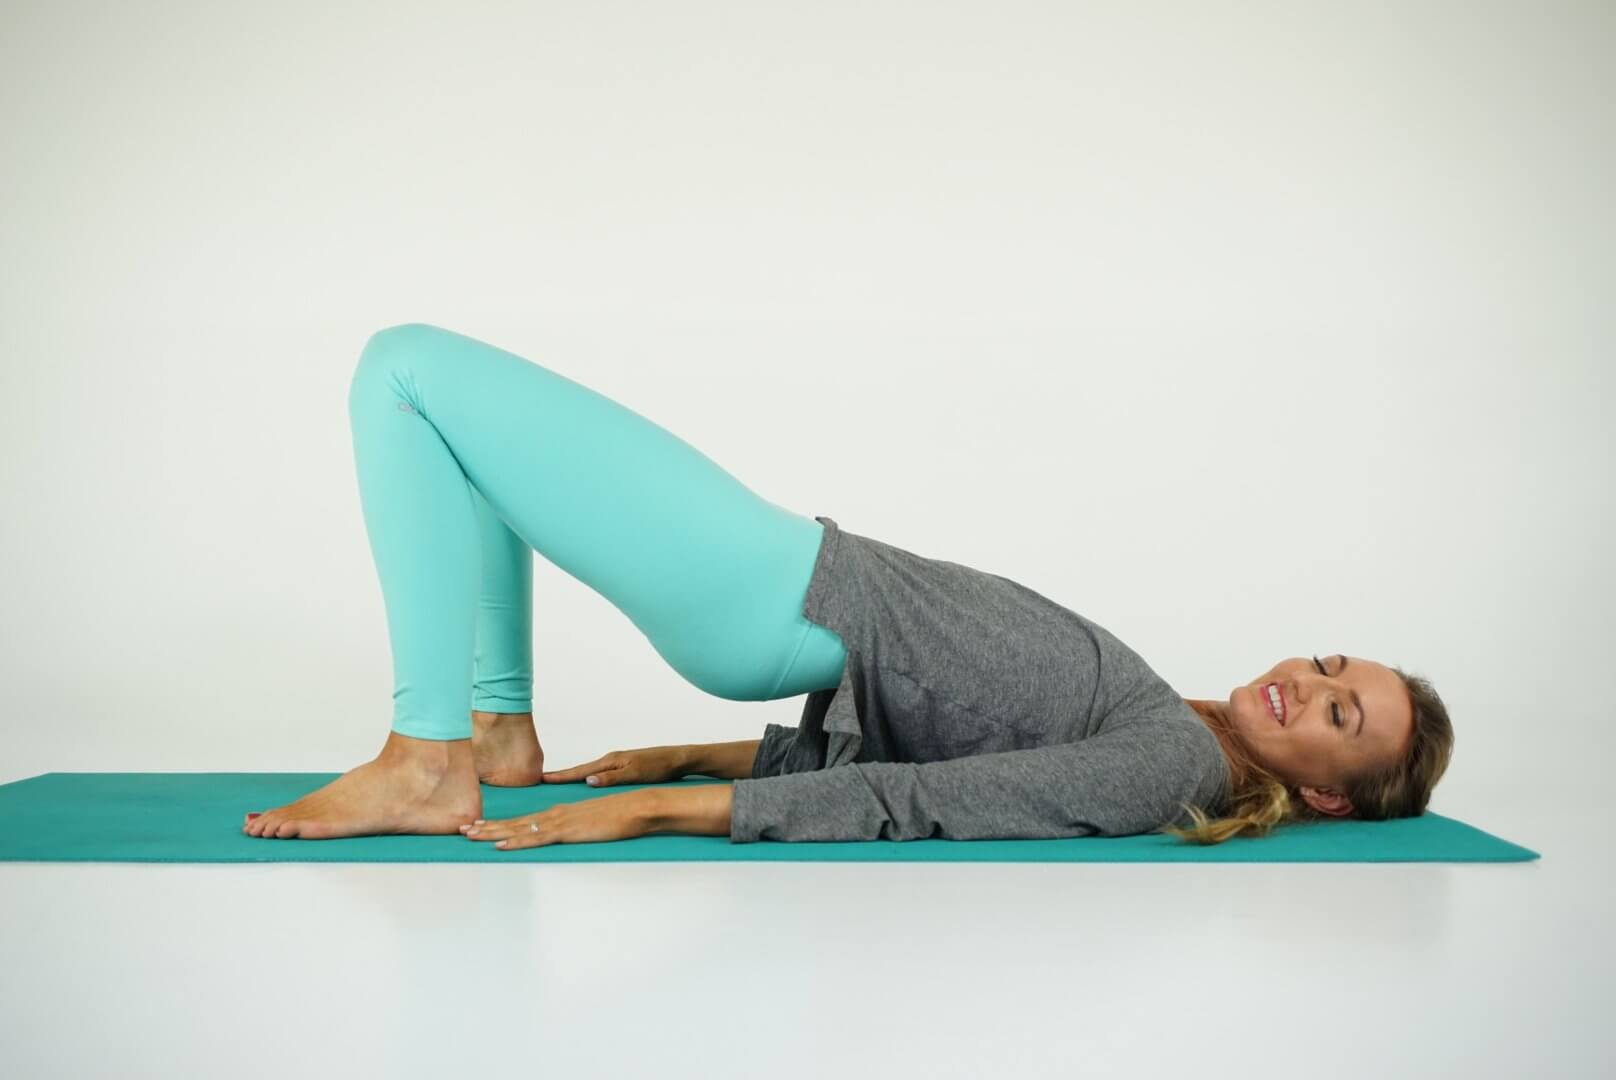
- Step 1: Starting on your back, bring the soles of your feet hip width flat on the mat, ankles under knees. Keep your arms by your sides.
- Step 2: Breathe in as you squeeze through the glutes lifting the hips up. Scooch the shoulders together, interlacing the hands underneath you.
- Step 3: Exhale here and hold for several breaths. When you are ready to come out slowly release the hands and exhale as you send the hips back to the ground.
Variations: You can always keep the hands alongside the body pressing the palms into the floor or place a block under the hips for extra support.
Benefits: Bridge pose stretches the front body gently and opens it allowing that bloated stomach to move and digest more easily.
Pro Tips for Yoga Teachers:
- Try instructing your students to pull their pelvic floor muscles “up and in” as they rise into this posture. Let them try it once without and see if they notice a difference. Trust me, I definitely notice the difference.
- Bridge opens the heart. Invite your students to let loving energy flow through them in this posture. Release any bitterness they may have and surrender to joy and love. Add in some nice affirmations at this moment. I have plenty of heart chakra affirmations for you to choose from.
5. Happy Baby Pose (Ananda Balasana)
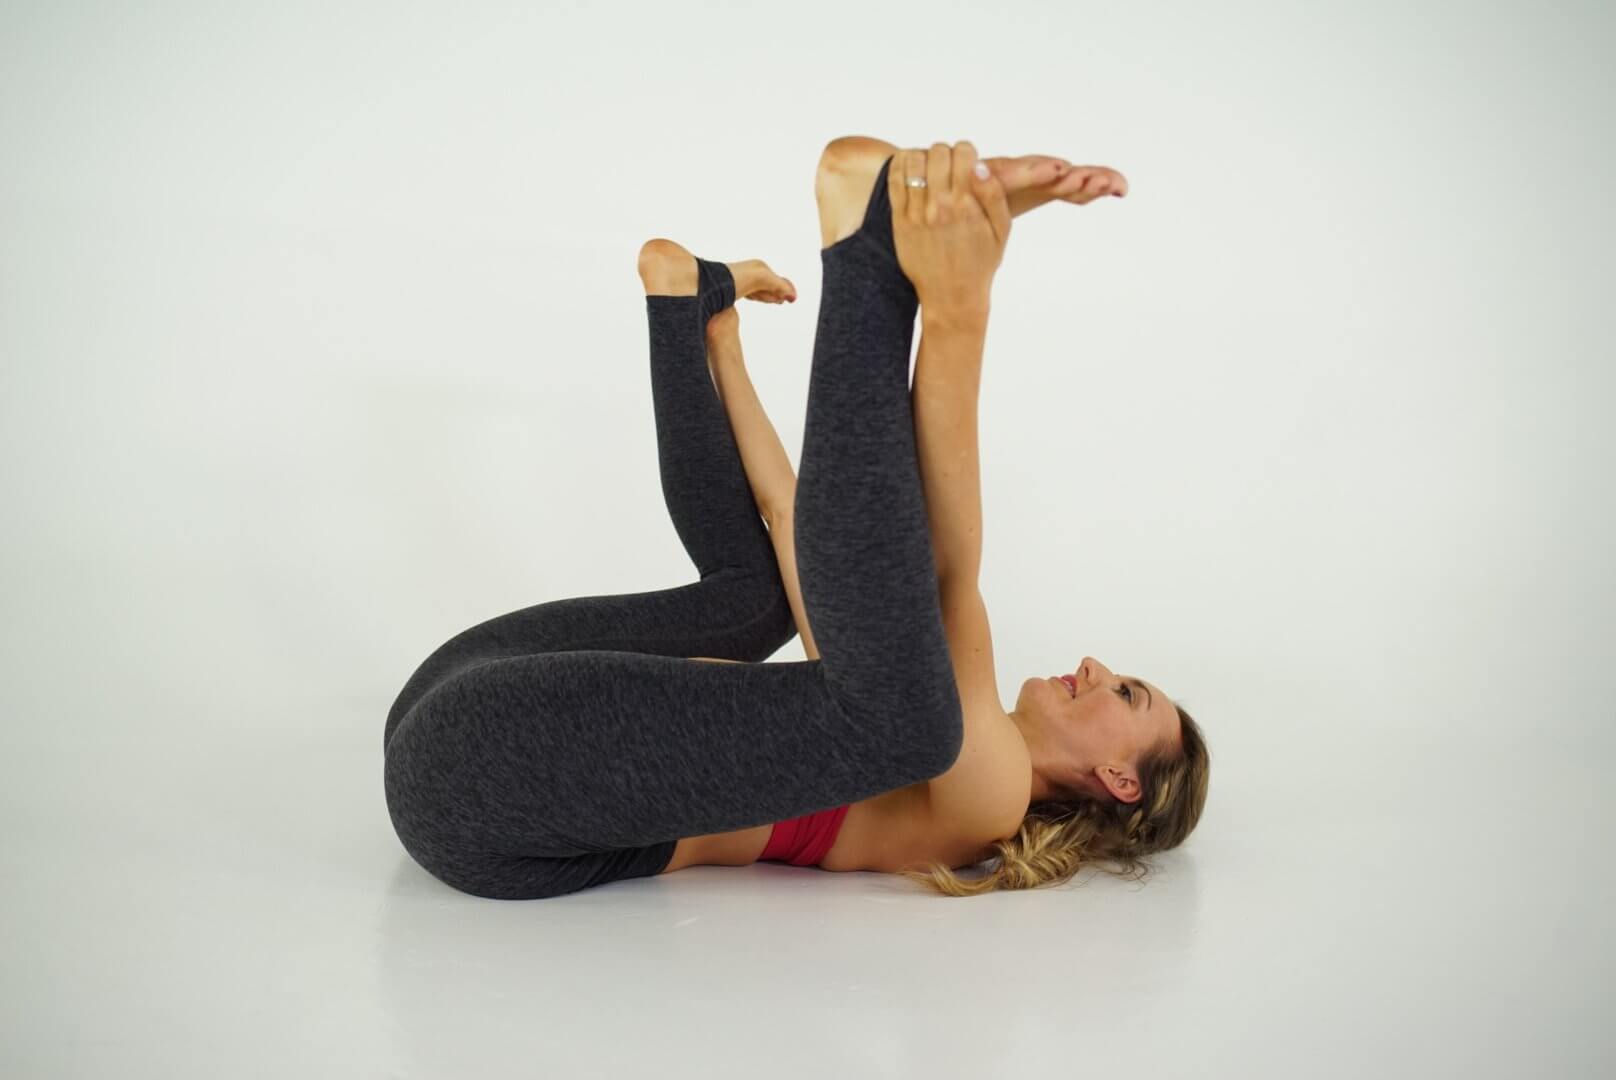
- Step 1: Lie flat on your back. Bring the knees to the chest.
- Step 2: Point the soles of your feet to the sky and grab the feet(inside or outside whichever is more comfortable for you) as you spread the knees apart and toward your underarms.
- Step 3: Flex the feet. You can either be still here or gently rock back and forth and breathe.
- Step 4: When ready, release the feet and hug the knees back to the chest.
- Step 5: Extend one leg to the ground, and then the other.
Variations: Hold one foot at a time keeping the opposite leg extended and after a few breaths switch sides if holding both feet is uncomfortable.
Benefits: Happy baby pose stretches the inner groin and also massages the abdomen increasing blood circulation to the digestive tract relieving gas pains and assisting with elimination when you feel bloated.
Pro Tips for Yoga Teachers:
- Don’t just cue holding the outside of the feet. State they can hold the inner thighs, shin, feet, or whatever is comfortable.
- A strap can be your students best friend in this posture. Let them know that option is available to them! Personally I love to use the strap in this pose with a leg extended. It just makes it next level, yum!
- Happy baby is a totally mood enhancing pose. Allow space for students to be playful here. Rocking back and forth or play with moving the legs towards and away from the body. Let this be a moment to just relax and have fun!!
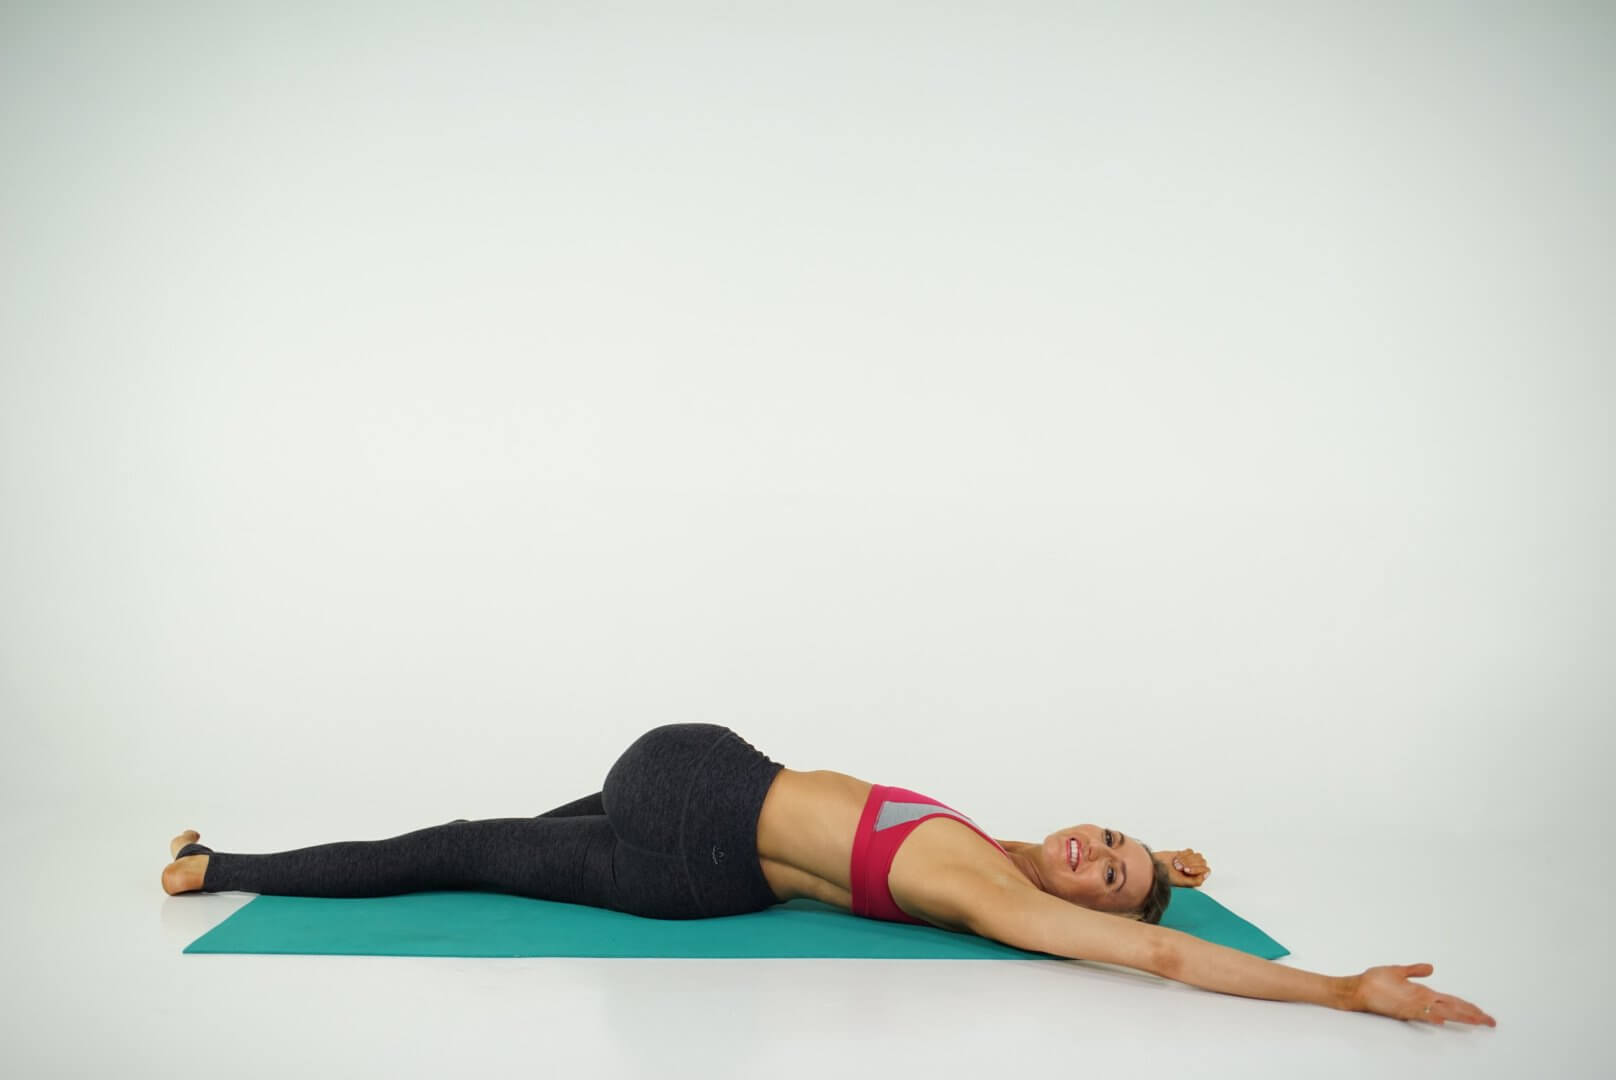
6. Wind Relieving Pose (Pavanamuktasana)
- Step 1: Laying on your back. Pull left knee into the chest.
- Step 2: Take a deep breath here for several breaths and completely relax.
- Step 3 : Exhale release the leg long laying back completely flat.
- Step 4: Repeat on the other side.
Variations: You can bring both knees into the chest and make this a knees to chest pose if having one leg long doesn’t feel so great on your low back.
Benefits: This pose definitely gets the digestive system moving! I think we’ve all been in this position and had the sudden urge to pass gas, it happens to all of us at some point….Making it a natural cure to help with that uncomfortable bloat. If it’s gas and you gotta let it go then do a wind relieving pose.
Pro Tips for Yoga Teachers:
- If your student’s extended leg is hovering above the floor, cue them to flex the heel of their foot forward. That will help bring their calf towards the ground for a more neutral pelvis.
- Being a hip opener and so close to the ground makes this a great pose to add to a sequence for “grounding” or “releasing blockages” in the lower chakras. Add in some root chakra affirmations to ground students even more.
7. Spinal Twist (Supta Matsyendrasana)
- Step 1: Lay flat on your back. Pull your right leg into your chest. Breathe in.
- Step 2: As you breathe out gently let the knee cross the body floating to the ground on the opposite side.
- Step 3: You can gently place the opposite hand of the leg onto the knee keeping the shoulders to the mat and the other arm extended to the side. Deep breaths.
- Step 4: Inhale as you untwist the body hugging that knee back to the chest.
- Step 5: Exhale release the leg long laying back completely flat.
- Step 6: Repeat on the left side.
Variations: Place a block or pillow under the knee if it doesn’t meet the ground. Play with the position of your arm to see what is most comfortable. Or if you don’t like having one leg extended you can always bring the knees together and twist them both to one side, then the other.
Benefits: Twisting yoga poses help with stagnant energy in the body. This yoga pose will increase blood flow in addition to stretching the abdominal muscles, hip and spinal muscles. All of these great benefits will help relieve bloating.
Pro Tips for Yoga Teachers:
- You can make this a really beautiful shoulder opener by sliding the extended arm slowly up and down as if you were making a snow angel.
- Twists help release waste from the body. Create a visual for your students of wringing out a dirty rag and let them release not only the physical that’s being clogged but the emotional too. Imagine twisting all of those negative thoughts out of the rag and right down the drain.
8. Seated Twist Pose (Ardha Matsyendrasana)
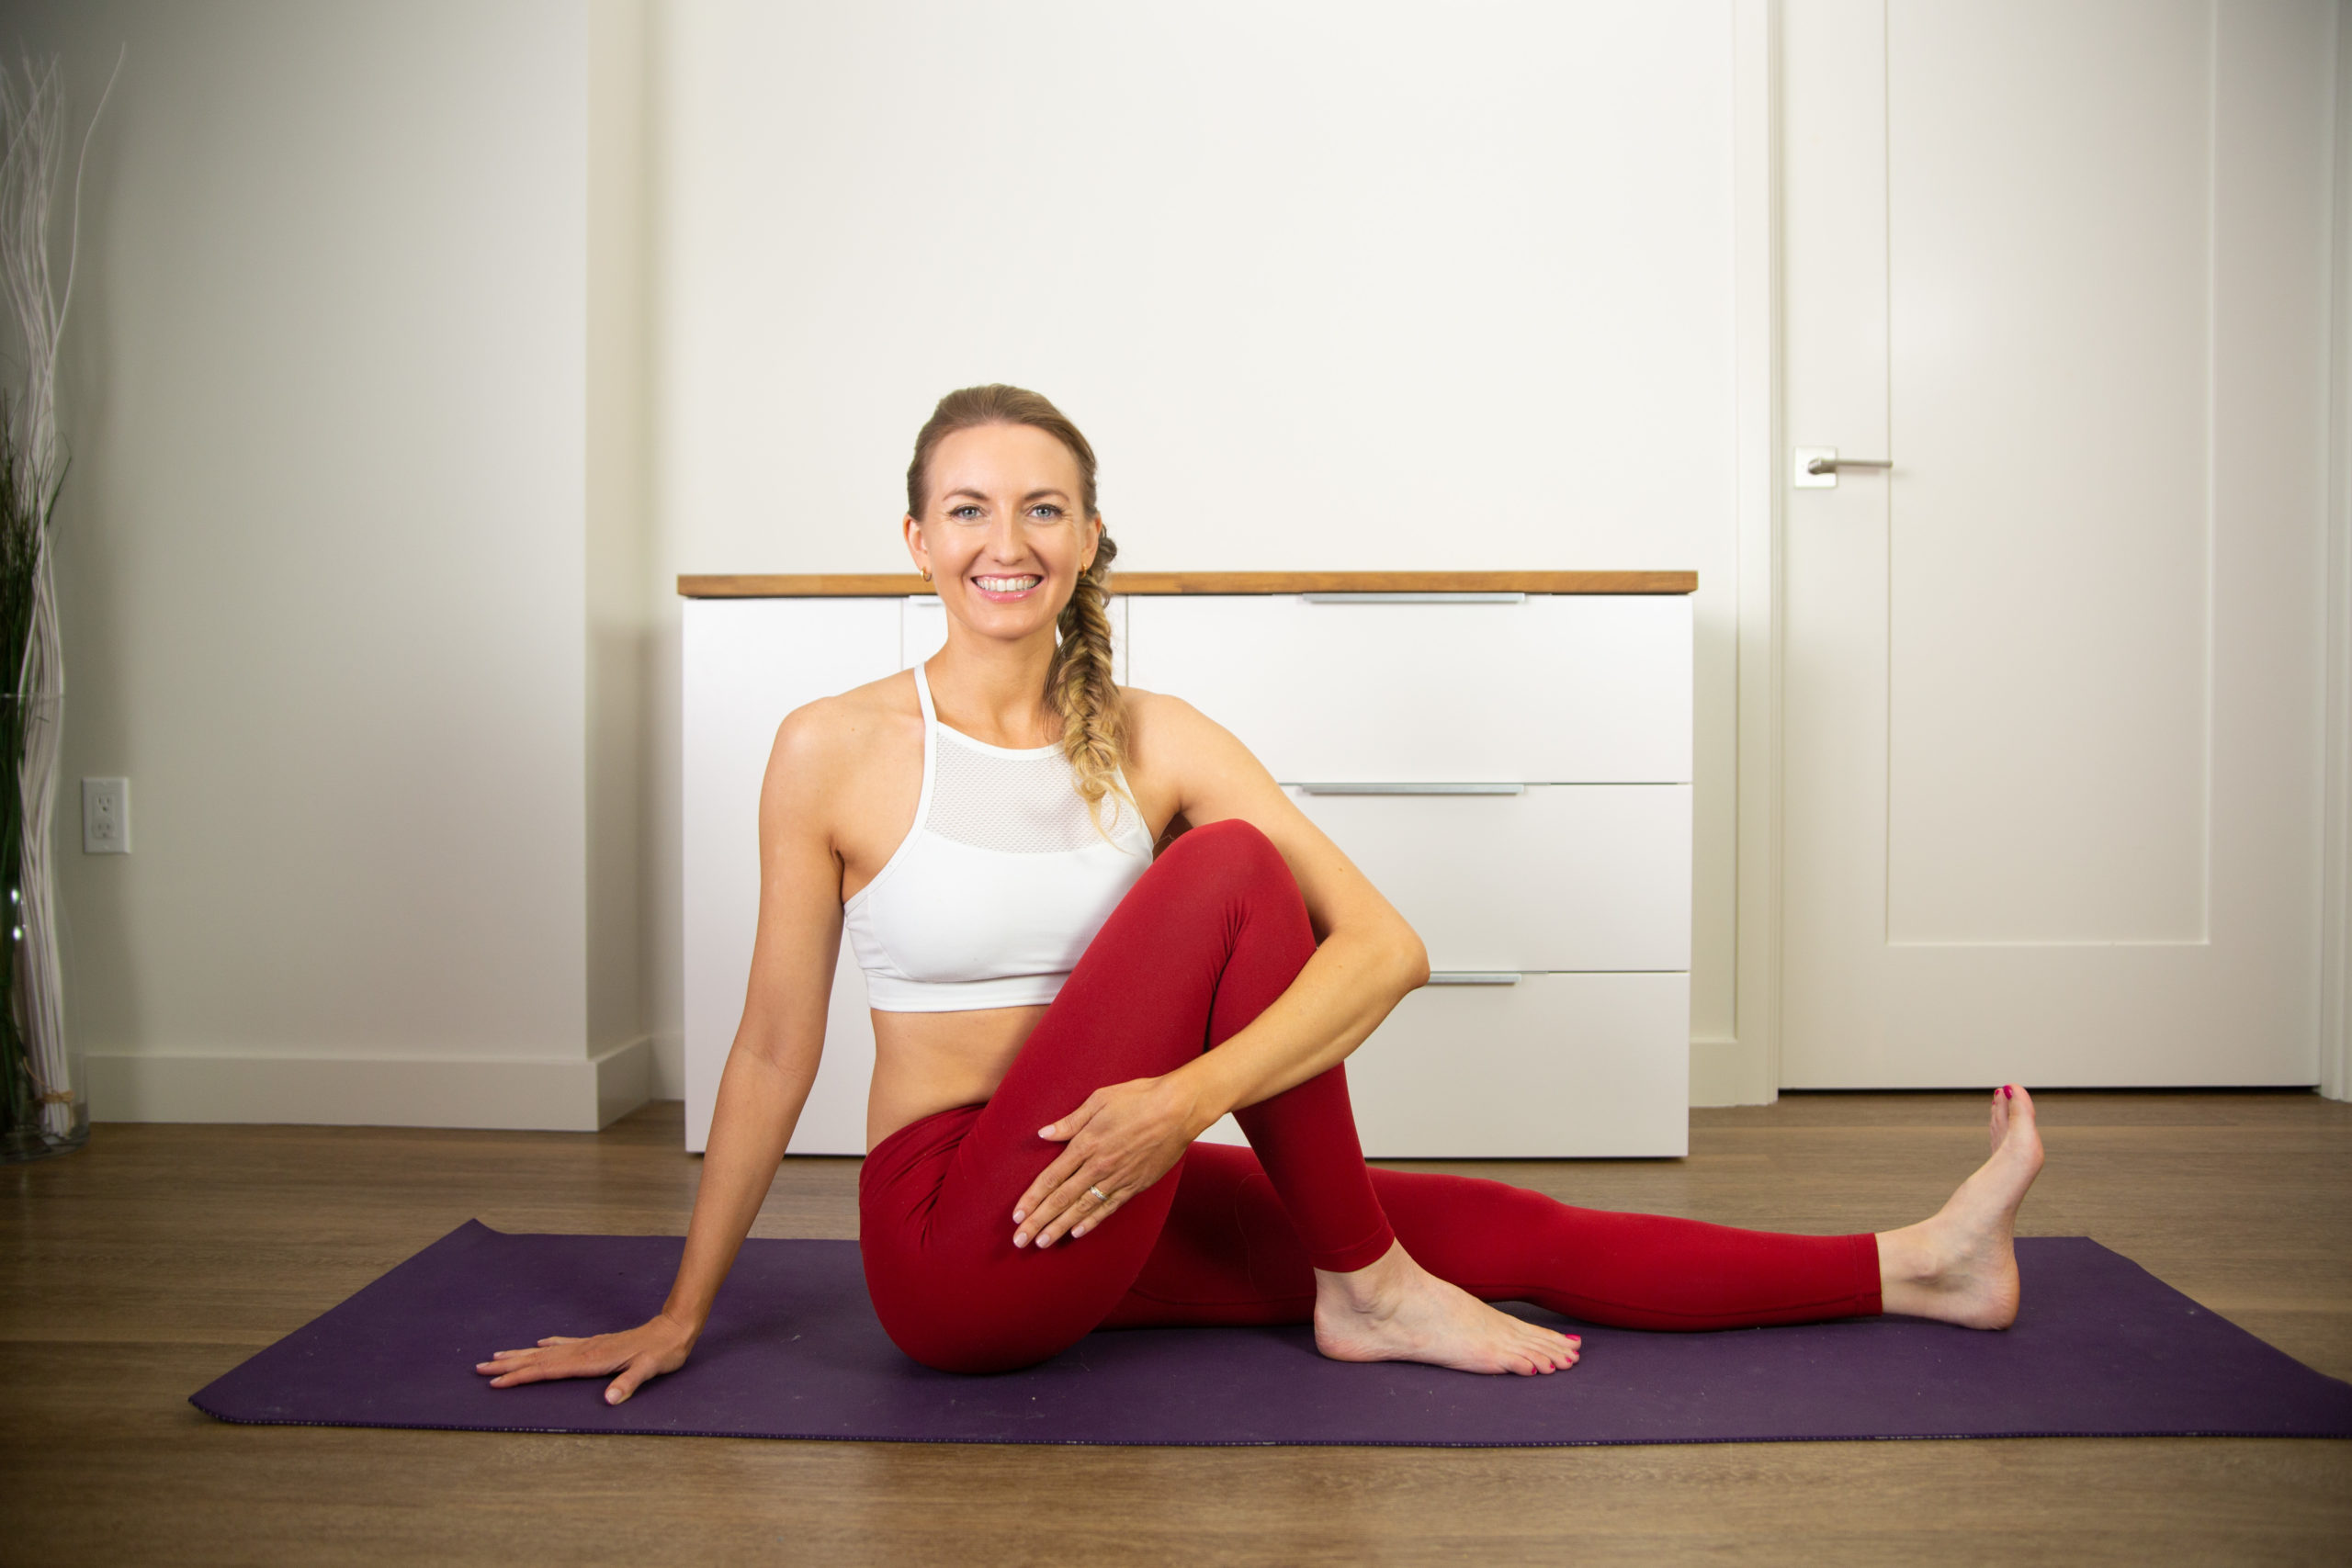
- Step 1: Start in a seated position, legs straight in front of you, weight evenly distributed across the sit bones. Ensure a straight spine.
- Step 2: Bend the right knee, bringing the right foot to the mat. Cross it over the left leg.
- Step 3: Inhale the arms overhead, exhale pulling the navel in and twist the torso to the right.
- Step 4: Bring the left hand around hugging the right knee with the left arm while the right arm comes to the back of the mat.
- Step 5: Inhale, with the spine elongated, exhale, abs engaged further in to deepen the twist.
- Step 6: Breathe in as the arms come back up, releasing the twist and setting the right leg down.
- Step 7: Repeat over the left leg.
Variations: You can bring the heel of the extended leg to the seat and you can also put the elbow to the outside of the leg to deepen this yoga pose.
Benefits: This twist will massage the abdominal organs and muscles helping to release anything that might be clogging that area up.
Pro Tips for Yoga Teachers:
- Ensure your class knows to keep the shoulder blades drawn down the back and they are not pushing the elbow into the knee…ouch! Don’t let them force themselves or “yank” into the twist.
- Tell students to draw their shoulders down their back. So much tension is held in the shoulders and a twist like this is perfect for releasing that tension, opening up the upper body and inducing happiness and relaxation.
9. Seated Forward Bend (Paschimottanasana)
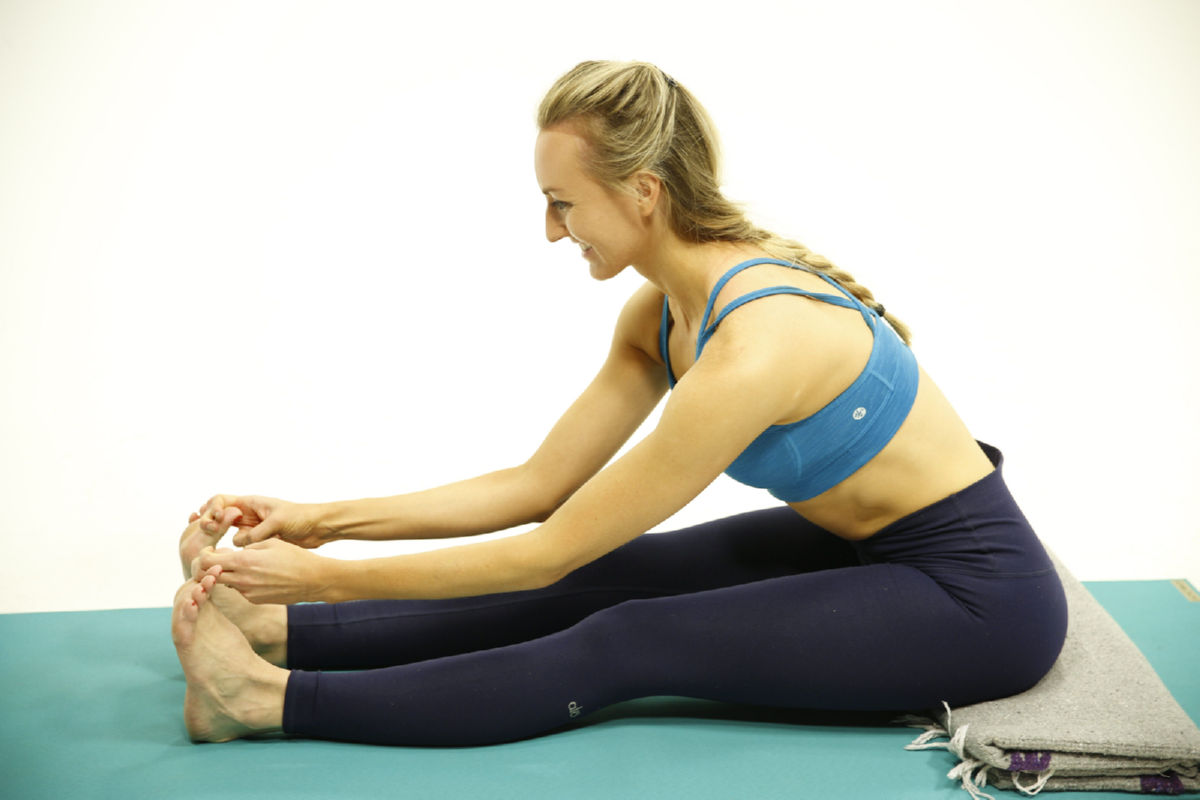
- Step 1: Start seated, legs extended. Ensure a straight spine.
- Step 2: Heels touching or hip width, flex the feet as you inhale the arms up getting tall.
- Step 3: As you breathe out, draw the belly in, hinge from the hips to bend forward keeping the spine straight.
- Step 4: Place hands on shins or wherever you can comfortably keep the integrity of the low spine. Neck stays long. Breathe deeply.
- Step 5: When ready, inhale and press the palms into the floor to gently lift yourself back to your starting position.
Variations: Place a folded blanket or pillow under the seat if the back needs a little extra love. Or make this a yin fold letting the whole body relax into the posture with some delicious deep breathing.
Benefits: This forward fold stretches the backline of the body. It opens up the hamstrings and low back easing discomfort in those areas, making it another great option for when you have painful cramps.
Pro Tips for Yoga Teachers:
- Always remind students they don’t need to touch their toes. It’s not a competition after all. Have them flex the feet and engage the quadriceps to activate the entire back line of the body and keep integrity in the spine.
- Encourage introspection here. Allow students to touch base with the different sensations in their body and mind while in this pose. Ask, how can you let go in this posture?
When your body feels full and uncomfortable you just want to find a way to release whatever is stuck there. And it’s not just about physical release as you read earlier with how the mind and gut are connected. So what do you need to release to make yourself feel lighter? What can you do FOR YOURSELF to feel less heavy? These can be hard questions to answer so let me help you figure it out with my Yoga for Self Mastery course. It is literally life changing!
If you are a yoga teacher and want to know more about the different ways yoga is a great form of therapy my 300 hr yoga teacher training is right for you. Check it out! I would love to see your smiling face there.
The body is unique, powerful, self-healing, and beautiful. YOU are unique, powerful, self-healing, and beautiful. Don’t ever forget that.
Next Steps
- Check out my YouTube channel and find some yoga classes that you can try out for yourself!
- Explore my knowledge hub for How to Become a Yoga Teacher
- Attend a 200 YTT info session to see what else you’ll learn in my online teacher training.
Find more yoga sequences by benefit.
YOU MIGHT ALSO LIKE
- How to Teach Somatic Yoga: A Practical Guide for Instructors
- The Best Somatic Exercises for Grief: Find Healing Through Movement
- The Best Somatic Exercises for Anger Management and Emotional Release
- Yoga to Reconnect with Yourself: 5 Essential Practices for Inner Peace
- Yoga for Connection: 10 Poses to Deepen Relationships and Bonding
- Yoga To Connect With Your Body For Mind-Body Harmony
- Yoga to Connect with Feminine Energy: 5 Transformative Practices
- Yoga to Connect with Your Heart: 3 Poses for Emotional Balance
- Myofascial Release Yoga: Unlock Tension and Improve Flexibility
- 6 Hip Openers For Emotional Release
- Office Yoga: 10 Poses You Can Do Right Now
- Ayurveda Food Combining: The Key to Balanced Digestion
- Yoga For Grief: 8 Yoga Poses For Support
- Yoga for Vata Dosha: Practice Poses and Tips
- Yoga for Pitta Dosha: Practice Poses and Tips
Learn how to do 11 of the most popular yoga poses correctly. Free video + PDF download.


