Raise your hand if you’ve ever peed a little when you sneeze, cough, laugh, or jump. Or maybe you have some unexplained pelvic pain you’re embarrassed to ask your doctor about. As a mother of 4, I can tell you I have and it’s not fun!
Perhaps you think this is to be expected, just a consequence of pregnancy and childbirth, aging, or lifting heavy objects. While all of this is common for many women, pelvic floor function can be improved!
I completely understand if this topic makes you feel uncomfortable. There are a lot of reasons people shy away from this area. It could be because of trauma, abuse, or your upbringing.
As your friend I encourage seeking out professional help in any of these situations. Counseling and/or pelvic floor physical therapy can help you heal and reconnect with this important part of your body. And yoga can help too! So let’s talk about that. But first…
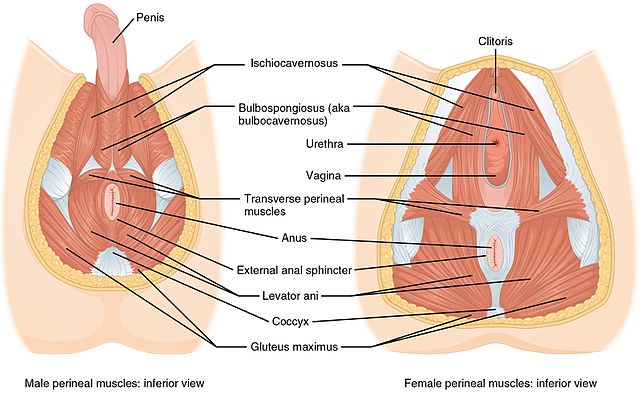
What is the pelvic floor anyway?
These are deep muscles situated at the very bottom of your pelvic bowl. The pelvic floor muscles are responsible for keeping our pelvic organs inside of our bodies. These muscles help stabilize your spine and core. They control the flow of urine and the release of stool or gas. Last but not least, these muscles control our sex organs.
All of us have pelvic floor muscles. Child bearing (female) pelvic floors have 3 openings, while non-childbearing (male) pelvic floors have only 2 openings.
When you think of a healthy pelvic floor, you probably think of strong pelvic floor muscles. You’re right, but what we are often told to do, a kegel exercise, is not always the best answer. A kegel exercise is great to strengthen your pelvic floor. However if your pelvic floor holds too much tension already, it could make things worse. Strong pelvic floor (PF) muscles are important, but tense does not equal strong. Healthy muscles need to contract and relax!
Stress, urinary incontinence (or difficulty in urination), pelvic organ prolapse, chronic constipation, pain during sex, low back pain, and difficulty getting a full deep breath can all be symptoms of pelvic floor dysfunction.
Let’s look at symptoms for overactive (hypertonic) and underactive (hypotonic) pelvic muscles. This may help you as you decide which yoga poses will be best for you.
Overactive (Hypertonic) Pelvic Floor
- Difficulty starting to urinate
- Constipation
- Painful penetration during sex
- Bladder leaks
- Trouble controlling gas
- Feeling unable to lift pelvic floor upwards
- Difficulty getting full complete breath in
- SI joint pain, hip pain, low back pain, pelvic pain
- Kegels make pain worse
Underactive (Hypotonic) Pelvic Floor
- Poor bladder control (urinary incontinence)
- SI joint pain, hip pain, low back pain
- Trouble controlling gas
- Tampons may fall out
- Heavy or feeling of pressure in vagina
- Increase risk of pelvic organ prolapse
A weak pelvic floor may be present in either scenario! In BOTH cases pelvic floor strength may need improving. Your body works best as a whole. This means that the more you can help your muscle groups work together as they should, the better off you will be. That is why pelvic floor yoga can be beneficial for the PF muscles.
What sets yoga apart from every other physical activity out there? The BREATH!!! Whether your pelvic floor is overactive (hypertonic) or underactive (hypotonic) simply working with the breath can help.
Yoga also asks you to pay attention to your posture, this body awareness influences your pelvic floor function. Yes, the way you sit and stand affects the way your diaphragms function!
Your breathing diaphragm and your pelvic diaphragm are meant to work in tandem. When you breathe in your (breathing) diaphragm contracts down while your pelvic floor (pelvic diaphragm) relaxes down. As you exhale your diaphragm relaxes up while your pelvic floor muscles contract up.
Pause now and tune into your breath, can you feel this beautiful dance between these two muscle groups? If not, don’t worry! This can take time and practice. As you embark on this journey, I invite you to make the breath number one in your pelvic floor strengthening regime.
Best Types of Yoga for Your Pelvic Floor
Science backs what the ancient yogis knew all along, yoga is good for your overall health! Yoga has been shown to help reduce stress, depression, and anxiety. It helps improve your mobility, flexibility, and strength. It helps your lymphatic system reduce inflammation and boost your immunity. Yoga helps improve the function of your lungs, heart, and digestion.
What does all of this have to do with your pelvic floor? In our Uplifted Yoga 200hr YTT we discuss the nervous system, and being stuck in “orange alert” (B.6.3 in your material). This constant state of stress has a cascade effect on your bodies. It affects your breath, your posture and muscle tension. All of these things have an influence on the pelvic floor muscles. When choosing pelvic floor yoga I look to these styles. Invite a full complete breath into all of your yoga poses for added benefits.
- Hatha Yoga: This style is great for refining your posture and alignment. Holding the poses in stillness helps cultivate strength and flexibility. It also gives you time to breathe deeply in your asana. I saw significant improvement in my pelvic floor with consistent practice.
- Restorative Yoga: This style helps you rest in total relaxation. You are completely supported in your postures, allowing you to tap into your parasympathetic nervous system. You may know this as your “rest and digest” mode, and this is also where healing occurs. Restorative yoga can be practiced any time of day, and can be a great way to relax before bed at night.
- Yin Yoga: This style of yoga works with your fascia, which is the interconnective tissue that surrounds every muscle and organ in your body. Fascial restrictions in one area of the body can greatly affect other areas of the body, like your PF. Imagine you are wearing a tight bodysuit and you put a big knot in one side of it. Picture how this would restrict your movement now. That is how the fascia works!
Now let’s explore some yoga poses that can help you restore your pelvic floor health.
Top Yoga Poses for Your Pelvic Floor
1. Full Complete Breath – Diaphragmatic Breathing
- Step 1: Sit or lie down in a comfortable position.
- Step 2: Observe where you feel the breath in your body right now. Notice the pace of your breath, the depth of your breath.
- Step 3: On your next inhale imagine that you are sending your breath deep into the bowl of your pelvis. Feel your pelvic floor expand and relax down.
- Step 4: Gently release and exhale as you’re ready. Feel your pelvic floor lift up and in.
- Step 5: Breath in through your nose, fill the bowl of your pelvis then the cylinder of your ribcage. Expand your torso from bottom to top.
- Step 6: Breathe out through your nose. Pelvic floor lifts, ribcage contracts and maybe your navel pulls toward your spine gently at the bottom of the exhale.
- Step 7: Repeat as long as feels comfortable for you (up to several minutes), providing a lovely massage for your internal organs.
Variations: If breathing deep into your pelvis feels difficult, try lying on the floor. Support your lower legs on a piece of furniture, or place your feet on the wall so your legs are at a 90 degree angle. Place your arms in a cactus shape, elbows at shoulder height with the back of your hands resting on the floor. This helps some of the accessory breathing muscles turn off making it easier to get a full complete breath.
Benefits: Helps restore proper diaphragm and PF function. This also helps us tap into our parasympathetic (rest and digest) nervous system. Reference B.6.4 in your 200hr Yoga Teacher Training material.
Pro Tips for Yoga Teachers:
- Notice if you can see a lot of movement in the shoulders as your students breath. This can indicate a shallow breathing pattern and they could benefit from the variation listed above.
- Find language you are comfortable with when talking about the PF. If you feel silly or uncomfortable talking about it, your students will too. If you can be confident and matter of fact, everyone else in the room will feel safer with the topic too.
- Be sure students are not just breathing into their belly. Encourage them to feel their ribcage expanding on each inhale and contracting on each exhale.
2. Child’s Pose (Balasana)
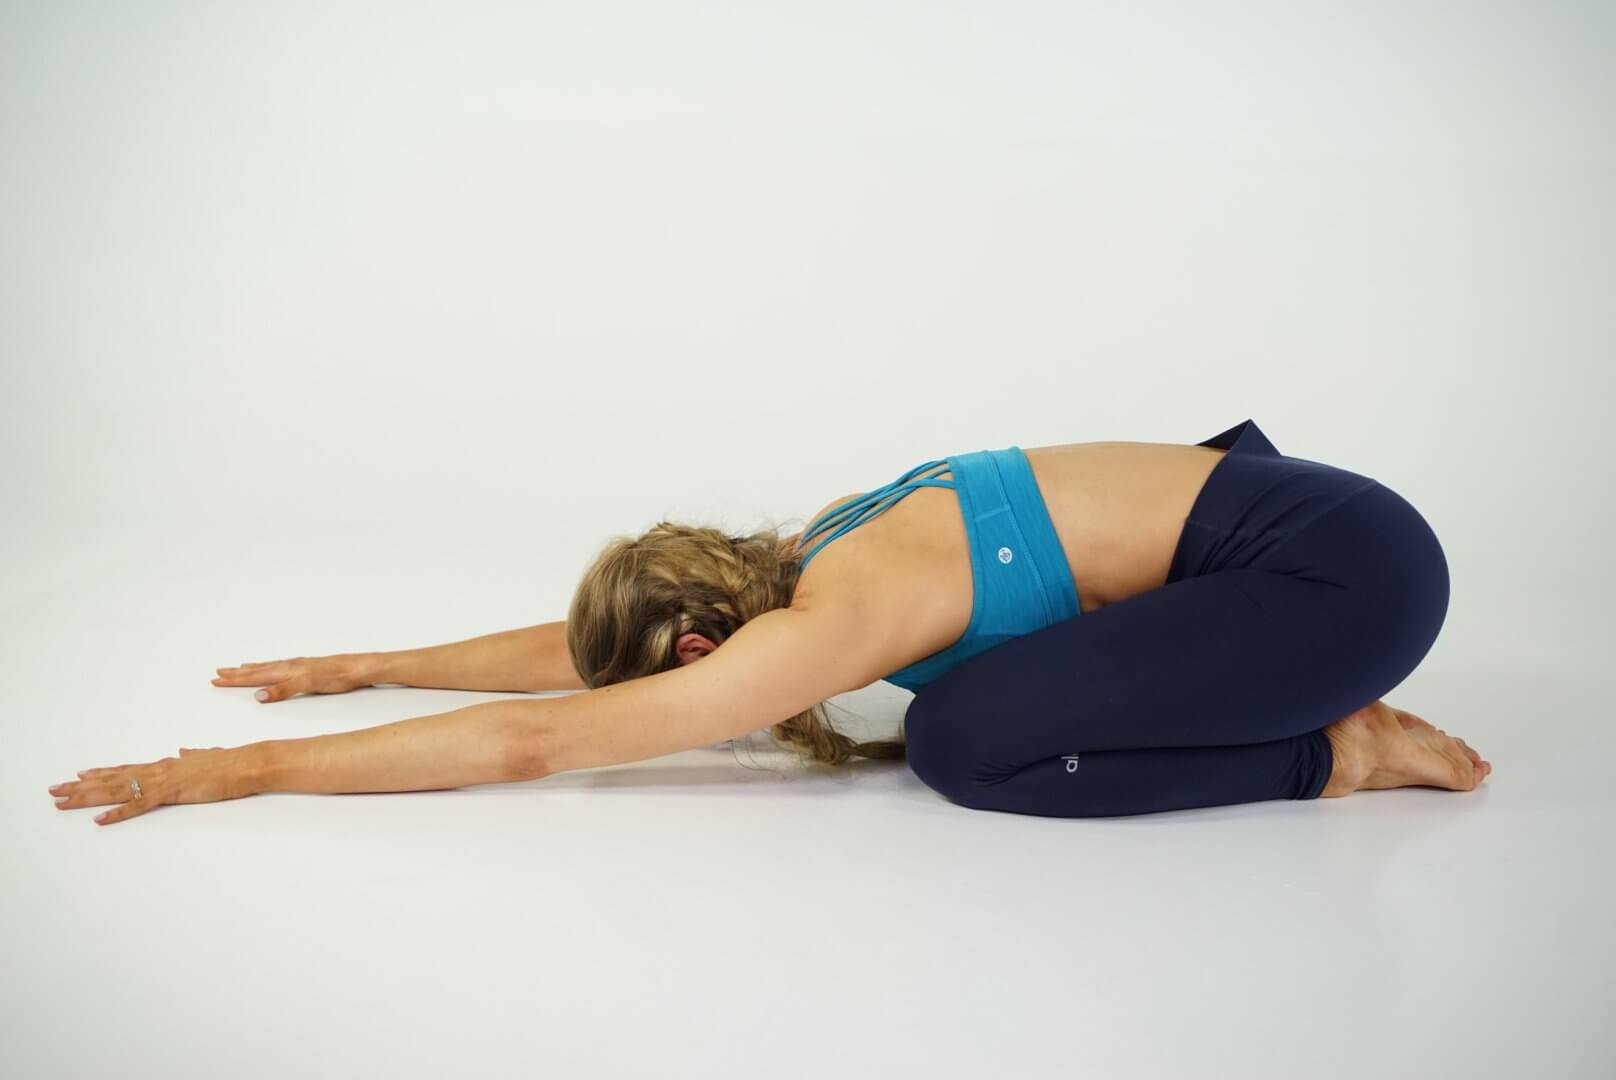
- Step 1: Begin in a tabletop position, pad your knees with a folded blanket.
- Step 2: Bring your big toes to touch, taking your knees almost as wide as your mat.
- Step 3: Begin to sit your seat back toward your heels. Don’t worry if it doesn’t come close! You can place a cushion, blanket or bolster there if you wish.
- Step 4: Allow your torso to soften toward the floor. This is where a bolster may come in handy. Allow your arms to reach in front of you in a diamond shape. Forehead gently rests on the floor (or a block).
- Step 5: Hold this for at least 10 slow deep breaths (longer if You’d like). Try to tune into the dance of the diaphragms here.
- Step 6: When you are ready to come out take a big breath in, and as you breath out start to walk your hands back toward you coming back to your tabletop position.
Variations: Support your entire torso and head on a bolster. You can also experiment with how wide apart or close together you have your knees here. You could also opt for a Puppy Pose here if Child’s Pose is not serving your body.
Benefits: Balasana soothes the nervous system and allows you to open the fascia in the back side of the body. This pose also helps release the deep muscles around your hips and pelvis, which can help relax a tight pelvic floor.
Pro Tips for Yoga Teachers:
- You can use this pose as a way to help students breathe into their back body at any point in class.
- This pose is amazing for getting students to draw their attention inward and really notice what is happening with their breath and body.
- Encourage students to tune into the dance of the diaphragm and PF as they breathe in this pose.
3. Cat/Cow (Marjaryasana/Bitilasana)
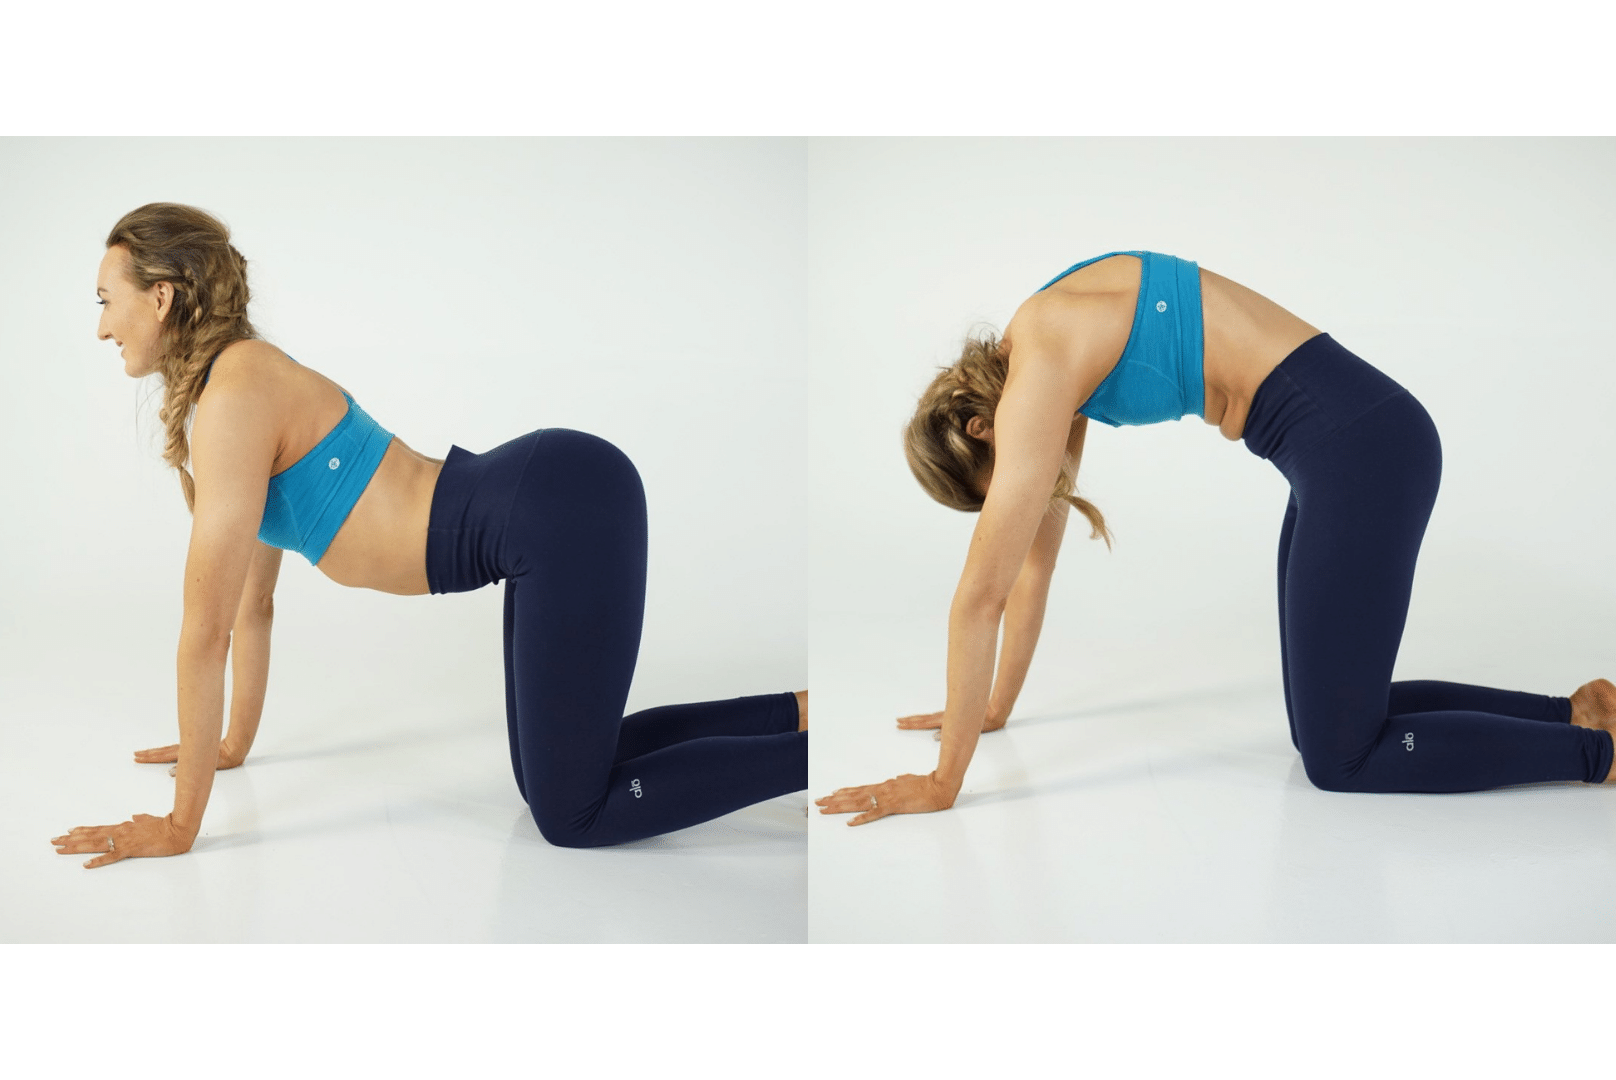
- Step 1: Begin in tabletop position. Shoulders stacked over wrists, hips stacked over knees, ankles directly behind the knees, tops of the feet press to the floor if possible. Engage your core! Pretend there is a giant block of ice on the mat beneath you and you are hugging your front body up to meet your back body.
- Step 2: Keeping your core engaged, as you inhale, begin to rock your sit bones toward the ceiling. Ripple up your spine so your gaze and collarbones pull slightly forward. Broaden your collar bones as you squeeze your shoulder blades together.
- Step 3: Begin to exhale as you curl your sit bones toward the backs of your knees. Arch your back toward the ceiling hugging your navel to your spine, gaze toward your knees. Push the floor away creating space between your shoulder blades, broadening upper and lower back.
- Step 4: Flow between steps 2 and 3 in a slow articulate manner at least 5 breath cycles. You can do more if you wish.
Variations: Find a circular movement with your body. Pretend you’re scraping the inside of a barrel with your torso as you involve the hip, head, neck and shoulders in the movement.
Benefits: Helps tone abdominal and pelvic floor muscles. Helps bring movement to all parts of the spine aiding in circulation and digestion.
Pro Tips for Yoga Teachers:
- Experiment with beginning the movement at the crown of the head and articulating down the spine.
- Give students the option to play with the direction their fingers are facing. Palms can be flat with fingers facing knees, the sides of the room or the center of the mat.
- Option to squeeze block between inner thighs to engage inner seam legs, helping PF muscles to engage.
4. Low Lunge (Ardha Alana)
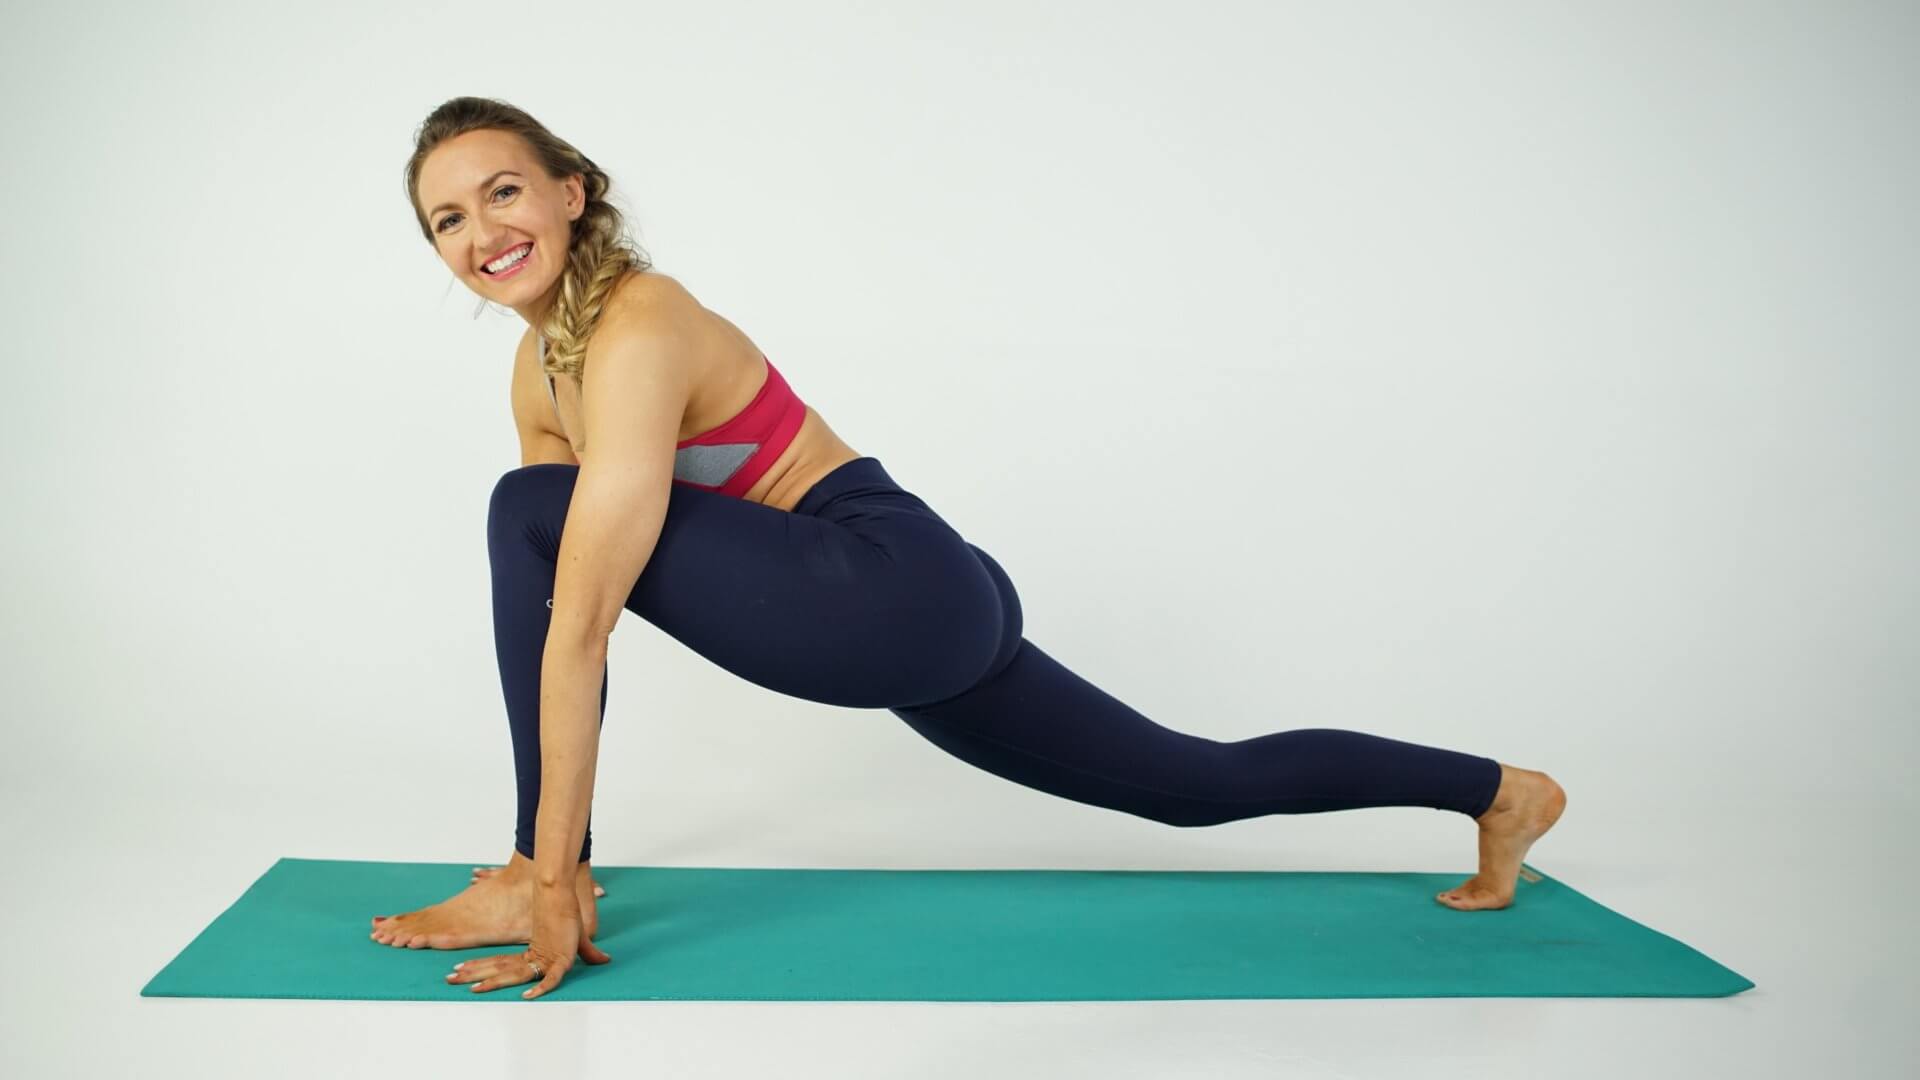
- Step 1: Begin in tabletop position. Shoulders stacked over wrists, hips stacked over knees, ankles directly behind the knees, tops of the feet press to the floor if possible. Engage your core! Pretend there is a giant block of ice on the mat beneath you and you are hugging your front body up to meet your back body.
- Step 2: Step or carry your fight foot to the top of the mat. Keep your knee aligned with your hip, ankle directly beneath your knee, foot straight with toes facing forward.
- Step 3: Inhale to prepare, exhale to raise your torso. Hands can rest on your hips, helping to make sure your hips are square and level.
- Step 4: Inhale and feel your hips dipping toward the floor just slightly, pelvic floor relaxed. This might mean letting your front knee go past your ankle a bit.
- Step 5: Exhale, strong pelvic floor lifting up and in as you lift your hips to make the front thigh parallel to the floor. Keep the lift and strength as you raise your arms, lengthening your fingertips toward the ceiling (maintain long spine as you do this). Hold for 3-5 breath cycles.
- Step 6: When you are ready, inhale to prepare, exhale to hinge at the hip and fold your torso forward. Keep your spine long and neutral. Place your hands on the floor and return the front leg to tabletop position.
- Step 7: Repeat on the left side. Follow steps 2-6.
Variations: Padding your knees with a folded blanket, or thick towel, can be helpful here. Sensitive knees may benefit from keeping the back toes curled under instead of having the top of the foot pressing into the floor. Use cactus arms if you feel your shoulders coming up when you raise your arms.
Benefits: Strengthen your pelvic floor and inner thigh muscles. Stretches hip flexors. Improves core strength and balance.
Pro Tips for Yoga Teachers:
- Have students imagine that they are drawing the front heel and back knee toward the center of the mat to help keep the pelvis square and engage the inner seam of both legs.
- Watch for rib flare or excess lumbar lordosis as students begin to raise their arms overhead.
- Having students engage a light Mula Bandha can be helpful here.
5. Chair Pose (Utkatasana)
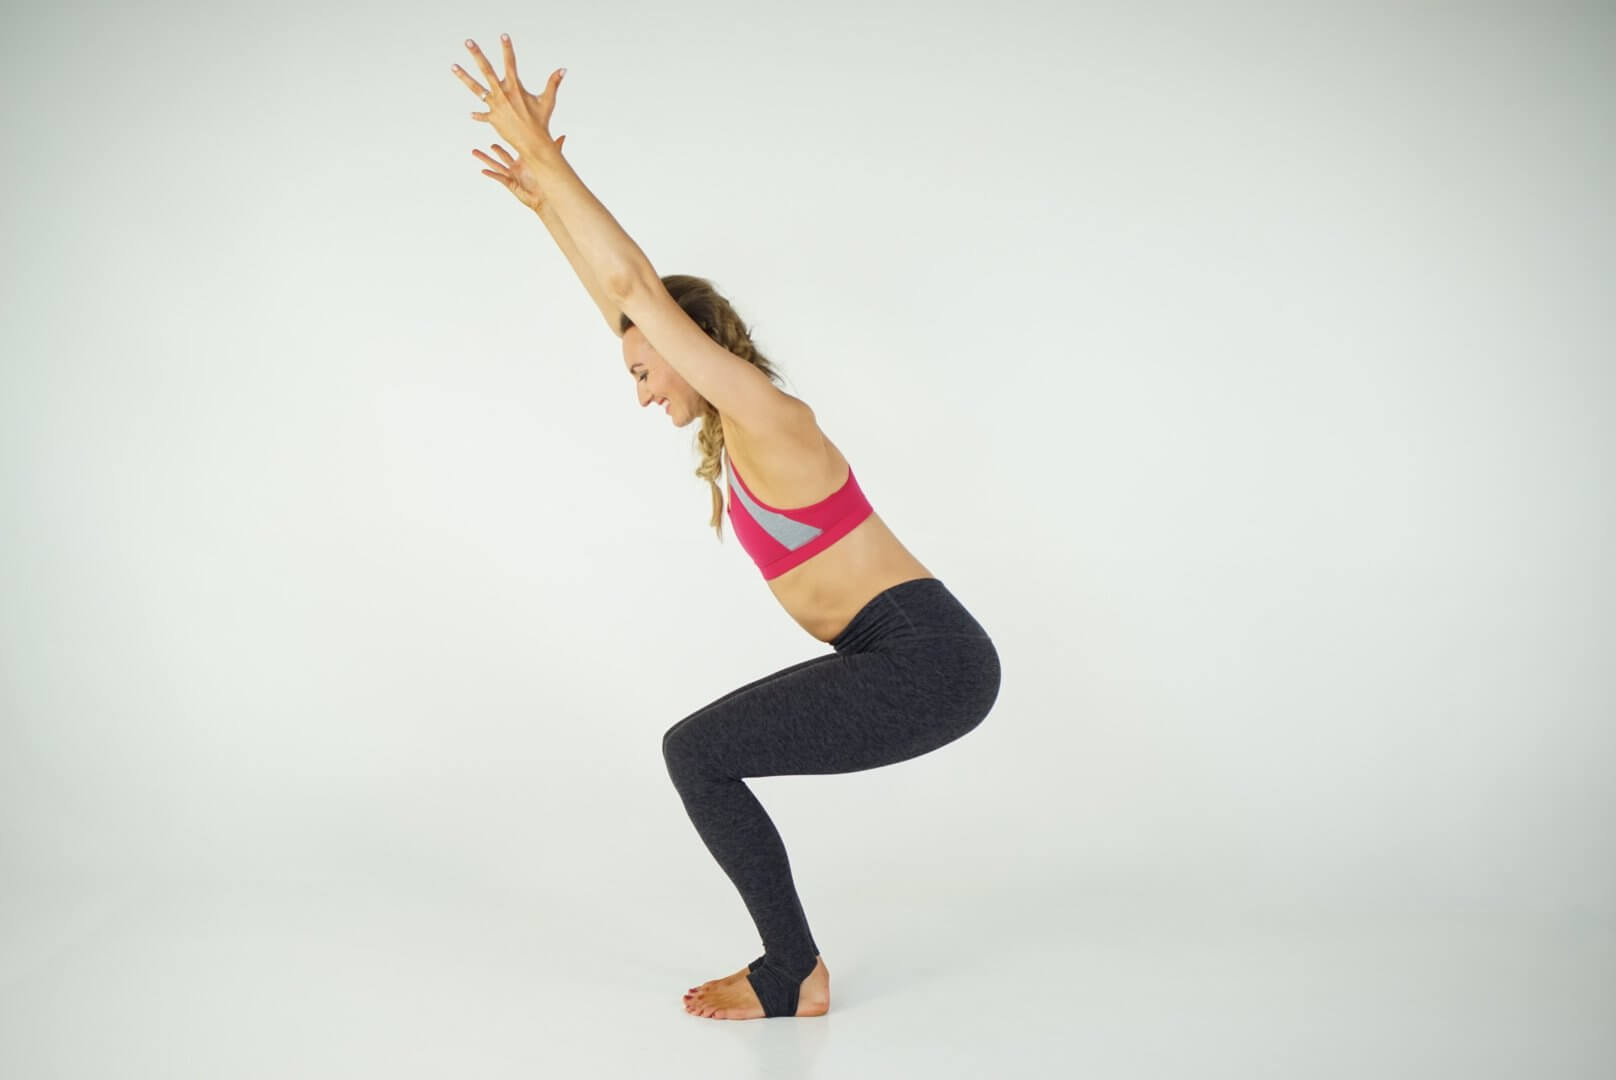
- Step 1: Begin in Mountain Pose (Tadasana), feet hip distance apart, toes spread wide and facing forward. Legs straight, soften behind your knees and bring your pelvis into neutral. Stack your ribcage and shoulders over your pelvis. Arms straight at your sides, palms face your thighs as your shoulders relax down your back. Lengthen through the back of your neck and tuck your chin into your throat slightly.
- Step 2: Inhale as you sweep your arms forward and up. With your arms stretched upwards, maintain your neutral spine.
- Step 3: Exhale as you sit into an imaginary chair. Knees bent, hug your belly button to your spine to help maintain a neutral pelvis. Peek down and make sure you can still see your toes, weight is even in the feet.
- Step 4: Hold for 3 to 5 rounds of breath.
- Step 5: Inhale to prepare and exhale into either Mountain Pose or Standing Forward Fold (Uttanasana)
Variations: Place a block between the thighs or bring the legs together to touch. Bend your elbows for cactus arms, widen arms to a vee shape, or keep your hands on your hips.
Benefits: Helps strengthen the muscles around your hips, in your legs and core. Helps lengthen the glute muscles as you hinge at your hips to sit into the pose. Lengthening the glute muscles can help a tight PF relax.
Pro Tips for Yoga Teachers:
- Have students imagine that they can feel their sit bones widening apart as they sit into chair pose.
- Remind students to keep a gentle drawing in of the low belly to help engage the PF muscles.
- A slow steady flow between Mountain and Chair pose can both strengthen and lengthen the glute muscles. Students can engage their glutes as they rise to stand, but not squeeze so much that their hips push forward. We want them to think, engage and lift while maintaining a neutral spine and pelvic bowl.
6. Tree Pose (Vriksasana)
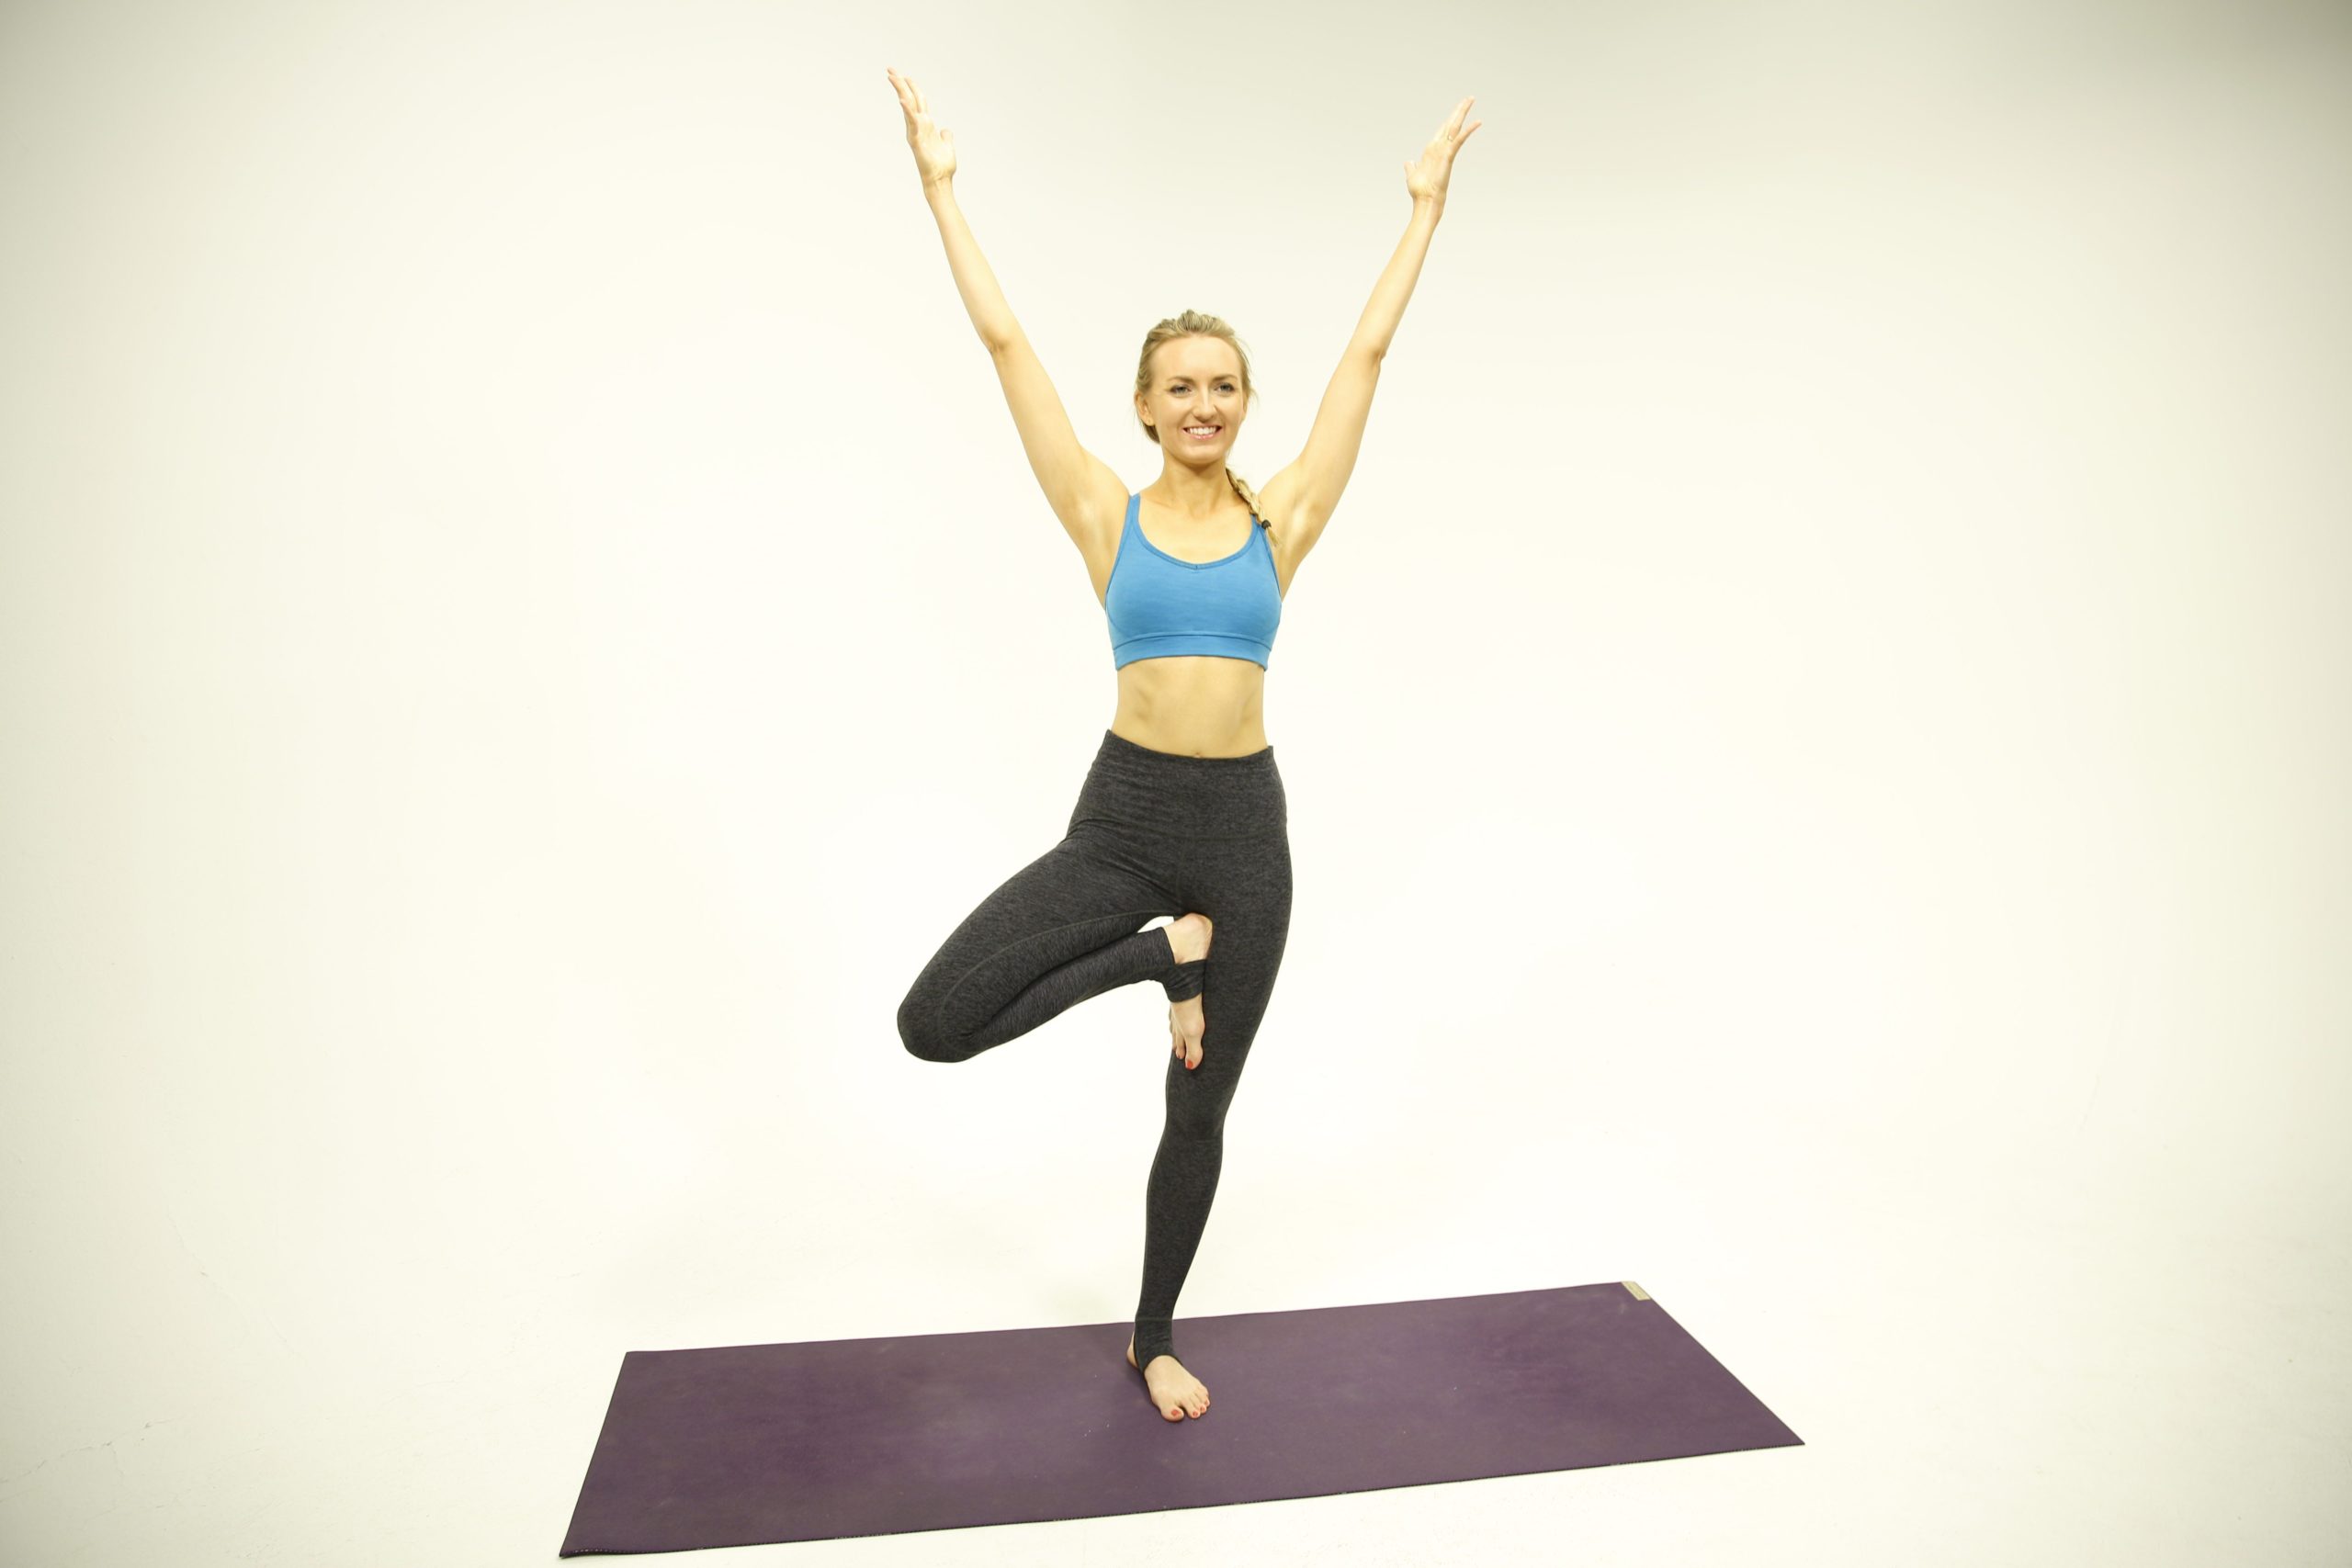
- Step 1: Begin in Mountain Pose (Tadasana), feet hip width apart, toes spread wide and facing forward. Soften behind your knees and bring your pelvis into neutral. Stack your ribcage and shoulders over your pelvis. Arms straight at your sides, palms face your thighs as your shoulders relax down your back. Lengthen through the back of your neck and tuck your chin into your throat slightly.
- Step 2: Shift your weight to your right foot. Begin to lift your left foot off the ground, bending your knee. Turn your bent knees out to the side as far as feels comfortable for you and place your foot along the inner seam of your right leg (above or below the knee).
- Step 3: Find a single point of focus to help you balance. Equal pressure of your foot into your leg, and your leg into your foot. Hold for 3 to 5 rounds of breath.
- Step 4: Bring your left knee back forward and place your left foot back on the ground.
- Step 5: Shift your weight to your left leg and repeat on the other side.
Variations: Keep toes on the floor and place foot against ankle. Stand near a wall, counter, or chair to help with balance.
Benefits: Single leg balances can help strengthen glute medius and minimus when striving for a neutral pelvis. This can help with tightness on one side of the pelvic floor.
Pro Tips for Yoga Teachers:
- If a student is struggling with balance, have them press their tongue to the roof of their mouth. Mula Bhanda can be a useful tool to help with balance if the student does not have PF tension.
- Remind students that their knee doesn’t have to point straight out to the side! Prioritize a neutral pelvis.
- Notice the foot on the standing leg. Does the arch collapse? If so, can they bring the elevated foot lower to concentrate on lifting the inner seam of the standing leg to help lift the arch. Engaging the inner seam of the leg helps the PF engage too.
7. Garland Pose (Malasana)

- Step 1: Stand with your feet about shoulder width apart, toes pointing to the corner of the room (in the same direction as your knees).
- Step 2: Inhale sweep your arms up overhead bringing the palms to touch if you can.
- Step 3: Exhale your hands to heart center as you drop your hips toward the floor.
- Step 4: Press your palms together to broaden across your chest. Press your inner knees into your elbows, and your elbows into your inner knees. Maintain length in your spine and neck as you breathe in this pose. You can hold here as long as feels comfortable. Place a block or blocks beneath the sit bones for additional support here.
- Step 5: Inhale to prepare, exhale as you press through the soles of your feet and rise to stand. You could also carefully place your hands behind you and gently bring your seat to the mat coming into a butterfly position.
Variations: This pose can feel very vulnerable for some people, especially if they have a pelvic organ prolapse. You could offer a squat keeping the feet and knees hip width apart or touching. This squat can be a lovely place to work with breathing into the back and sides of the ribcage.
Benefits: This pose can help a tight PF release and relax. The PF will naturally contract strongly as you rise back to a standing position.
Pro Tips for Yoga Teachers:
- Offer a rolled blanket or yoga mat under the heels if a student can not keep their heels connected with the floor.
- If a full deep squat is not available at all, offer more of a horse stance with hands or elbows resting on the thighs.
- Encourage students to find a bit of movement before they settle into stillness in the pose.
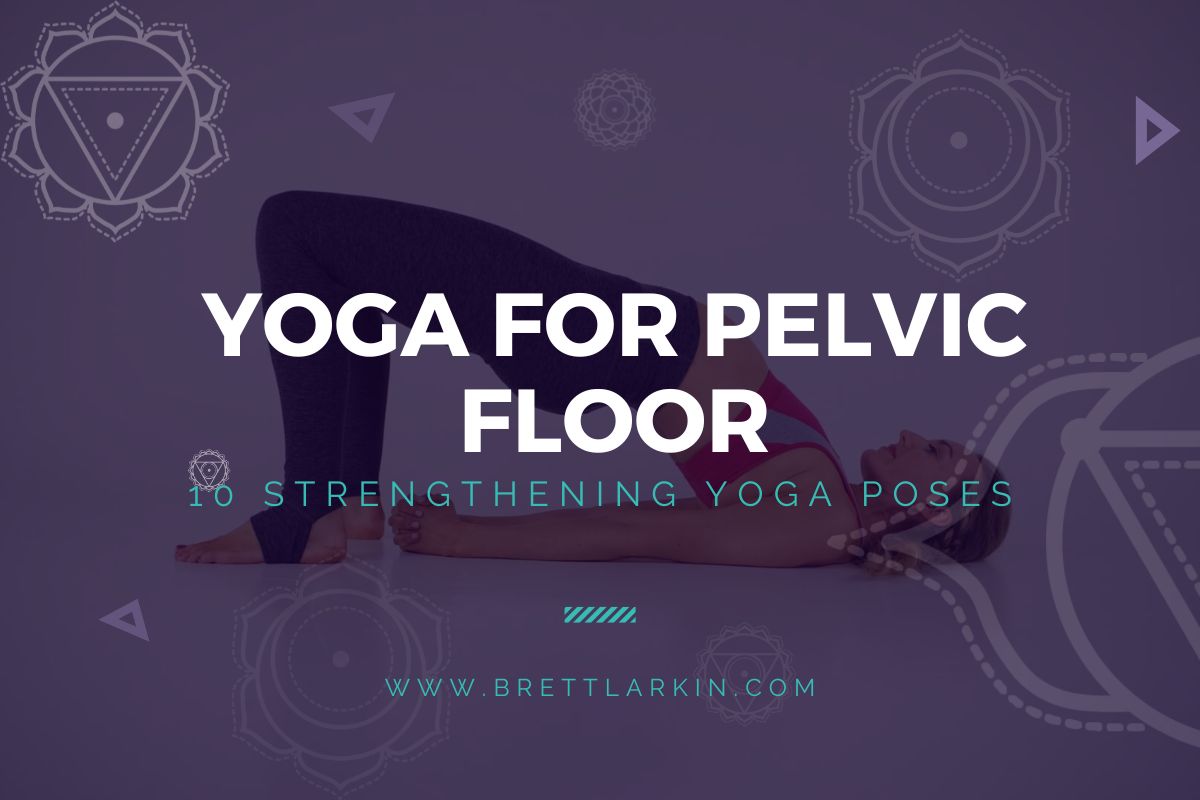
8. Bridge Pose (Setu Bandha Sarvangasana)

- Step 1: Lie on your back, knees bent, feet flat on the floor hip width apart. Outside edges parallel with your mat, heel centered behind the widest part of the foot. Knees stack directly over ankles. Pelvis and spine are in neutral to start.
- Step 2: Inhale to prepare, exhale, drawing your low belly up and in, to press through your feet and using both the glutes lift your hips toward the ceiling. Arms press to the floor alongside your body, fingers lengthened toward the bottom edge of your mat.
- Step 3: Hold at the top for one round of breath. Imagine that you are pulling your heels toward your shoulders without actually moving anything. Try to keep your spine long and neutral.
- Step 4: Maintaining a neutral pelvis, lower back to the floor by hinging at your hips.
- Step 5: Repeat steps 2-4 three to five times (or as many as you’d like).
Variations: The above version will work more with the glute muscles. To target more hamstrings you can come into a posterior pelvic tilt (think of flattening your low back into the floor while reaching your sit bones toward the backs of your knees) while lying on the floor and maintain that as you lift and lower.
Benefits: Strengthens glutes, hamstrings, low abs, and adductor muscles. Squeezing something (block, ball, pillow)between the knees as you lift can help bladder leakage by strengthening the front PF muscles.
Pro Tips for Yoga Teachers:
- Inhale up and exhale down to decrease PF tension.
- Watch for legs splaying open, this can indicate an over clenching of the glutes.
- Have students squeeze a yoga block between their knees to assist the adductor muscle engagement. This also helps those that over clench glutes.
9. Figure 4 Stretch
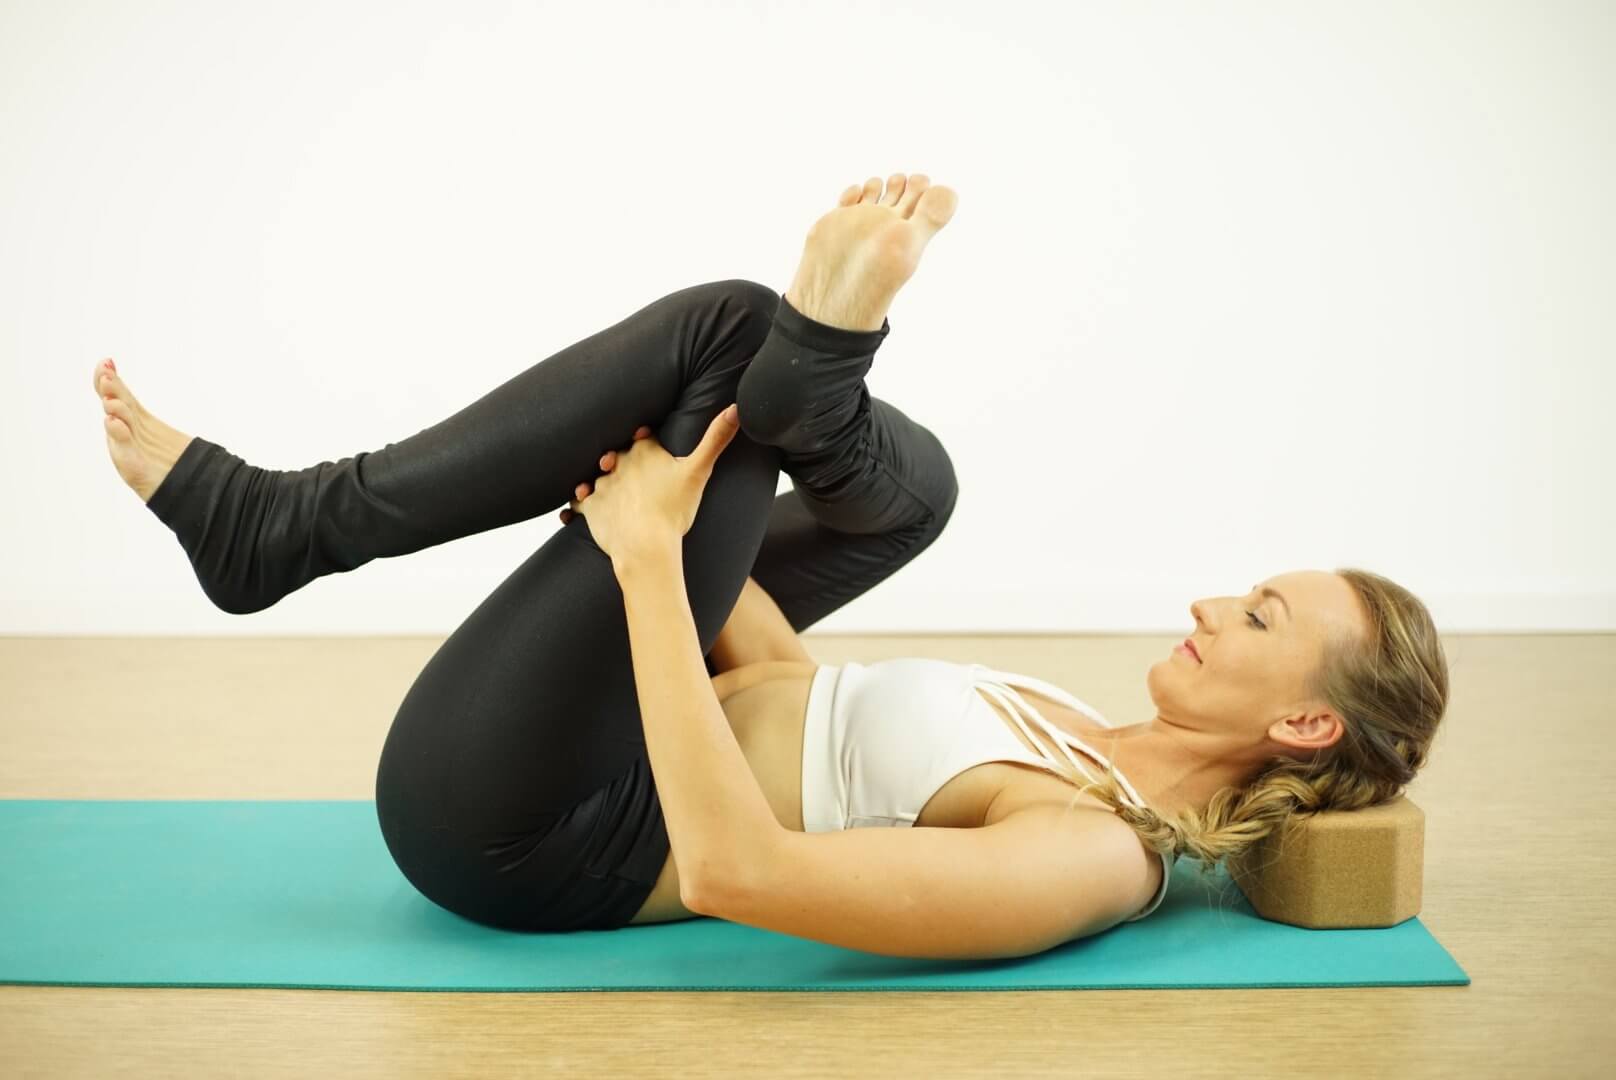
- Step 1: Lie on your back, feet flat on the floor hip width apart, heel centered behind the widest part of the foot. Knees stack directly over ankles. Pelvis and spine are neutral.
- Step 2: Lift one foot off the floor, externally rotating at your hip to point your knee to the side. Cross your ankle over your thigh, right below your knees on the opposite leg.
- Step 3: If you feel enough sensation already stay here. If you wish to go deeper, inhale to prepare, then exhale lifting the sole of the foot off the mat. Use your abdominal muscles to lift the legs. Keep your pelvis and shoulders firm on the mat. If you can reach behind the thigh and clasp your hands without lifting feel free to do so. Hold as long as you would like.
- Step 4: Unclasp your hands if you had that and lower your foot back to the floor gently. Uncross your leg and return that foot to the floor as well. Let your knees fall together and rest here for a few breaths noticing the difference between sides.
- Step 5: Repeat steps 1-4
Variations: Use a strap to loop around the thigh so you can keep your pelvis, head, neck and shoulders relaxed on the floor. Bottom foot could also rest on blocks, a piece of furniture, or a wall.
Benefits: Releases tension in the glutes, outer hips, and low back muscles. Helps deep hip rotators relax, decreasing PF pain.
Pro Tips for Yoga Teachers:
- If a student experiences more tightness on one side of their PF, encourage them to spend a few extra breaths on that side.
- Invite students to experiment with rocking the legs side to side to open into different spaces.
- Students can experiment with finding a twist with the figure 4 legs by taking the sole of the top foot to the floor. Shoulders remain on the floor, arms can be in a letter tee shape.
10. Supta Baddha Konasana (Reclined Butterfly Pose)
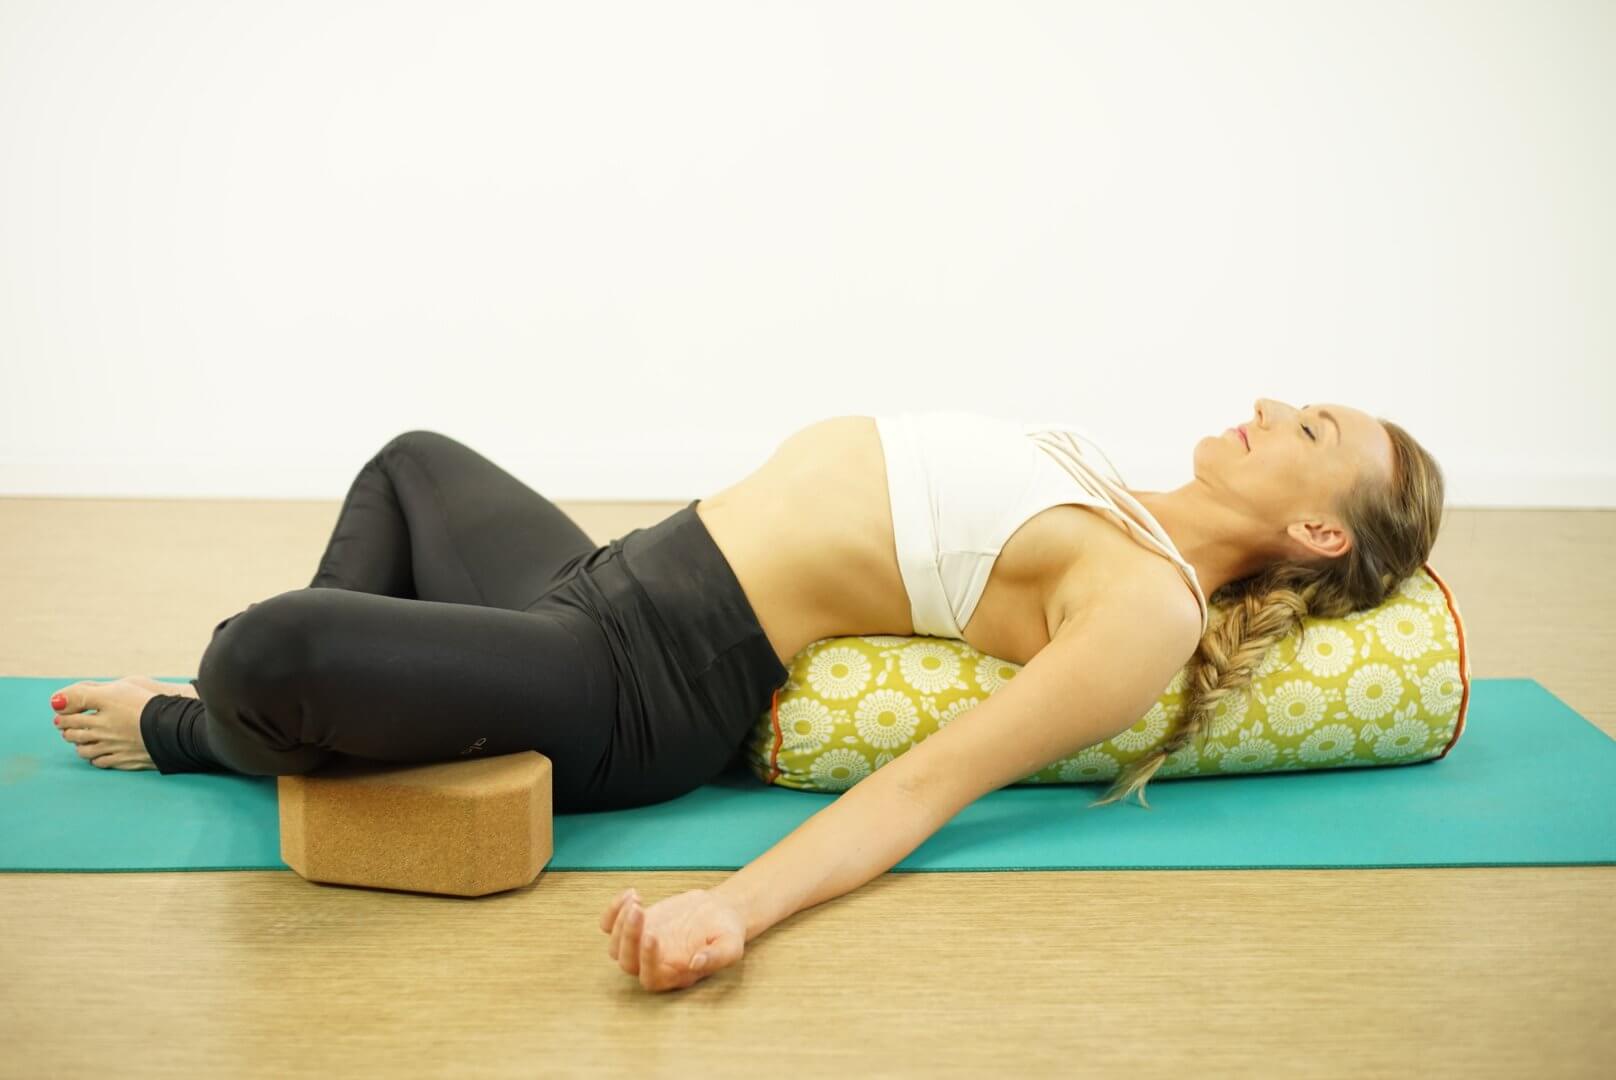
- Step 1: Begin lying on the floor with a bolster under your torso, or your back flat on the floor. Bring the soles of your feet to touch as your knees fall to the sides of your mat.
- Step 2: If you feel too much pulling on your inner thigh muscles place blocks or cushions under your outer thighs for support.
- Step 3: Connect with your full complete breath. Perhaps you can let your exhale extend a little longer than your inhale here. Stay in this as long as feels comfortable for you.
- Step 4: When you are ready to come out, gently place your hands on your outer thighs and lift your legs so the soles of your feet come back to the floor. Take your feet shoulder width apart and let your knees fall toward one another.
- Step 5: Carefully roll to one side to rest for a few breaths. When it feels safe, slowly push yourself to a seated position.
Variations: If lying flat try a bolster. If using a bolster, try elevating the head a bit on a yoga block. Experiment with where you place your arms, beside your body, in a tee shape, or maybe overhead.
Benefits: Release tension in the inner thigh muscles. Our inner thigh muscles help stabilize the PF. When they’re flexible, you’re able to naturally activate your PF muscles more deeply. When the adductor muscles are tight, it makes the PF muscles less elastic.
Pro Tips for Yoga Teachers:
- Help students get as comfortable as possible here. Watch for excess lumbar lordosis, or excess cervical extension. Offer props to help them find a more neutral spine and pelvis.
- This posture can also feel very vulnerable for students. Perhaps offer to cover them with a blanket once they have settled into the pose.
- Offer this pose as one of the last in your class before Savasana. Students could choose to stay here or gently transition into Savasana.
Learn more about anatomy and alignment in our 200hr Yoga Teacher Training. Pregnant momma, or certified yoga teacher? You will love Pregnant & Powerful. Uplifted members check out the Women’s Health section of the app.

About the Author | Jennifer Hall
Jen is an E-RYT 500 and YACEP, with a Pregnancy and Postpartum Corrective Exercise Specialist certification. She is a lead trainer here at Uplifted™Yoga. She shares this healing practice via in person classes at her local gym. Jen is especially passionate about making yoga accessible for every body, and using the practice to keep bodies healthy and mobile for life.
Next Steps
- If you’re interested in practical kriya yoga as a way to improve your daily life and relationships, check out my Yoga for Self Mastery course.
- Order my Yoga Life book for a practical guide to creating balance in your life through yoga.
- Check out my YouTube channel and find some yoga classes that you can try out for yourself!
Find more yoga sequences by benefit.
YOU MIGHT ALSO LIKE
- How to Teach Somatic Yoga: A Practical Guide for Instructors
- The Best Somatic Exercises for Grief: Find Healing Through Movement
- The Best Somatic Exercises for Anger Management and Emotional Release
- Yoga to Reconnect with Yourself: 5 Essential Practices for Inner Peace
- Yoga for Connection: 10 Poses to Deepen Relationships and Bonding
- Yoga To Connect With Your Body For Mind-Body Harmony
- Yoga to Connect with Feminine Energy: 5 Transformative Practices
- Yoga to Connect with Your Heart: 3 Poses for Emotional Balance
- Myofascial Release Yoga: Unlock Tension and Improve Flexibility
- 6 Hip Openers For Emotional Release
- Office Yoga: 10 Poses You Can Do Right Now
- Ayurveda Food Combining: The Key to Balanced Digestion
- Yoga For Grief: 8 Yoga Poses For Support
- Yoga for Vata Dosha: Practice Poses and Tips
- Yoga for Pitta Dosha: Practice Poses and Tips
Learn how to do 11 of the most popular yoga poses correctly. Free video + PDF download.


