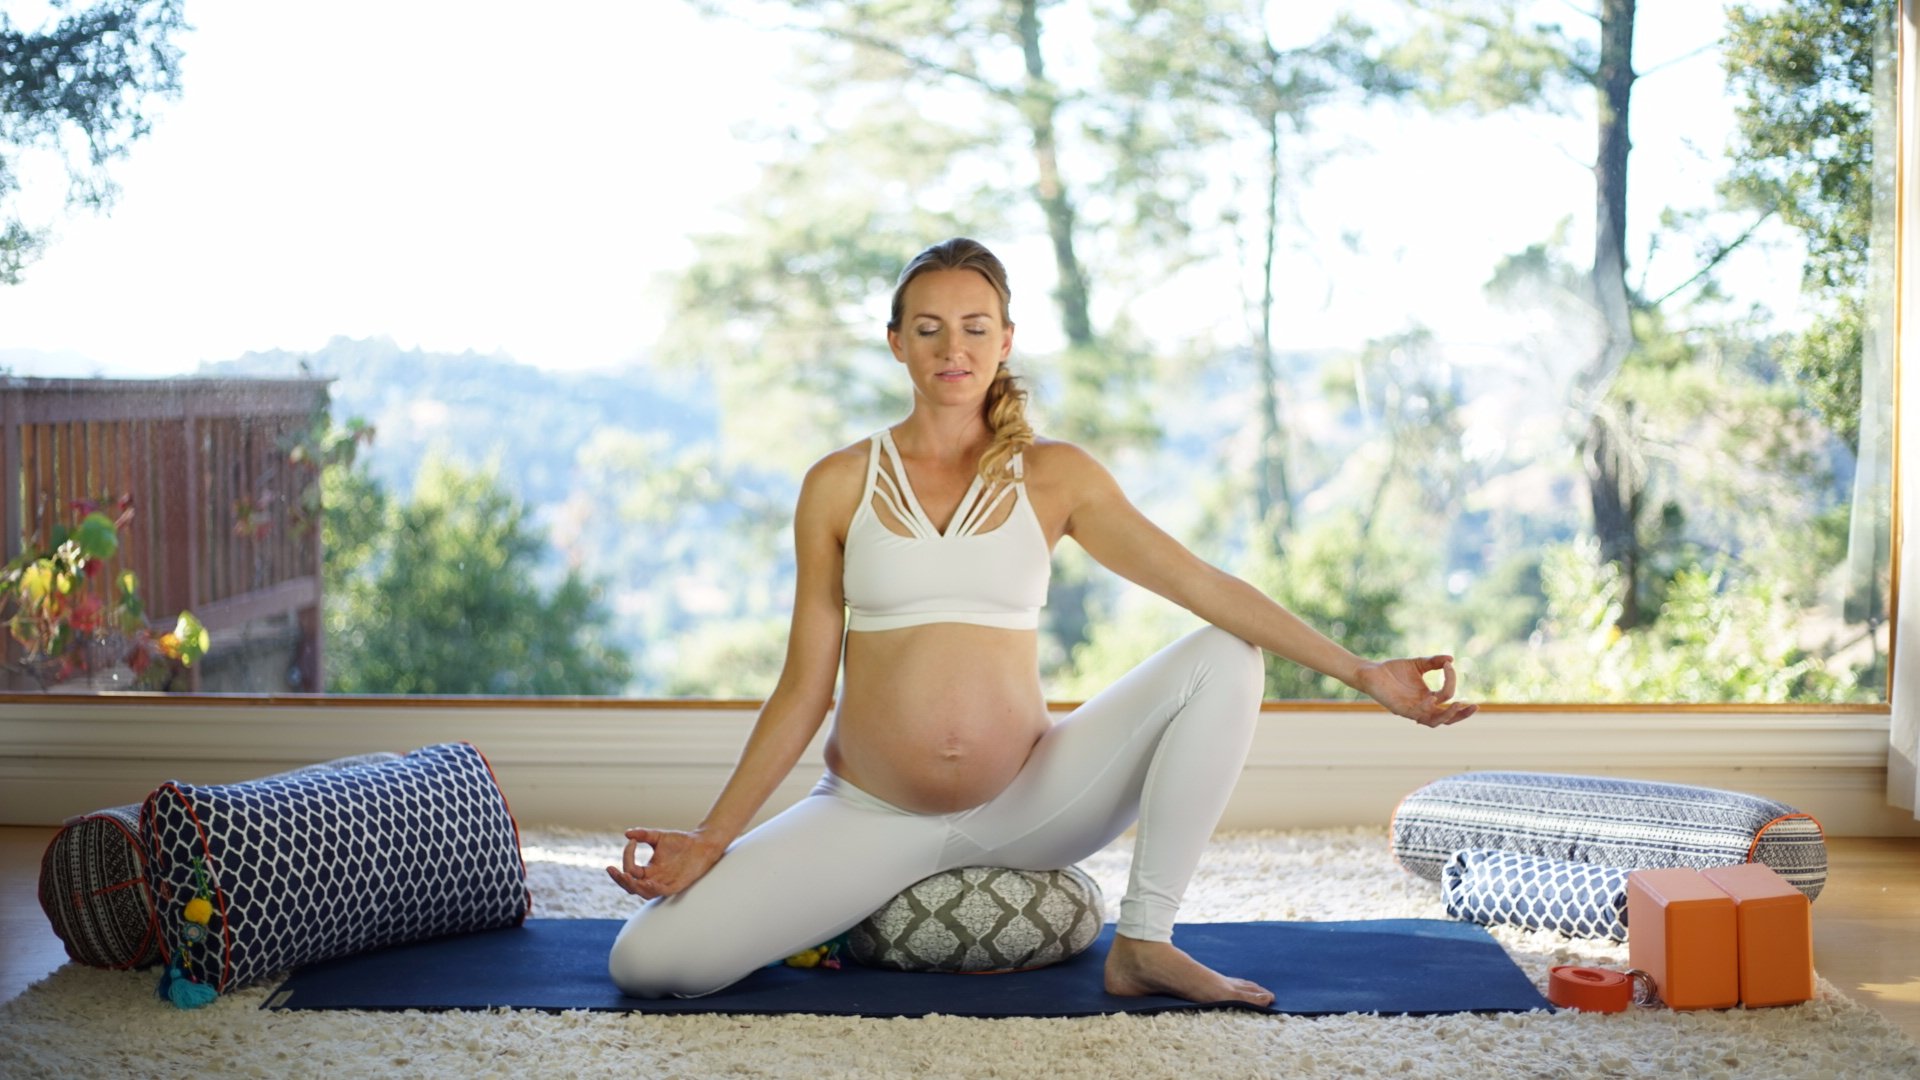
Your bags are packed… you’re ready to go… HAVE A BABY!

What a magical time in your life. You are in the home stretch of your pregnancy journey. You are probably feeling excited, nervous, and maybe some back pain, shortness of breath, and fatigue. Good news! Your yoga practice can help with all of that!!
Yoga for Third Trimester
There is a common misconception that women are “fragile” or “weak” during pregnancy and might break or hurt themselves and the baby if they do anything too physical. This couldn’t be further from the truth! Right now, as you are growing a life inside you and still maintaining your everyday world, YOU ARE A CHAMPION! Especially in your third trimester when you are physically being pushed to your limits.
When you practice yoga, you connect with your body and your baby on a deeper level, use breathing techniques to assist with your labor, and prepare mentally for the approaching changes to your world.
How Does a Third Trimester Practice Help?
What the science says: Prenatal yoga and mindfulness practices have been shown to decrease a woman’s fear of childbirth and increase their self-efficacy in regard to childbirth. Meaning that it makes women more confident in their ability to give birth and trust in their bodies. This improvement showed even if women waited to start prenatal yoga until their second trimester! Pregnancy yoga has been shown to decrease the discomfort of physical aches and pains of pregnancy. This is AWESOME, considering they start to really amp up in that third trimester. Studies have also shown that not only does a regular yoga practice during pregnancy decrease pregnancy and labor pains but it can shorten the length of labor! Who doesn’t want that?!
The Uplifted Perspective: Right now your intuition is heightened, literally! In my Pregnant & Powerful Course, I explain how your pituitary gland physically enlarges during pregnancy. This is the gland associated with intuition. You are more intuitive than ever at this time, so trust yourself and your body. You know exactly what is best for you and your baby!
Pregnancy is a state of excess fire (Pitta), so your body runs hot at this time! You may need to make adjustments to your practice. Remember, this is not because you are “weakened” by being pregnant, it’s because you need to cultivate the opposite of the fiery energy of creation glowing inside you.
Here are some tips to adjust your practice during pregnancy:
- Focus on stability, not flexibility – Your body is already swimming with the hormone relaxin, making your ligaments loosen. You don’t want to run the risk of overstretching and damaging ligaments! Cultivate the opposite and prioritize yoga poses for strength and stability.
- Nourish throughout your practice – Listen to your body. You might not be able to move the same, especially in the third trimester, so take breaks as you need and cool down with some water or have a snack. Rest is a good thing!!
- Bring baby into your practice – Let your practice become bonding time with your baby. Place your hand(s) on your belly throughout the flow where you can. Select yoga poses that leave your hands free to do this and send your breath down to your baby.
- Amp up your breath – Baby is taking space away from your diaphragm right now making it feel like you can’t take a deep breath. Recommit to breathing as deeply as possible even if you have less range of motion in your diaphragm. Every time you take a Full Complete Breath, you’re sending more oxygen to your baby. The slower and deeper you breathe, the more your nervous system shifts to calm… and your baby can feel that.
I’ve compiled a list of my favorite pregnancy and third trimester yoga poses below. But you can always go straight to my FREE PRENATAL RESOURCE CENTER for more info on yoga and pregnancy. Or if you just need a quick class to get started, I have so many on my YouTube Channel plus a bunch of EXCLUSIVE pregnancy yoga classes in my Uplifted Membership.
Give this quick 10-minute third trimester prenatal yoga class a try to get started! 10 Min Prenatal Yoga For Beginners Third Trimester Back Pain
Keep in mind that working with a certified instructor is always a great option to learn specific prenatal yoga poses for your body, and sometimes they even offer a birth education class once you enter your third trimester which can be a lot of fun!
Top Yoga Poses for Third Trimester
1. Child’s Pose (Balasana)
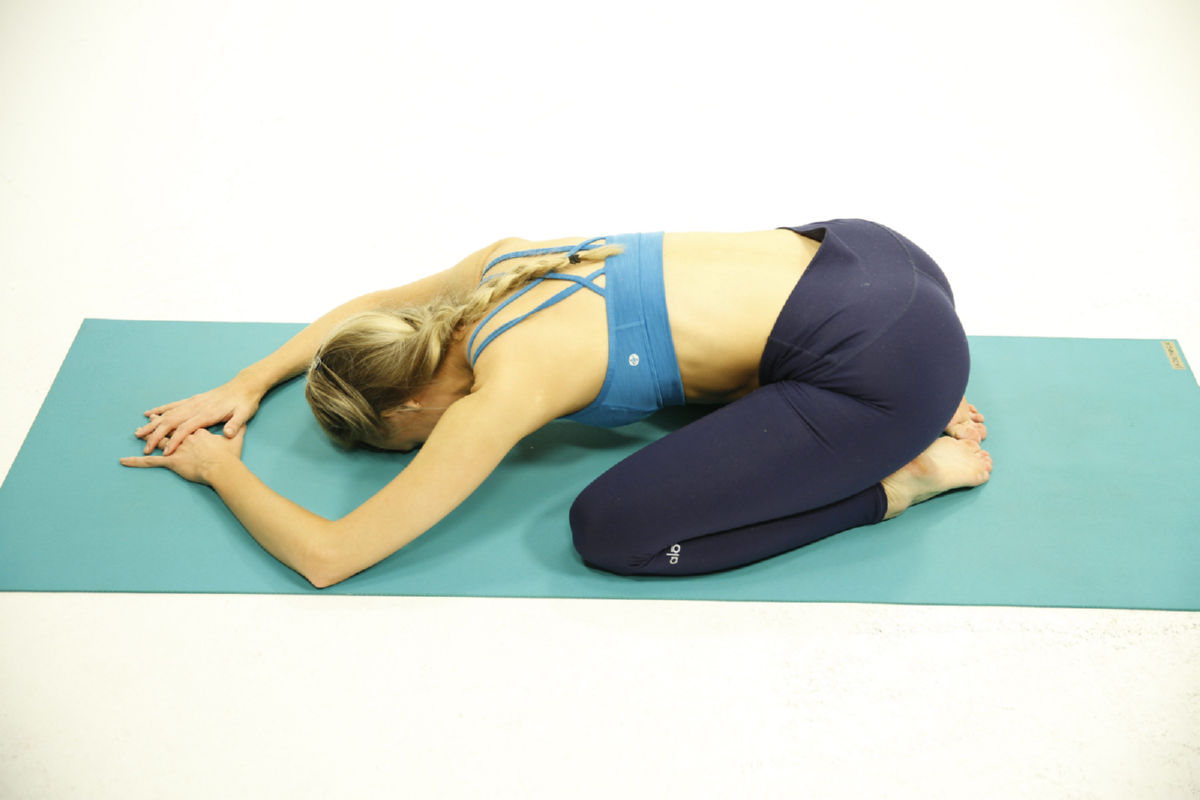
- Step 1: From your hands and knees, take your hips back to your heels. Knees as wide as the mat.
- Step 2: Let the head come to your mat, resting the forehead down on the ground, and closing the eyes.
- Step 3: Soften the upper body and experiment with where you want your hands/arms: index fingers touching, elbows wide in a diamond shape, or arms down with hands next to the feet.
- Step 4: Inhale, and rise back to all fours to come out of the pose.
Variations: To make this pose more restorative, you can hug a bolster to your chest. Another great variation is to place a block under the seat between the heels or under the forehead.
Benefits: Child’s pose opens the back body and releases the glutes and hips. Takes your attention inward, cooling the body and soothing the nervous system to reduce stress and improve overall well-being. You’re coming to the end of your pregnancy and it’s not uncommon for overwhelm and anxiety to set in. Let child’s pose soothe those nerves and reframe them to excitement for your new addition!
Pro Tips for Yoga Teachers & Yogis:
- Have students spread their knees wide to make room for baby and draw their attention to their womb space. Here the belly is fully relaxed, notice what sensations come as you feel the life growing inside you.
- This posture is about surrender. Childbirth often resonates thoughts of fear. Invite your students to “let go” of any fear associated with their delivery and trust their body knows what to do. Read more on energetic surrender in this post to understand how to incorporate it into your practice.
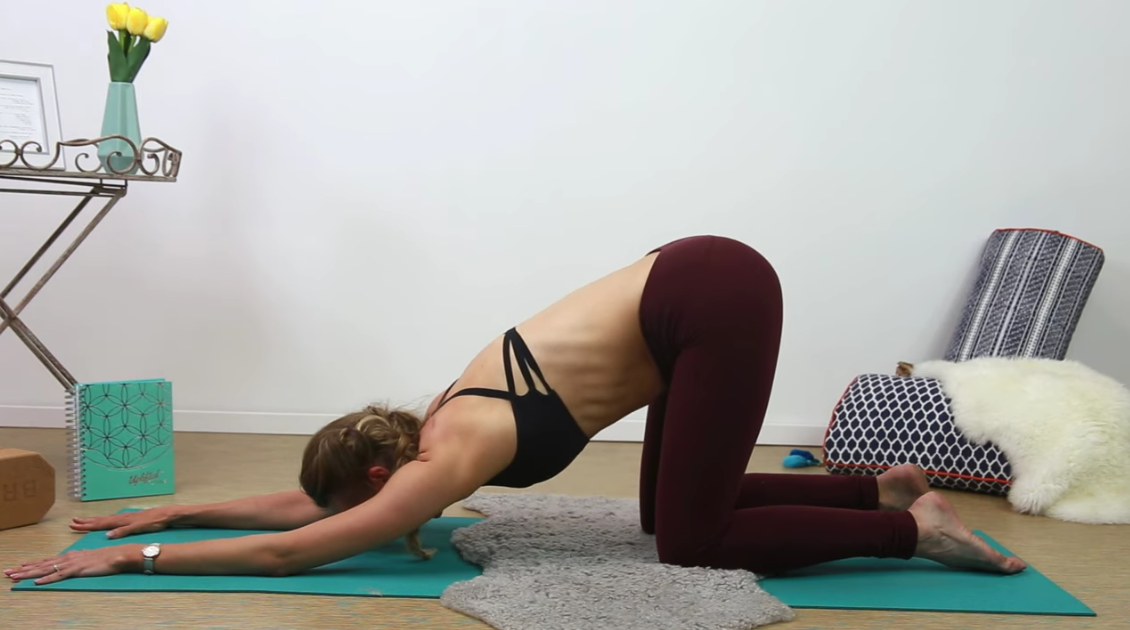
2. Cat Cow Pose (Marjaryasana/Bitilasana)
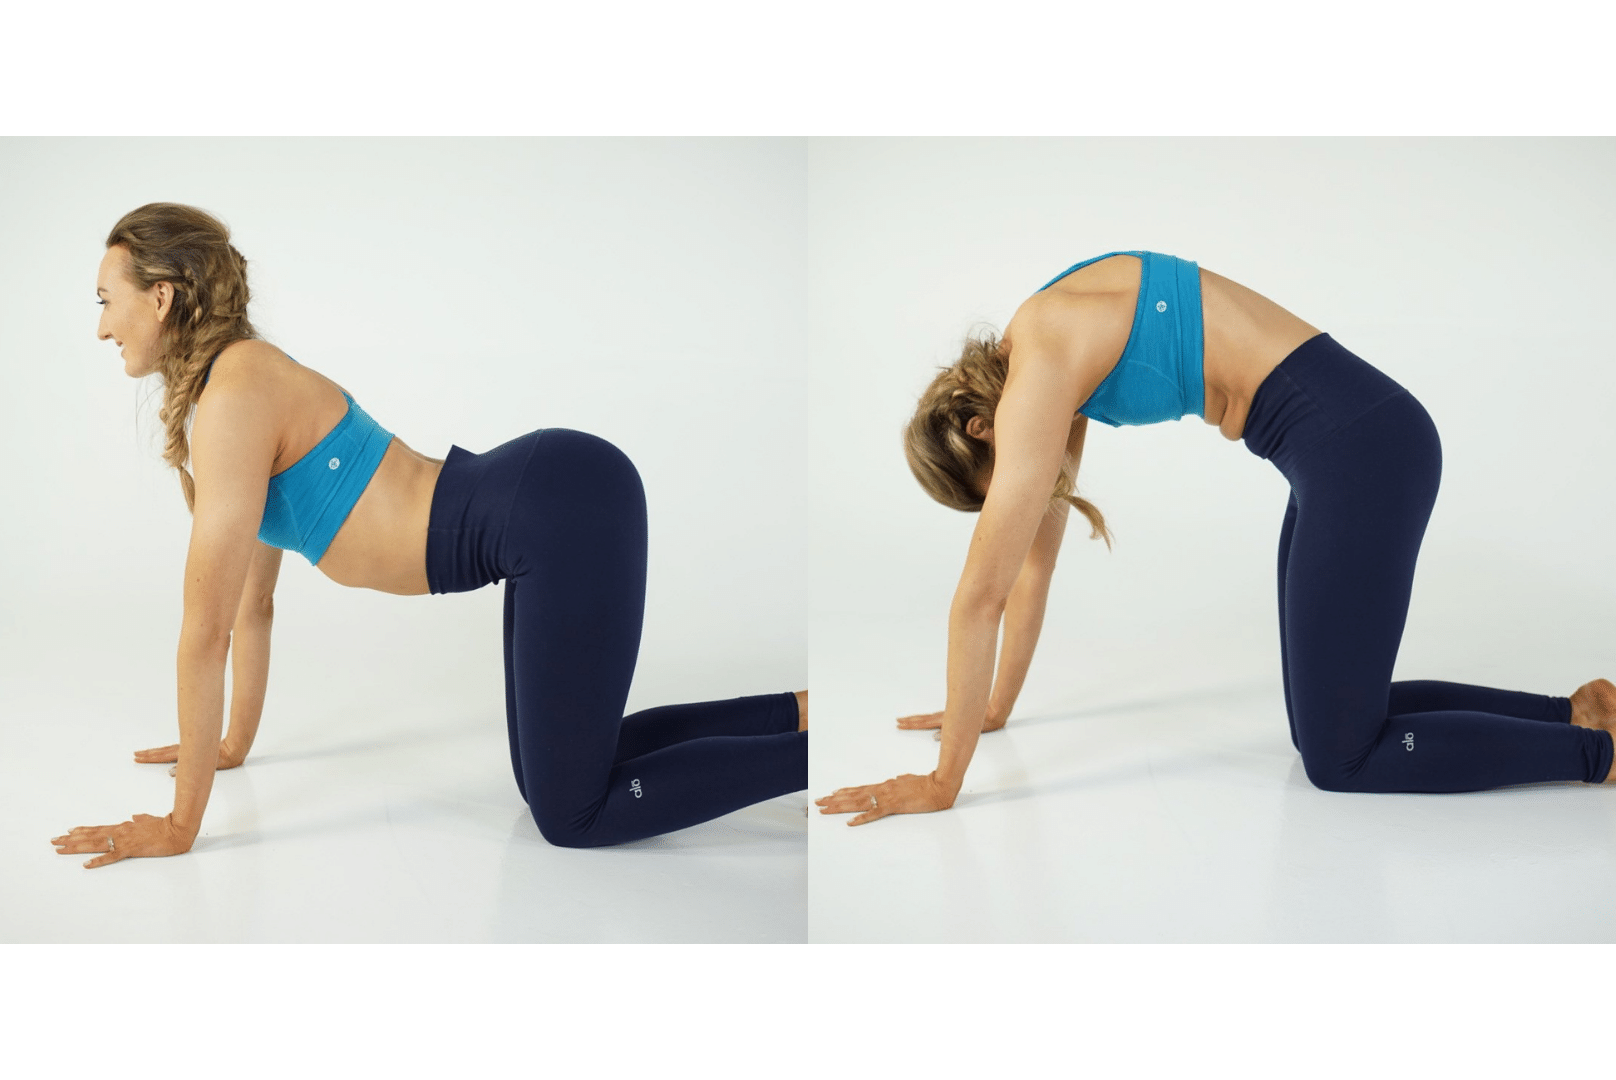
- Step 1: From a tabletop position, place your hands underneath your shoulders and knees underneath the hips.
- Step 2: Inhale, drop the belly, and keep the abs engaged. Open your chest and send your heart forward, shoulders down and back. This is cow pose. Use the muscles of your lower back to send your tailbone toward the ceiling.
- Step 3: Exhale, round the back, drop your head, tailbone draws down between the knees. This is cat pose.
- Step 4: Repeat the postures, linking the breath to the movement.
Variations: Pad the knees with a folded blanket or put the hands on blocks for wrist issues. This can also be done in a seated position.
Benefits: Cat cow pose is the perfect way to warm up the spine and work through any tightness. These postures open up the chest and shoulders. It takes the pressure off of your front body, which can be hard to do with a big baby belly, and allows you to stretch those back muscles that may feel sore and tight due to the extra weight in your front.
Pro Tips for Yoga Teachers & Yogis:
- Practice these postures daily! When I labored I spent 90 percent of the time on hands and knees breathing through these positions and chanting “Sat Nam”. It was a beautiful comfort through those intense contractions. So this is a great movement in preparation for childbirth!
- Encourage intuitive movement with these postures. Do what feels best in YOUR body as you flow back and forth between the two.
3. Half Butterfly Pose (Ardha Baddha Konasana)
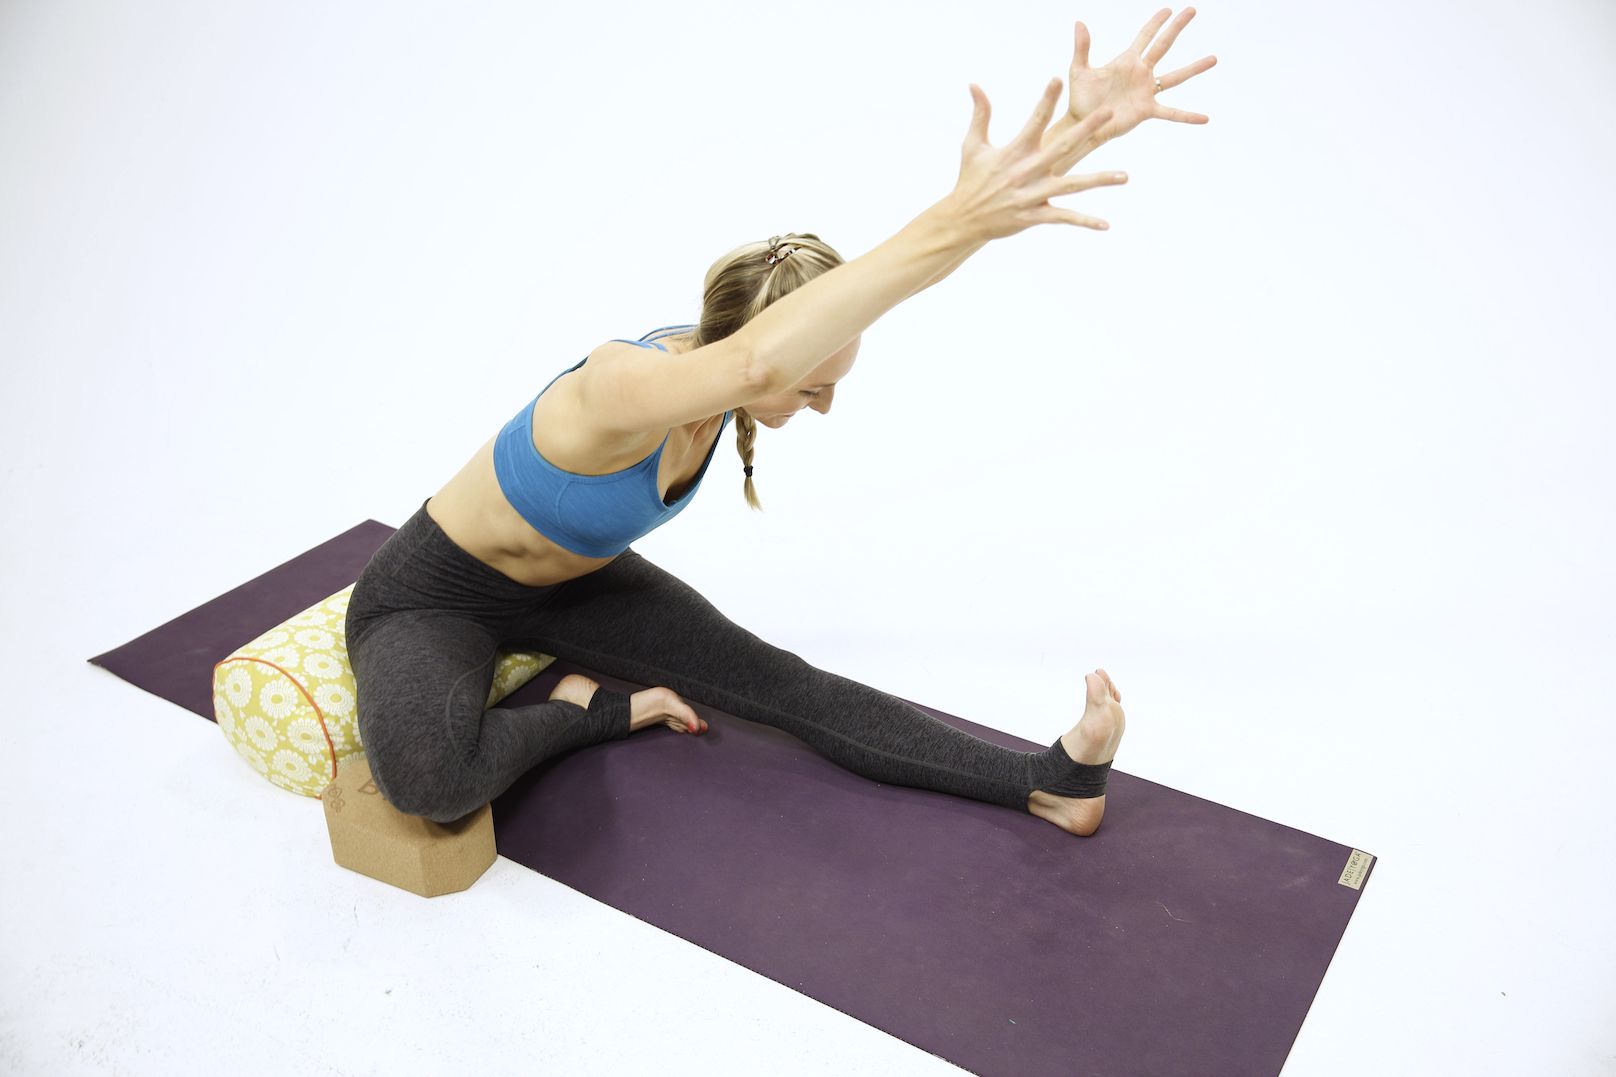
- Step 1: Begin in Staff Pose. Bend the right knee, the sole of the right foot resting lightly on the inner thigh of the left thigh (avoid your knee). Your extended foot should be flexed, sending energy out the heel.
- Step 2: Breathe in, arms come slightly forward and up, reach toward ceiling, fingers spread wide. Firm your low abs up and in, find length in the front, sides, and back of the torso.
- Step 3: Breathe out as you fold forward over the left leg, heart to the shin. Arms come alongside the left leg or hands come to the foot.
- Step 4: Steady deep breaths. Left leg and abdominals energized and engaged; soften tops of shoulders away from the ears.
- Step 5: To come out, inhale, torso rises back to an upright position, arms up, and reach toward the ceiling. On an exhalation, hands come to prayer at the heart’s center. Prepare for the second side with right leg extended, left knee bent.
Variations: Use a strap around the foot so you don’t overreach. You can also prop your seat on a blanket or bolster to elevate the hips. Take the extended leg out to the side a bit to make room for your protruding belly.
Benefits: Half butterfly pose builds stability in the hips and pelvic area. Will release physical tension in the low back, spinal extensors, hamstrings, and groin. Calms the mind, improves digestion, and relieves anxiety, fatigue, and headaches. Great to add to your pregnancy yoga poses list for its pelvic opening and induction of relaxation.
Pro Tips for Yoga Teachers & Yogis:
- Add fluidity. Inhale, let the chest come up and rise, then exhale and bow the head down. Cycle through several breaths like this.
- Again, surrender here. Bow to the divine feminine within you. You are the most powerful creature on earth, creating life within you. Add in prenatal affirmations like “My body knows how to bring life into this world”. Iffy on using affirmations? Learn how they work here.
4. Bound Angle Pose (Baddha Konasana)
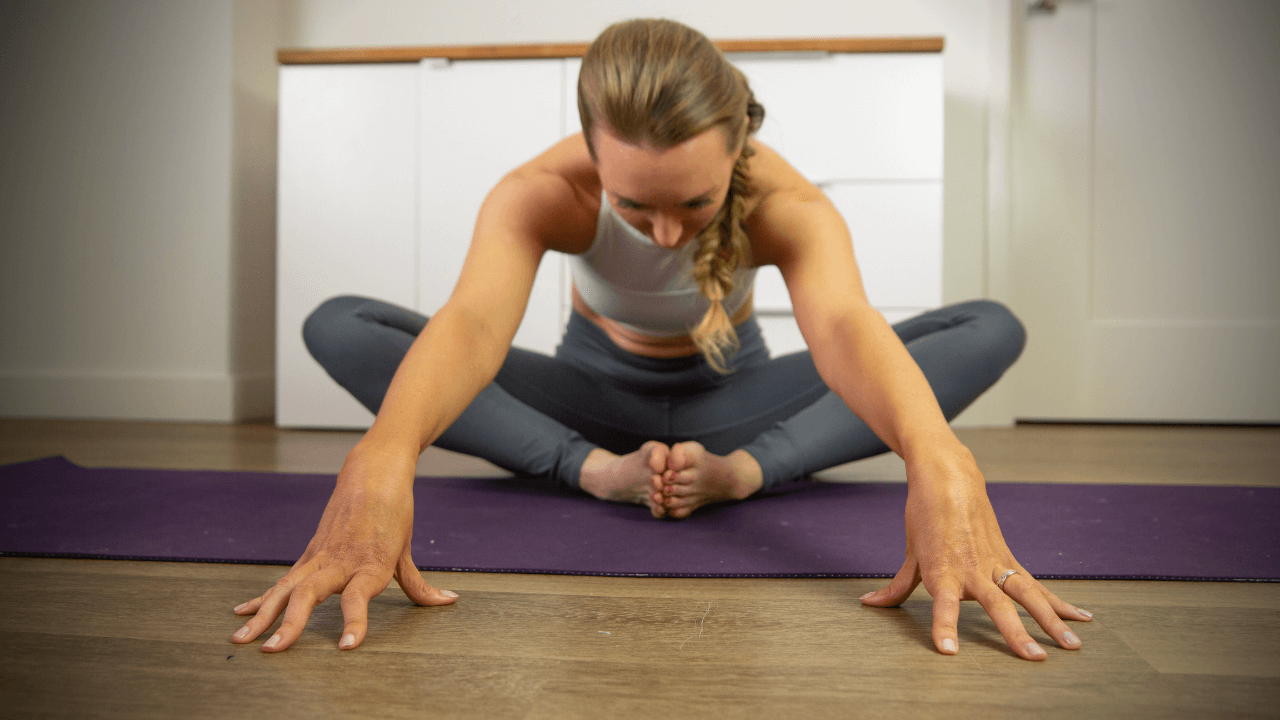
- Step 1: From Dandasana: bring the soles of your feet to touch, creating a diamond shape.
- Step 2: Root the sits bones down, holding the soles of the feet as you inhale getting tall.
- Step 3: Exhale as you fold over the legs keeping the spine long. Hold for several breaths and round: rest.
- Step 4: Breathe in as you slowly rise up to sit tall. Take the legs back out in front of you.
Variations: Knees up high? Place blocks or blankets underneath them. You can also make this more restorative by reclining back on a bolster or some cushions.
Benefits: This is a great hip opener to relieve cramps and low back pain in addition to stimulating the gut to help when you feel bloated. (All of which probably ail you in the final months of pregnancy!)
Pro Tips for Yoga Teachers & Yogis:
- Let this be a peak pose for a prenatal yoga class. Have students rest here for quite a few breaths, putting a block under their head to be most comfortable.
- Head does not need to touch your toes!! Fold until you feel the sensation and then pause there. Use blankets and props to hold yourself where you feel the stretch best.
5. Goddess Pose (Utkata Konasana)
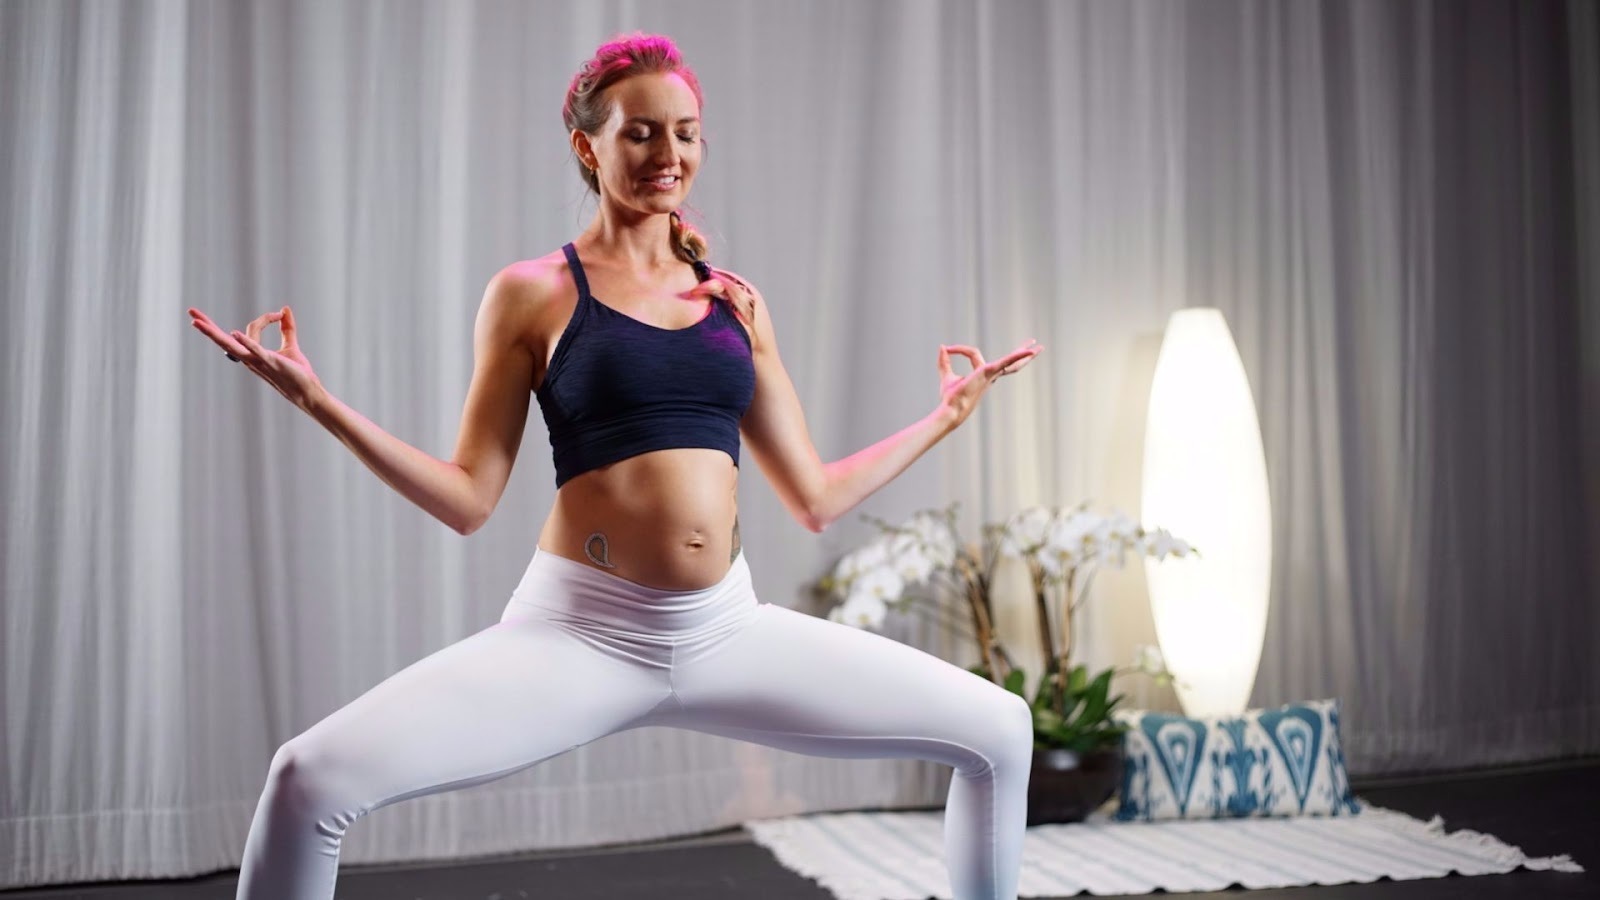
- Step 1: From a standing position, heel-toe your feet out wide. Toes turn out to a 45-degree angle.
- Step 2: Inhale taking your arms overhead and as you exhale drop your hips and bend your knees to 90 degrees. Make sure the knees are stacked over the ankles.
- Step 3: Pull the navel up and in as you broaden the chest and cactus the arms.
- Step 4: To come out simply push through feet to stand, heel-toe your feet back to your neutral, letting the arms come to your sides.
Variations: Bring your hands to the heart’s center or your hips if having the arms up aggravates the shoulders. You can always hold onto the back of a chair for support as well. If you want to make it harder, lift your heels to test your balance.
Benefits: Your prenatal yoga practice powerhouse, goddess brings you into your divine feminine energy, boosting self-esteem and making you feel powerful. (As you should in this stage of life!) It grounds and works your stabilizing muscles to improve posture, build strength, and release tension in the hips.
Pro Tips for Yoga Teachers & Yogis:
- Go to the wall to try this out before you do it on your mat or if you aren’t feeling very stable.
- Remind yourself and/or students how powerful you are in this posture. You can add in some really nice simple affirmations (“I am strong/I am powerful”) while in this position.
6. Garland Pose (Malasana)
- Step 1: From standing, heel-toe the feet just wider than hip-width distance.
- Step 2: Inhale and sweep the arms up overhead bringing the palms to touch. Exhale the palms to prayer position at the heart’s center as you bend your knees and drop the hips down between the shins.
- Step 3: Broaden across the chest, press the elbows into the thighs, and keep length in the back of the neck as you breathe.
- Step 4: To come out, inhale as you press through the soles of your feet to rise. Or you can place your hands behind you and bring your seat to the mat coming into an easy seat.
Variations: Place a block under your seat if it’s uncomfortable to drop the hips so low. Use a cushion or come to the edge of a small chair to assist you in this pose. Or make it a half squat like in the photo!
Benefits: Garland pose stretches and strengthens your pelvic floor, helping to reduce pelvic pain. It releases the lower back and aids the digestive organs. Malasana is always a part of my regular practice, it just feels so good! In fact, I don’t even need to be practicing yoga to drop into this pose. If my lower half is feeling tense I’ll just drop into it, no yoga class needed!
Pro Tips for Yoga Teachers & Yogis:
- Add some breathwork to this posture. This is one of the most natural positions to give birth in, so practice your breathing here in preparation for delivery.
- Garland is super grounding and calming, making it great to begin to bring energy and awareness down the spine before transitioning to the floor or savasana.
7. Puppy Pose (Uttana Shishosana)
- Step 1: Come to a tabletop position, shoulders over wrists and hips over the knees. You can curl or uncurl the toes.
- Step 2: Walk both hands in front of you a few inches. Exhale, shifting your hips back so that they stay directly over the knees. Fingers spread wide, grip the mat.
- Step 3: Press your chest toward the ground, both arms active. Ears come in line with biceps, and elbows stay off of the ground.
- Step 4: Breathe as you draw your hips toward your heels and stretch through the chest and arms.
- Step 5: To come out, slowly walk both hands toward you as you lift back up to a neutral tabletop.
Variations: Use a blanket underneath the knees if they feel uncomfortable. Rest the forehead on a block or folded blanket to bring the intensity down or aid if you cannot bring the forehead to the ground.
Benefits: This yoga pose increases flexibility in the shoulders, stretches the spine, opens the chest and breath, and promotes introspection. During pregnancy, all the extra weight in the front side of the body causes your shoulders to round and posture suffers, making for aches and pains. Puppy pose helps relieve the tension building in those areas and makes it easier to breathe.
Pro Tips for Yoga Teachers & Yogis:
- Place the elbows on blocks to make more room for your belly, clasping the hands above your head to deepen the stretch across your chest and shoulders.
- Extend one leg out to the side to add some challenge and hip opening to this posture.
8. Boat Pose (Navasana)
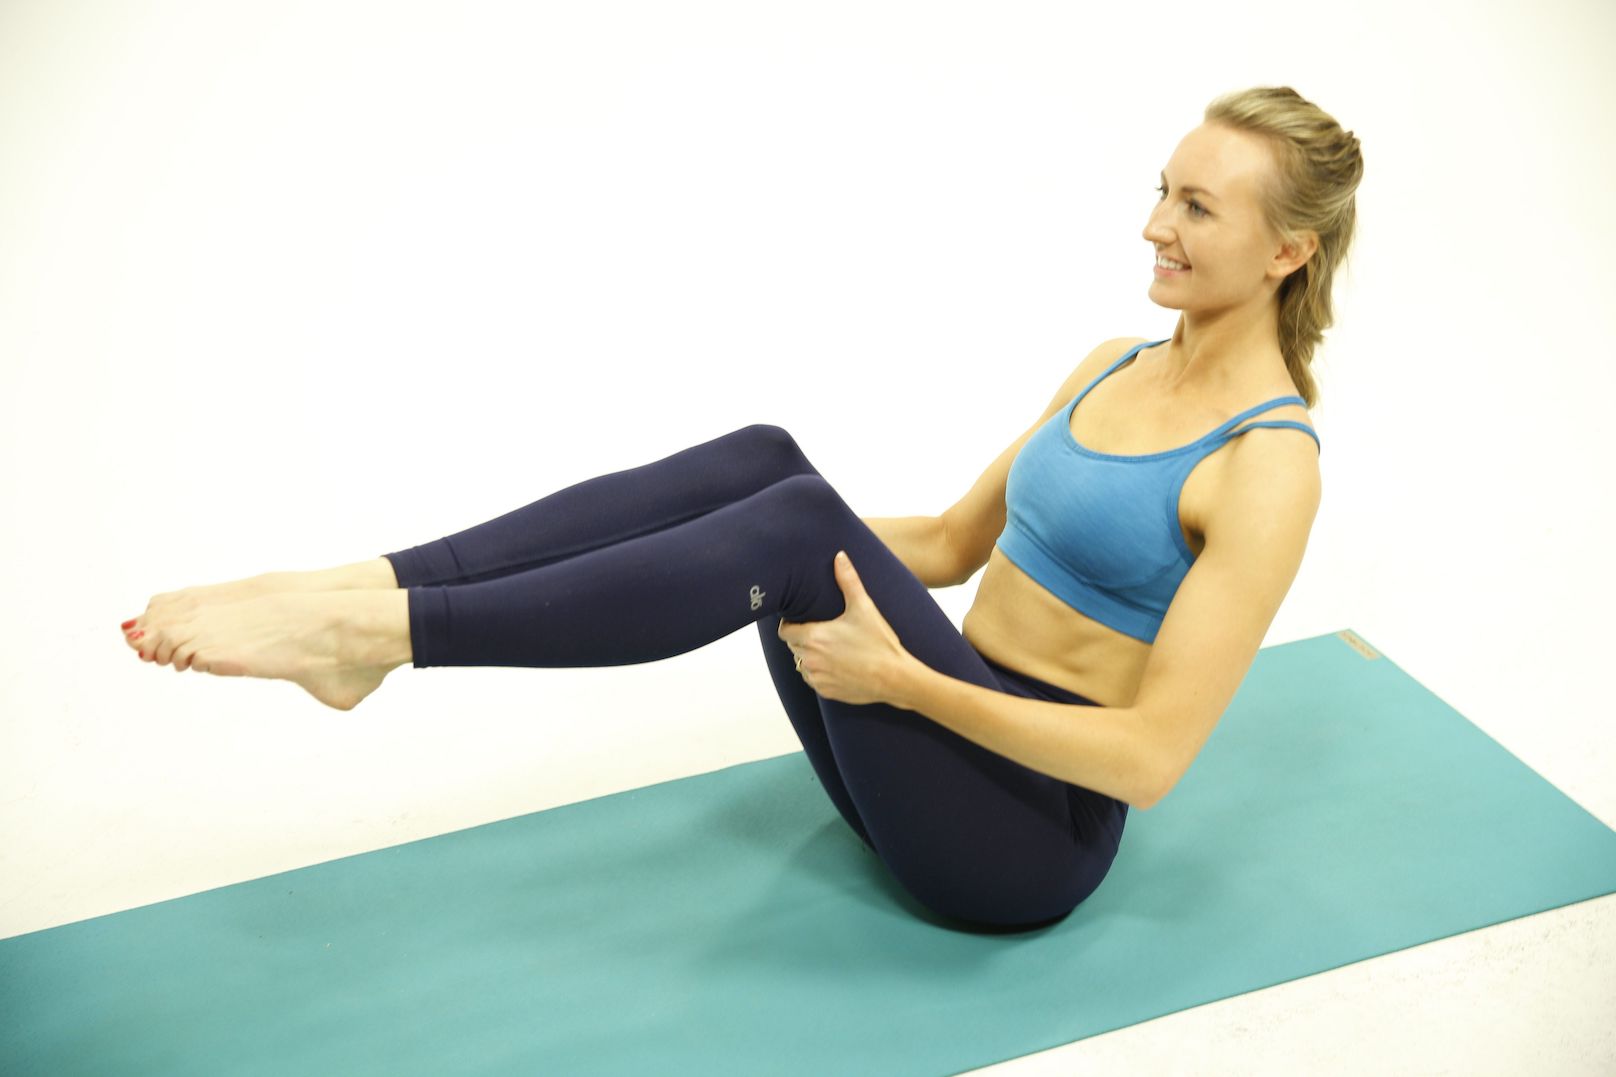
- Step 1: From seated, bring the soles of your feet to your yoga mat and grip the backs of the thighs.
- Step 2: Inhale, lengthening through the crown of the head to create a long spine.
- Step 3: Exhale, pull your belly up and in as you lean back on the sits bones.
- Step 4: When ready, engage your quadriceps and lift the feet off the mat as a single package. Hold here or opt to take the arms out straight. Keep the spine long.
- Step 5: Bring the soles of the feet back to the mat and come back to seated.
Variations: You can keep the hands on the back of the thighs for support or keep one foot down and only lift one at a time. For more advanced movement, take the legs out straight creating a “V” shape.
Benefits: Boat pose warms the abdominal wall and strengthens the entire core. It requires focus on your movement and breath which increases mindfulness and reduces stress. Weak pelvic floor muscles can lead to pelvic pain, making this a great option for reducing pelvic pain for women and strengthening those muscles in preparation for childbirth.
Pro Tips for Yoga Teachers & Yogis:
- Incorporate the chakras into your practice. Boat pose works with the solar plexus. Add in some chakra affirmations and learn more about them here.
- Keep the feet on the mat and play with the distance they are from your seat to make this more or less challenging, make sure to press down through the big toe.
9. Corpse Pose (Savasana) – During Pregnancy

- Step 1: Come to lie on your left side. Rest the head on your left arm or a blanket/cushion, right arm relaxes along your side. Place a cushion between the knees or inner thighs to support your hips. Close your eyes, relax your whole body, and breathe.
- Step 2: To release the pose, make small movements in the hands and feet then the rest of the body. Press through the arms to bring yourself back to a seated position.
Variations: Get as comfortable as possible. Cover up with a blanket, put sandbags on your hips, or a mask over your eyes. Mmmm it’ll be so good.
Benefits: Savasana triggers a relaxation response throughout the entire body, helps blood circulation, and releases tension, which is definitely reaching its peak in the third trimester!
Pro Tips for Yoga Teachers & Yogis:
- Start class with a savasana instead of ending with one and make it extra long (like at least 15 minutes). This is a great way to relax the body as doing more restorative postures in the third trimester feels fabulous for you and your baby!
- Turn this into a Yoga Nidra practice. Checking in with your body is the greatest thing to do for yourself and your baby. If you aren’t sure where to start, I have a Yoga Nidra course that is life-changing.
Want to learn more about how birth unfolded for me? Watch my full home birth story here:
Don’t stop practicing prenatal yoga after the baby has arrived. Postnatal care is just as important as prenatal care and these prenatal yoga poses can help you postnatally too. Keep up your yoga and self-care practices. And if you need a little help and accountability for that, My Yoga for Self Mastery course is perfect and I welcome you to it with open arms!
Congratulations on the newest addition to your family!
Next Steps
- Visit my Free Pregnant Yogini Resource Center for guided meditations, practice, and resources for a healthy and peaceful pregnancy!
- Check out my Prenatal Yoga Playlist on my YouTube channel and find some yoga classes that you can try out for yourself!
- Join Uplifted for exclusive content that you can access right from the app. Take a deep dive into your practice with me this year!

YOU MIGHT ALSO LIKE
- The Best Kundalini Yoga for Pregnancy: How to Practice Safely
- Yoga For Third Trimester: My Favorite Poses
- Home Birth vs Hospital Birth: Which is More Yogic?
- 9 Yoga Modifications for Pregnancy and How to Teach Them
- How To Relieve Pelvic Girdle Pain During Pregnancy
- What To Consider When Taking a YTT While Pregnant
- My Guided Pregnancy Meditation To De-Stress & Connect With Your Baby [VIDEO]
- 6 Natural Ways to Prepare Your Body For an Easy Labor & Delivery
- 6 Crazy Easy Pregnancy Meditation Tips For A Powerful Practice
- Six Essential Prenatal Yoga Poses for a Powerful Birth
Access my Ultimate Yogini Resource Center for mamas manifesting an empowering, natural childbirth. IT'S FREE!