Neck pain is one of the most common types of pain in the age of smartphones and desk jobs.
The extra strain on the neck muscles often results in headaches as the neck connects the brain to the rest of the body through the spine.
Due to the presence of the important nerves around the neck region, a lot of control and sensation in the rest of the body gets affected when the neck is in pain.
So what can we do about it?
Yoga for the neck, proper alignment, and stretches are extremely important to maintaining a healthy and pain-free neck.
The best part?
Just a few minutes a day can go a long way in alleviating pain.
Which Types of Yoga Are Best For Neck Pain?
Yoga for neck pain is a great way to alleviate pain due to its focus on flexibility and strength. The neck is a delicate part of the body so we must avoid very rapid movements in this region. We should also avoid heavy weightlifting in case of neck pain. Therefore slower forms of yoga may be a better option to relieve neck pain. Try these types of yoga for neck pain:
- Yin Yoga: This type of yoga practice helps release muscle stiffness while ensuring there is no excess tension being added to the neck during the practice due to the use of supporting props for yoga poses. The strong emphasis on breath may help with pain management.
- Restorative Yoga: This type of yoga helps in relaxing the surrounding muscles around the upper back, shoulders and neck, which can help in avoiding future neck injury.
- Traditional Hatha Yoga: In traditional Hatha yoga we hold yoga poses to gain strength and awareness in all the muscles involved in a yoga pose, therefore this type of yoga practice can be very beneficial in not just alleviating pain but also to avoid future injury and poor posture.
7 Best Yoga Poses For Neck Pain
1. Easy Seated Pose – Sukhasana
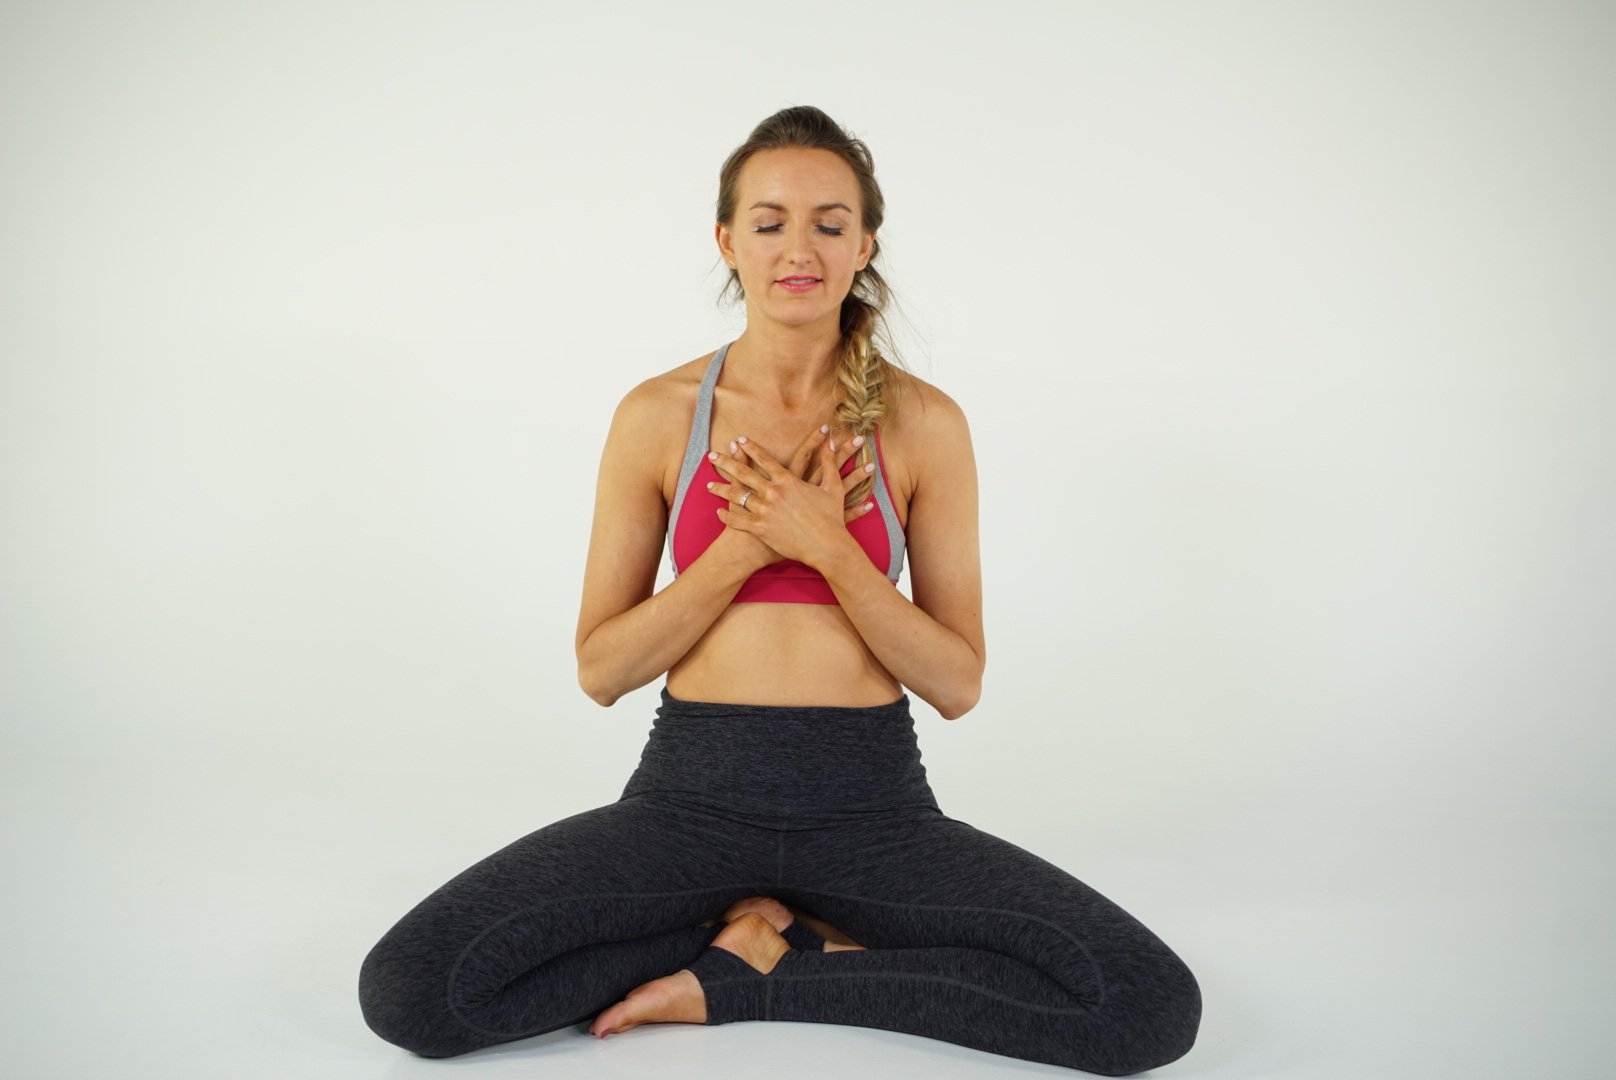
- Step 1: Sit on the yoga mat with legs stretched out and the spine upright in Dandasana. Try to align the back of the head, neck and shoulders with the base of the spine to ensure straight posture.
- Step 2: Inhale, fold the left knee bringing the left foot under the opposite knee
- Step 3: Exhale and fold the other leg bringing the right foot to the opposite side.
- Step 4: Place the hands on the corresponding knees or on the lap.
- Step 5: Stay here with the eyes closed focussing on slow steady breaths
- Step 6: Slowly exhale and extend the legs forward in Dandasana and relax
Variations: In case it is hard to sit upright in this position, get a few cushions to sit on. While you practice this yoga pose, you can move the neck gently in different directions without risking misalignment.
Benefits: This yoga pose is great to release tension from the neck, back and shoulders. It helps in increasing awareness of the body’s posture and keeps the spine in an ideal position. Additionally, it calms the mind and helps with pain management.
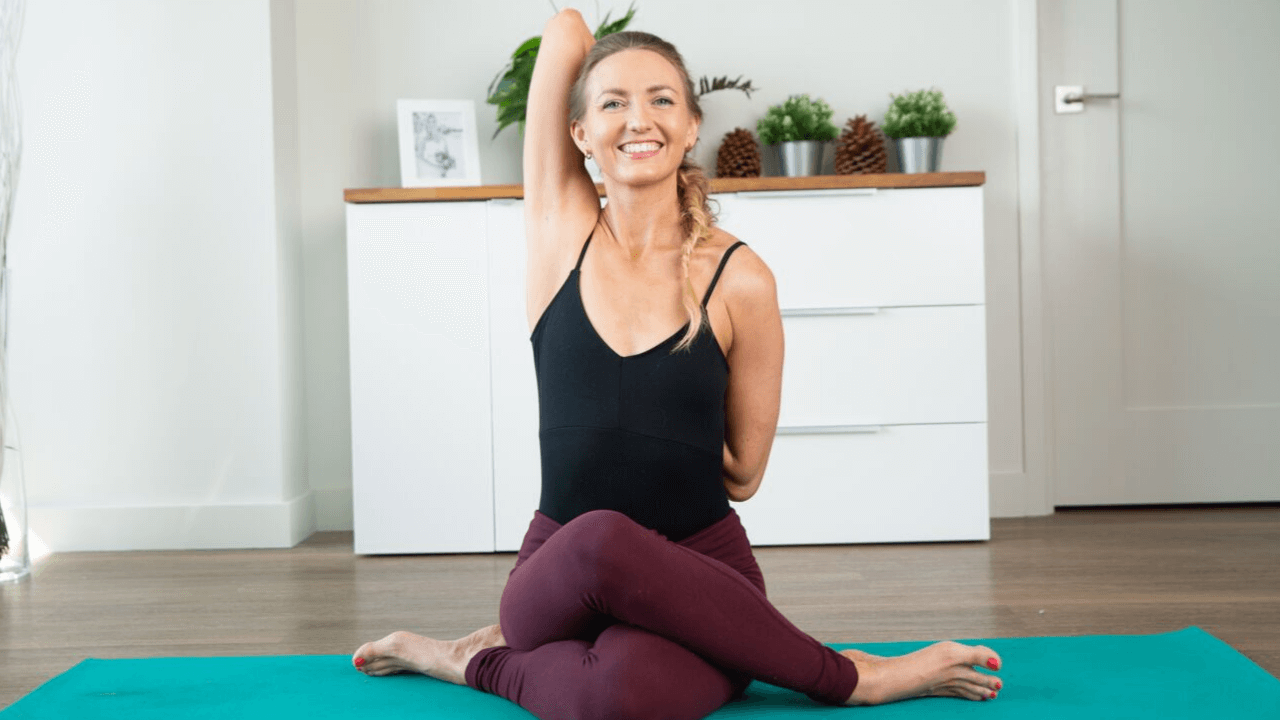
2. Cow Face Pose – Gomukhasana
- Step 1: Sit on the yoga mat with legs stretched out and the spine upright in Dandasana
- Step 2: Cross the right leg over the left thigh and rest the right foot on the mat next to the left hips
- Step 3: Bend the left leg and place the left foot on the mat next to the right hips
- Step 4: Lift the left hand up and then bend the left elbow placing the palm on the upper back
- Step 5: Stretch the right hand to the side and bend the elbow to wrap around the back. Try to clasp both the palms at the back
- Step 7: Tuck your chin to ensure the back is straight. Hold the pose for at least 30 seconds. To release, slowly reverse the process – first release the arms; then feet .
Variation: Incase one hip lifts up, use a thin blanket under the sit bone. If you can’t clasp your hands, get a strap or towel to help.
Benefits: This pose is excellent for increasing range of motion of the muscles surrounding the neck, shoulders and upper back. Apart from that, it also stretches the arms, ankles, hips and chest.
3. Thread The Needle Pose – Urdhva Mukha Pasasana
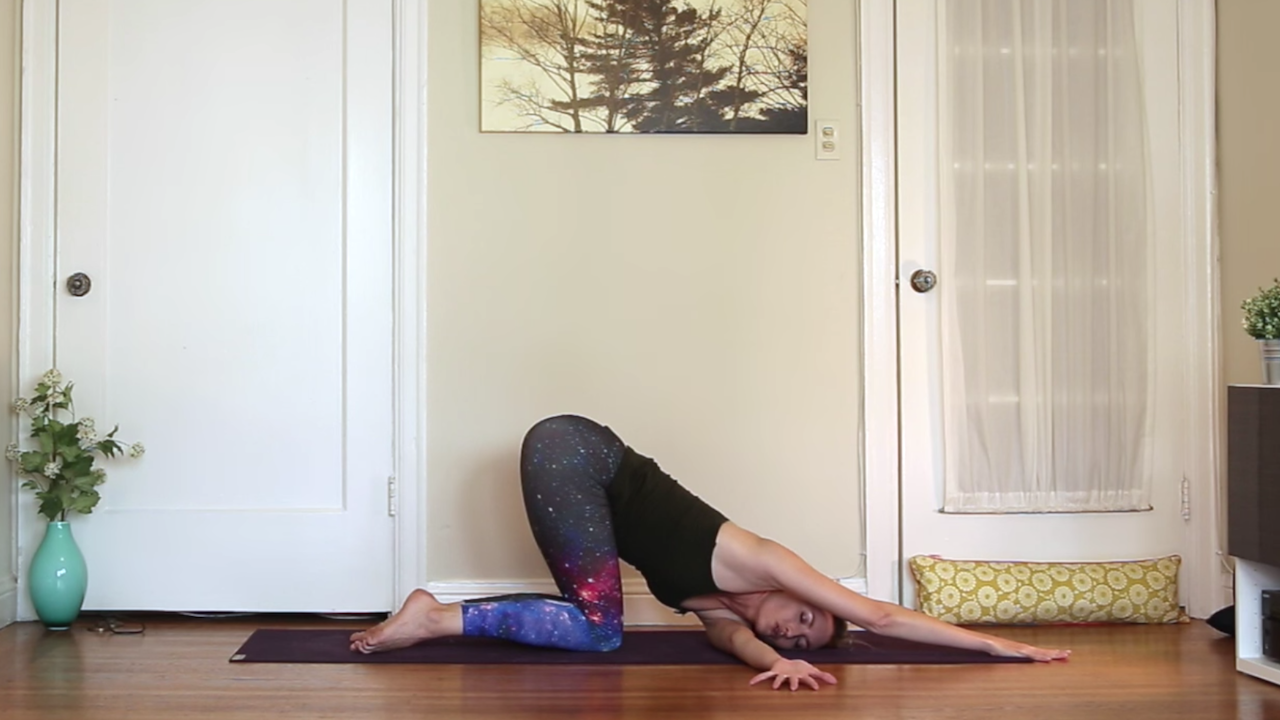
- Step 1: Start in tabletop position with shoulders over the hands and hips above the knees
- Step 2: Inhale and open out the chest to the right; lift the right arm up to point the right fingertips up.
- Step 3: Exhale and turn the body towards the ground. Slide the right arm underneath the left armpit, palm facing upwards. Rest the right shoulder on the floor. Turn the head to look towards the left side, rest the right ear on the floor.
- Step 4: Push the mat with the left palm and try to pull the chest away from the floor. This helps to get a deeper twist while taking the pressure off the neck.
- Step 5: You may hold the pose for at least 3-5 breaths.
- Step 6: To come out of the pose, inhale and press with the left palm and release the head and shoulders. Raise the right arm back towards the ceiling for a counter twist and then return to tabletop position.
- Step 7: Repeat on the other side.
Variations: Incase the yoga pose isn’t comfortable, keep a cushion or block under the head. Incase of knee pain, tuck the toes under.
Benefits: This pose with its variations help relieve the tension in the neck and shoulders. It also helps increase range of motion. Twists help to wring out the internal organs ridding the body of toxins and encourage better digestion.

4. Half Lord of The Fish Pose – Ardha Matsyendrasana
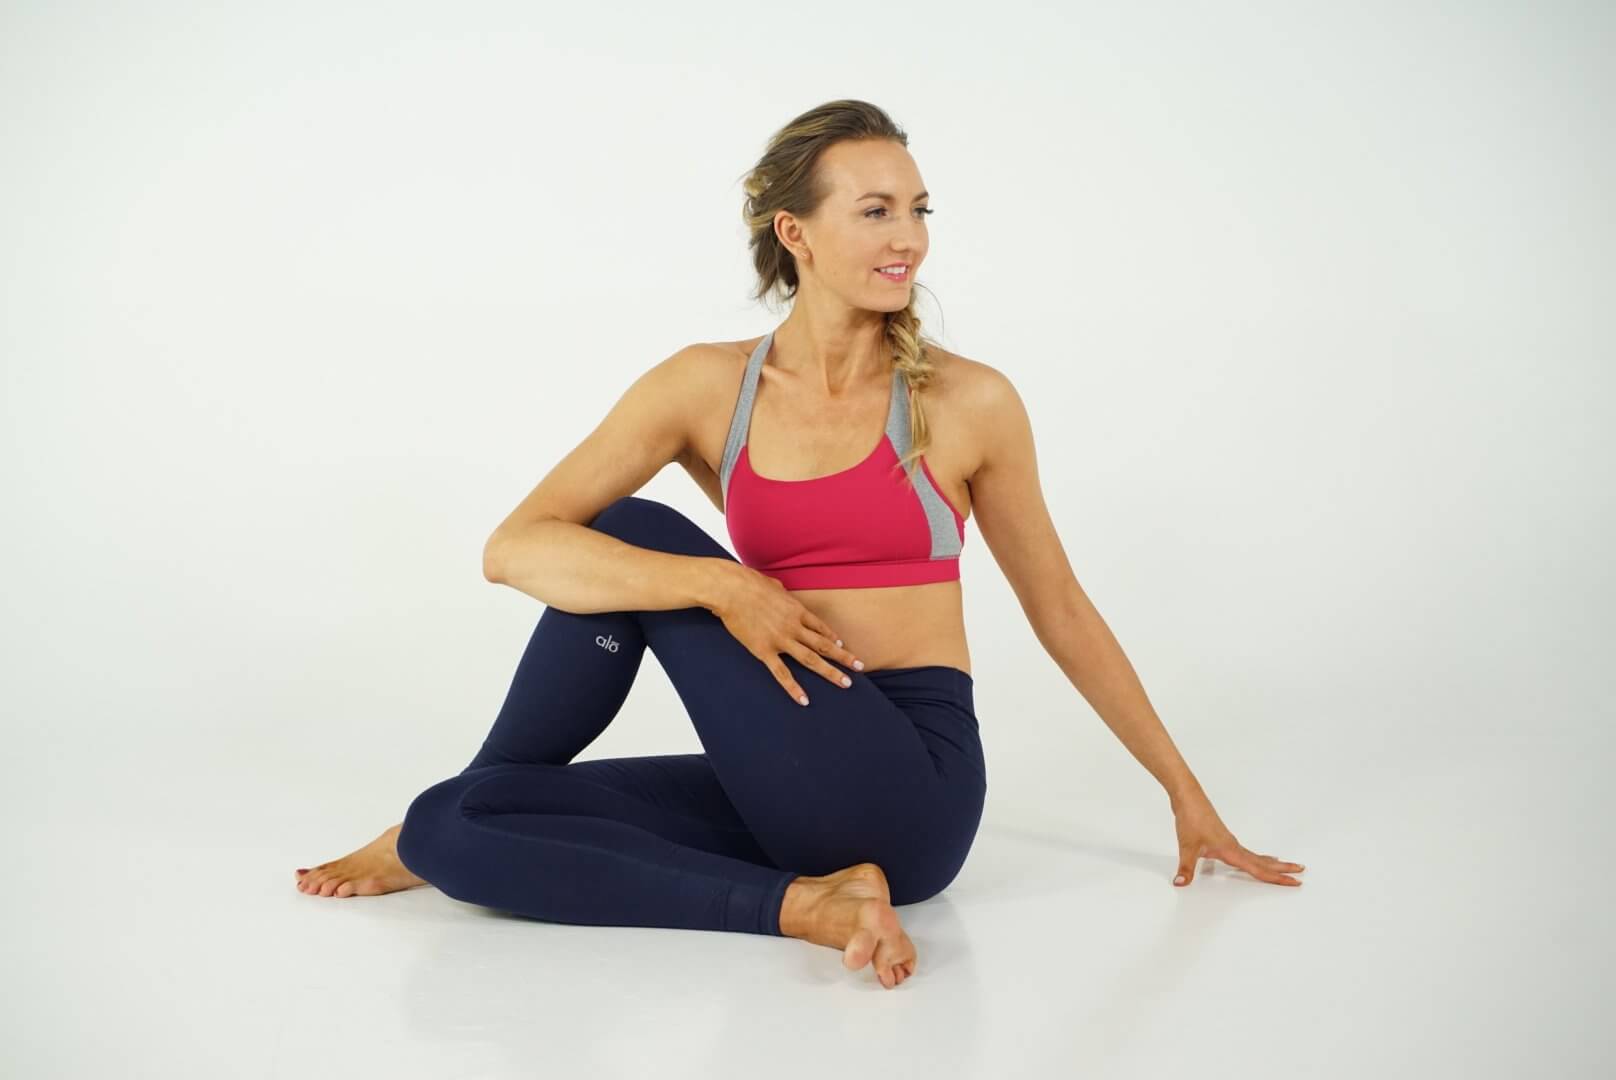
- Step 1: Start in Dandasana. Fold the right leg to bring over the left thigh; keep the right foot flat on the outside of the left knee or in front of it.
- Step 2: Fold the left knee and keep the outer edge of the foot next to the right hip.
- Step 3: Place the right palm next to the right hip. Inhale and extend the left arm up, then maintaining length of the spine, exhale to twist to bring the left elbow to the outside of the right knee.
- Step 4: Hold the right ankle with the left hand and push the chest forward – this stretches the back. Try not to round the lower back.
- Step 5: Take a few deep breaths and release the twist on the exhalation first, then release the left leg, then right. Repeat on the other side.
Variation: Incase you can’t hold on to the ankle, bend the elbow and keep it against the knee. In case of lopsided hips, use a thin blanket. Keep the chin, head and shoulder free
Benefits: This pose tones the spinal nerves, stretches the neck and back muscles while contracting the abdominal muscles thus helping with neck pain. Also helpful for those suffering from respiratory ailments. The twist massages the front of the abdomen and stimulates the liver, pancreas and kidneys.
5. Sphinx Pose – Salamba Bhujangasana
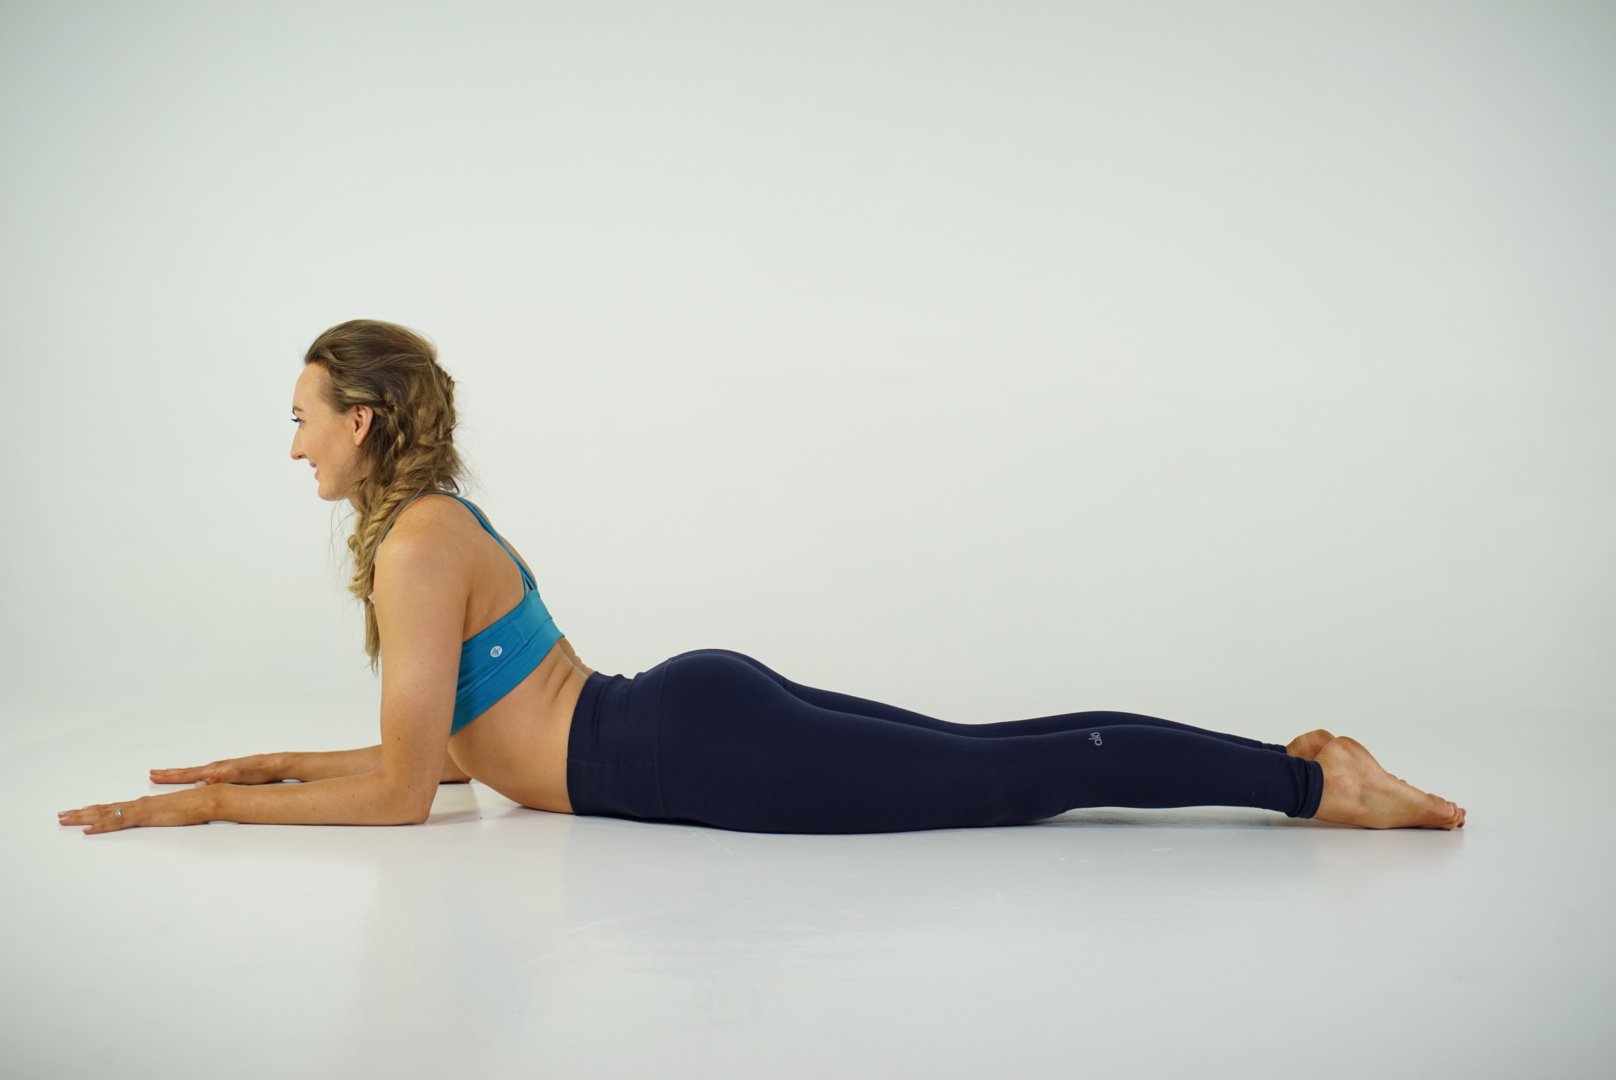
- Step 1: Start on your stomach with your top of the feet on the floor, hip distance apart and forehead on the ground.
- Step 2: Lift the upper body. Place your forearms to the front, shoulder distance apart and parallel to each other. Free up the shoulder away from the ears.
- Step 3: Inhale and lift the head up. Tuck your chin slightly to ensure the back of the neck is long and shoulders relaxed.
- Step 4: Pull the centre of the chest forward while keeping the lower body engaged. Take a few deep relaxing breaths here.
- Step 5: Exhale to gently bring down your abdomen, chest and head back to the floor.
Variations: In case your shoulders hurt, use a cushion under the chest for added support.
Benefits: This is one of the most relaxing poses for the back and neck. This pose helps maintain the alignment of the neck while strengthening the spine. It also stimulates the abdominal organs and expands the chest and shoulders.
6. Standing Forward Bend – Uttanasana
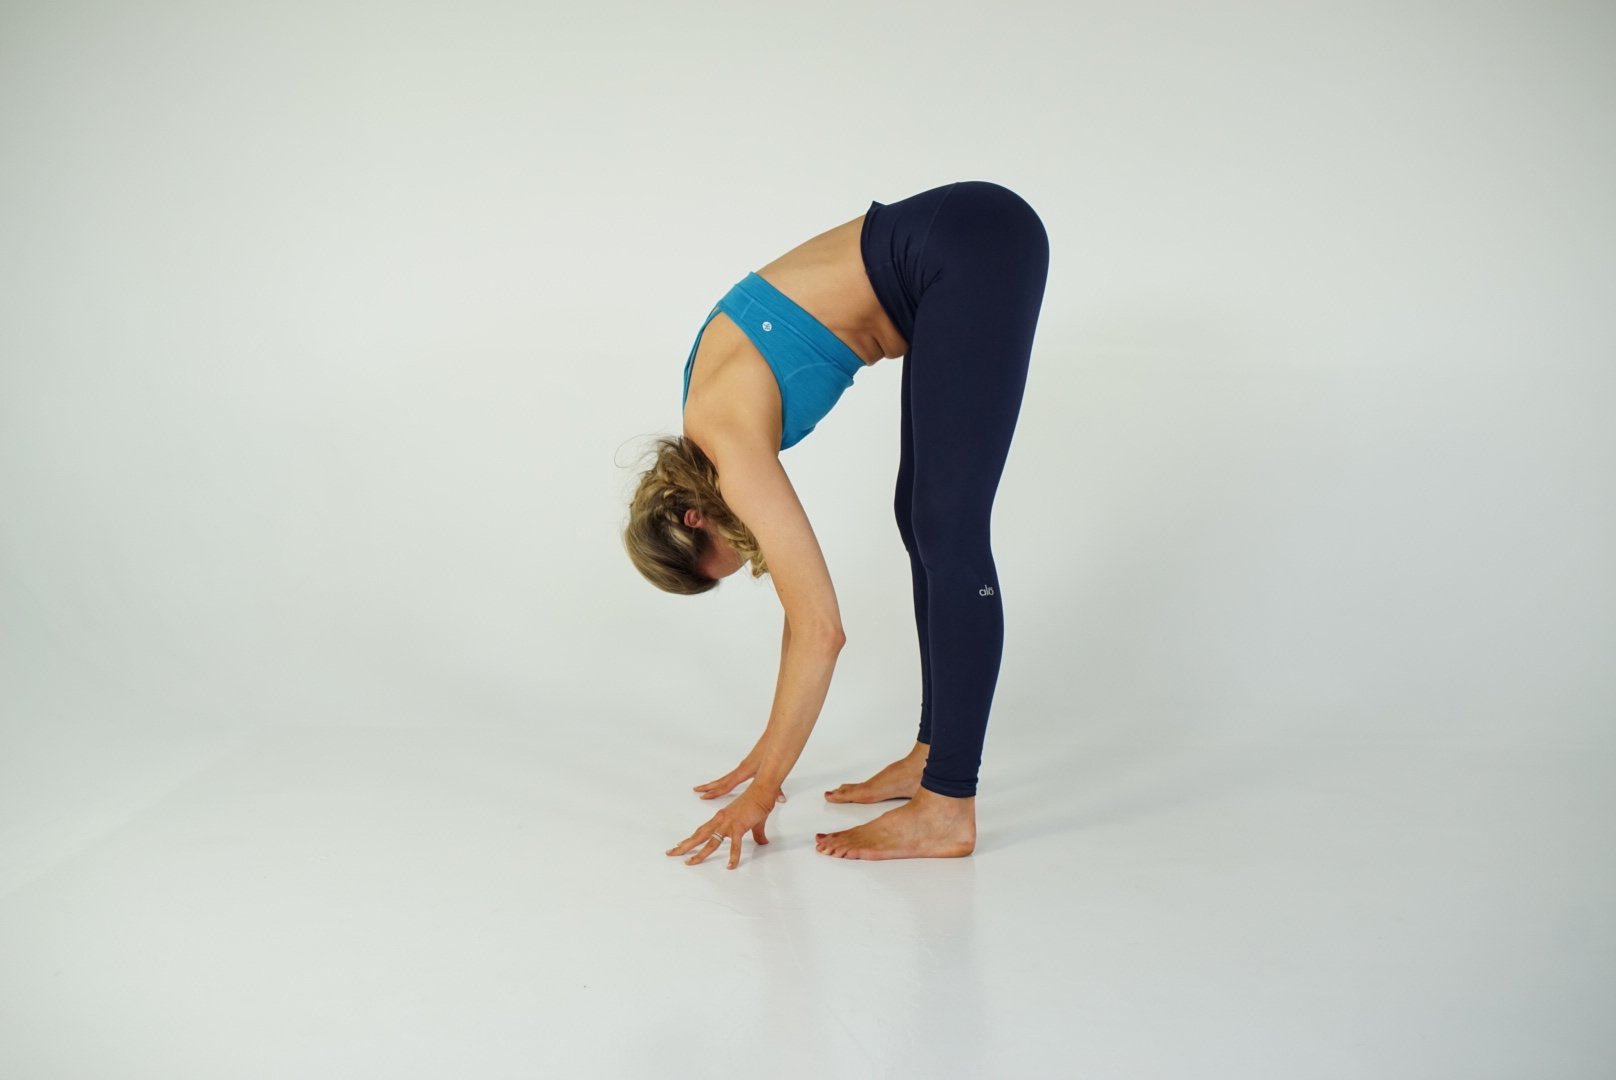
- Step 1: Start standing in Mountain pose.
- Step 2: Inhale and reach the arms up, then exhale to fold forward hinging from the hips.
- Step 3: Place the palms on the floor and keep the knees straight with a slight micro-bend. Avoid locking the knees. Press firmly into the feet.
- Step 4: Take a few relaxing breaths here and let the head, shoulders and arms fully relax so the neck can decompress.
- Step 5: Inhale to come back up.
Variations: Incase the hands don’t reach the floor, bend the knees bringing the ribcage to the thigh. This ensures length in the lower back.
Benefits: This pose helps to decompress the neck with the help of gravity. Also great for stretching the muscles around the lower back and back of the legs. The forward fold position enhances blood circulation, especially in the head region, thus calming the mind.
7. Extended Triangle pose – Trikonasana
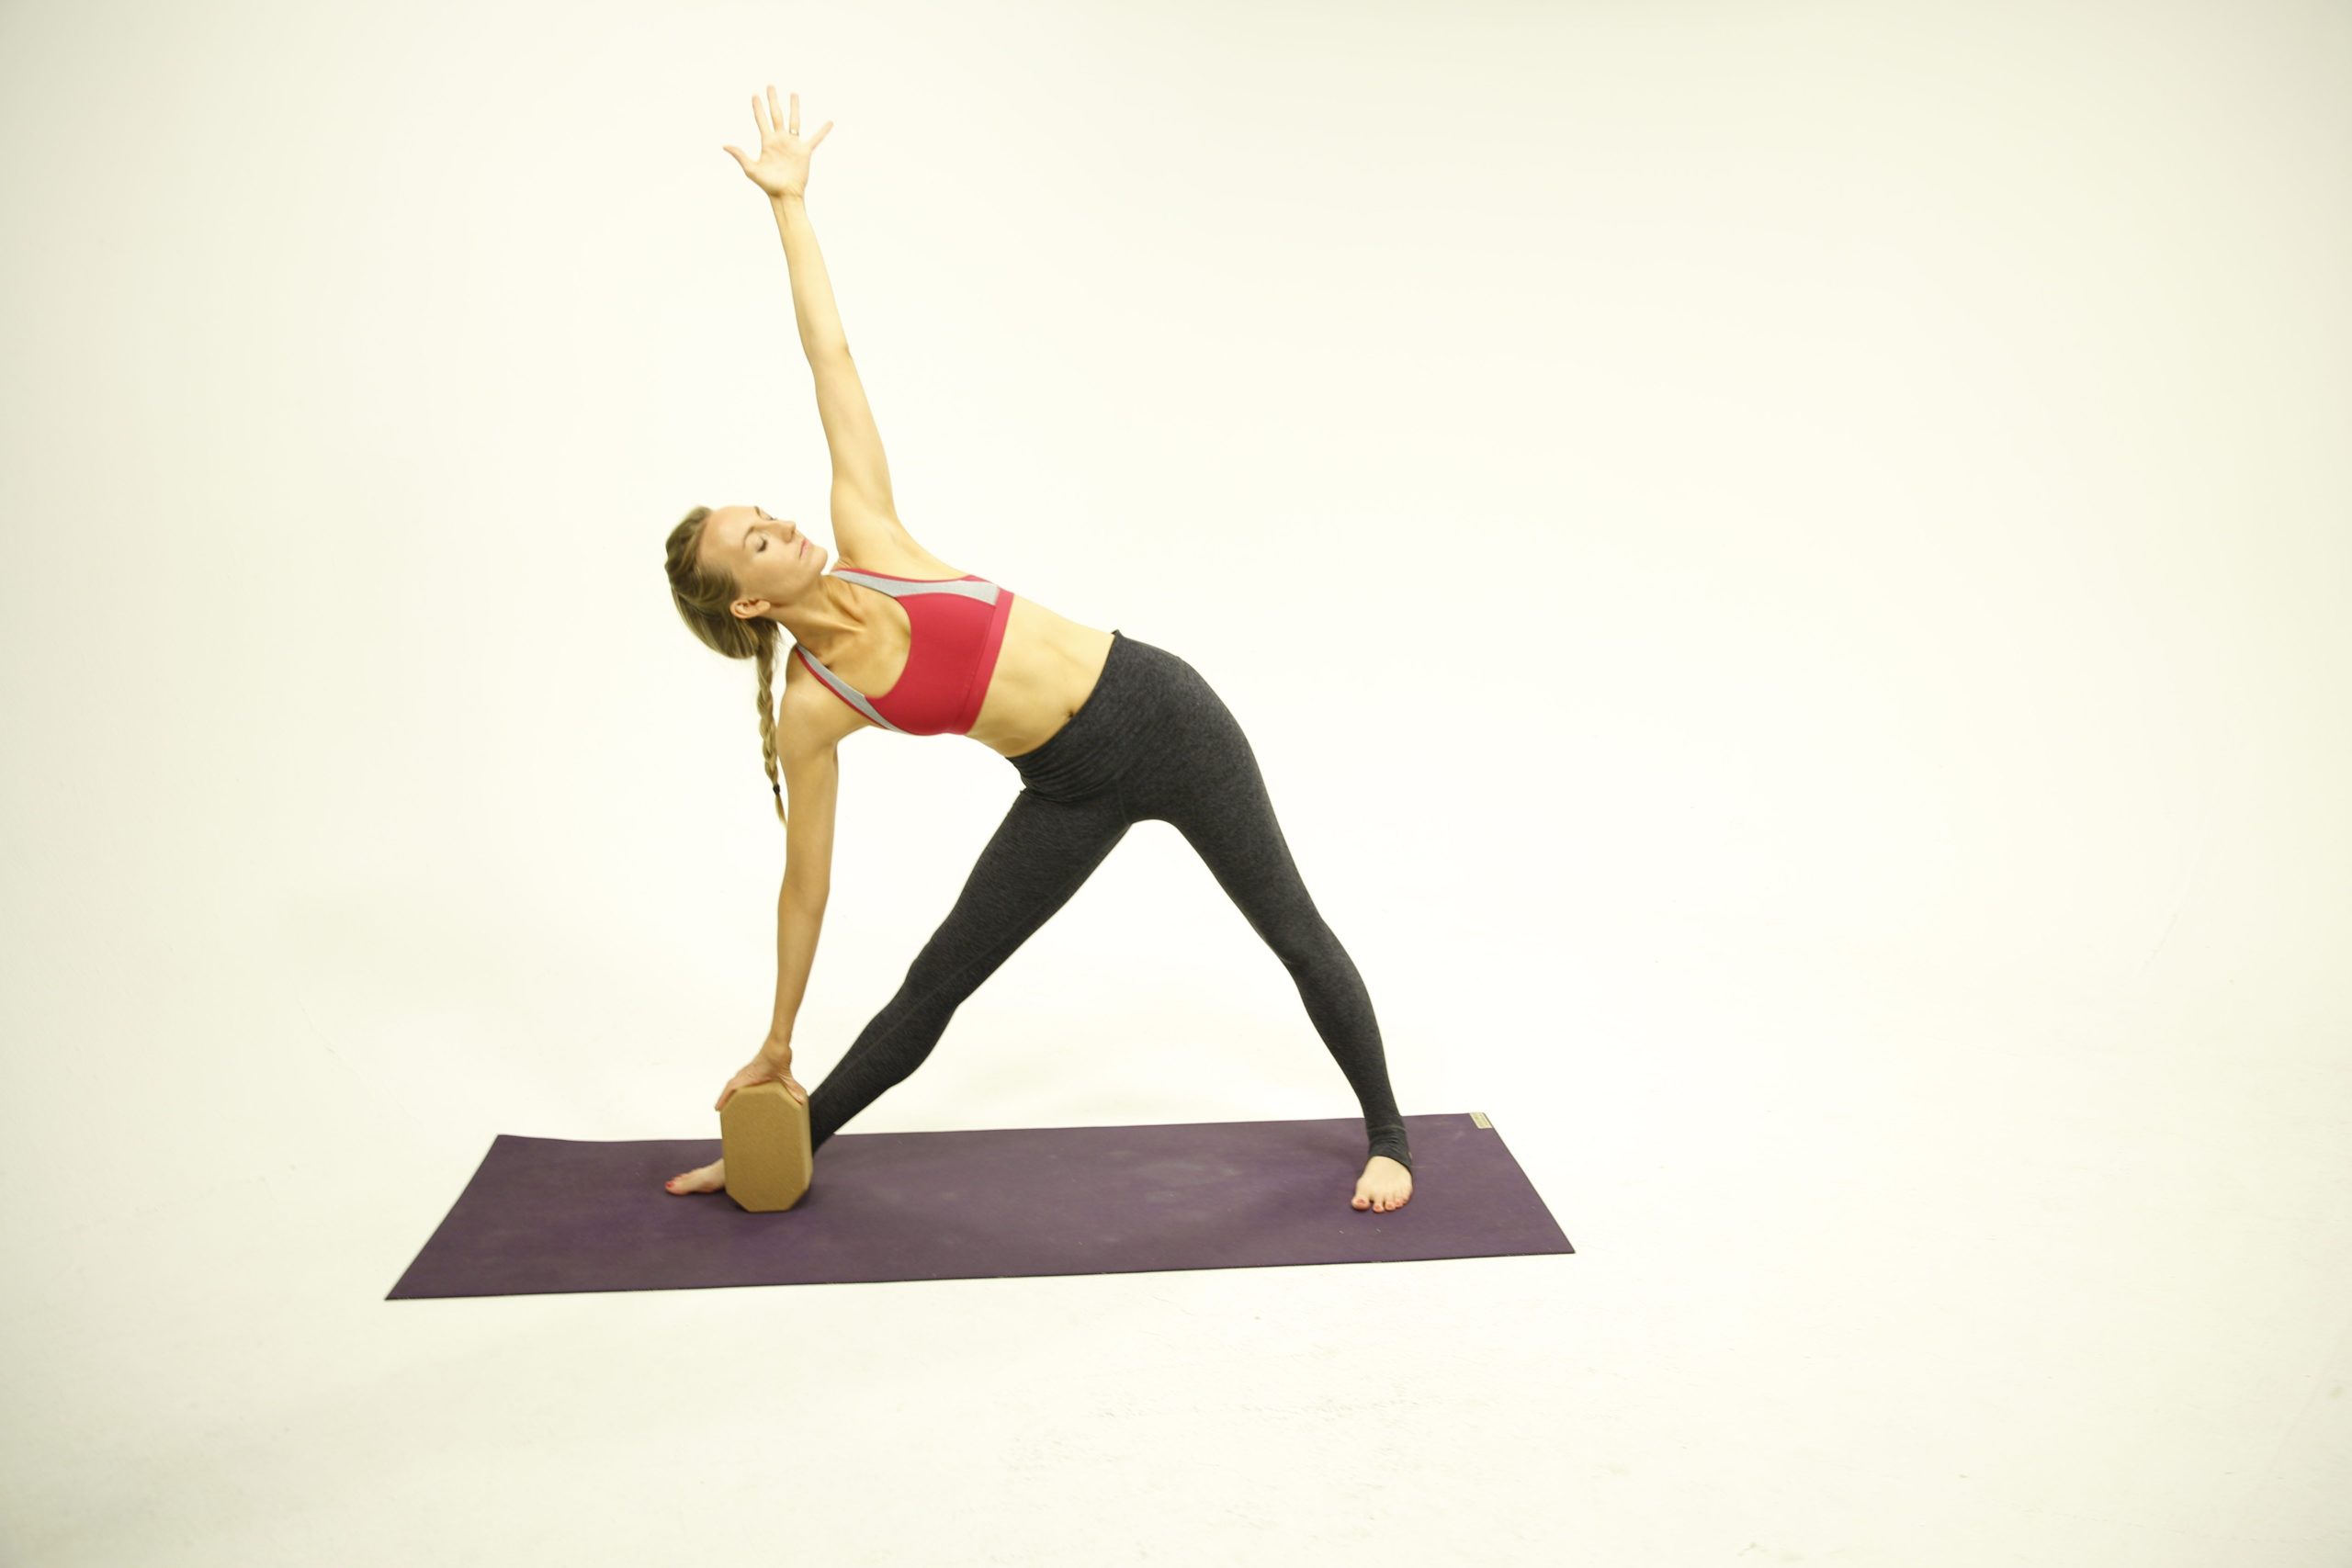
- Step 1: Start in a standing position with the legs apart, wider than the hips. Extend the arms out, palms facing down till they are parallel to the floor.
- Step 2: Turn the right foot toward the right side, ensuring that the heel of the right foot is in line with the centre of the left foot.
- Step 3: Inhale to reach the right arm out toward the side.
- Step 4: Exhale to bring the right palm towards the floor, in front of the leg. You can place the arm on the ankle or shin. Extend the left arm up and turn the head to look towards the left arm.
- Step 5: Take a few breaths here. To come out of this inhale to come up. Repeat on the other side.
Variations: Incase the arm doesn’t reach your leg, use a yoga block.
Benefits: This is one of the best poses to assess the strength of the neck muscles. It also helps to strengthen the legs while lengthening the side body. This pose is great for neck pain and back pain.
Next Steps
- If you’re interested in practical kriya yoga as a way to improve your daily life and relationships, check out my Yoga for Self Mastery course.
- Order my Yoga Life book for a practical guide to creating balance in your life through yoga.
- Check out my YouTube channel and find some yoga classes that you can try out for yourself!
Learn how to do 11 of the most popular yoga poses correctly. Free video + PDF download.
Find more yoga sequences by benefit.
YOU MIGHT ALSO LIKE
- How to Teach Somatic Yoga: A Practical Guide for Instructors
- The Best Somatic Exercises for Grief: Find Healing Through Movement
- The Best Somatic Exercises for Anger Management and Emotional Release
- Authentic Pathways: Connecting With Higher Self for Inner Peace
- Yoga to Reconnect with Yourself: 5 Essential Practices for Inner Peace
- Yoga for Connection: 10 Poses to Deepen Relationships and Bonding
- Yoga To Connect With Your Body For Mind-Body Harmony
- Yoga to Connect with Feminine Energy: 5 Transformative Practices
- Yoga to Connect with Your Heart: 3 Poses for Emotional Balance
- Myofascial Release Yoga: Unlock Tension and Improve Flexibility
- 6 Hip Openers For Emotional Release
- Office Yoga: 10 Poses You Can Do Right Now
- Ayurveda Food Combining: The Key to Balanced Digestion
- Yoga For Grief: 8 Yoga Poses For Support
- Yoga for Vata Dosha: Practice Poses and Tips
Learn how to do 11 of the most popular yoga poses correctly. Free video + PDF download.

