The upper back is directly affected by screen time and bad posture. With the current work-from-home situation plaguing the world, not many of us have been able to use correct work chairs to facilitate good posture.
This results in back pain and upper and lower back weakness. In fact, upper back pain has become increasingly common even in school children as they are expected to sit at a desk for most of the day.
And yoga is a great way to tackle the stiffness that comes with upper back pain.
Even 5 minutes of yoga every day can greatly help in alleviating upper and lower back pain. If you can work these yoga postures into your daily routine, you’ll help alleviate the tension that contributes to upper back pain.
What Types of Yoga Are Best for Upper Back Pain
Upper back pain or any sort of back pain for that matter can be managed through mindful movement-based practices. This means both slow and faster forms of back pain yoga will help relieve upper back pain. Some of the best types of yoga for upper back pain are:
- Hatha Yoga: This form of yoga can help you to understand the basics of yoga poses. This means in this type of yoga there is a strong emphasis on the structured way to bring yourself into and out of a pose. This really helps with ensuring spine health and alignment while practicing yoga. Since Hatha Yoga requires you to hold a yoga pose, it also helps with strengthening the upper body and back.
- Yin Yoga: One must hold the poses and slow the breath down in this type of yoga, thus it can help manage pain as well as release tension. Yoga poses like thread the needle pose or puppy pose in yin yoga can help reduce tension in the upper body as well as provide pain relief.
- Vinyasa Flow: A steady and effective Vinyasa flow practice involves moving the spine in all 6 directions which is very helpful in case of upper back pain.
7 Best Yoga Poses For Upper Back Pain
Here are 7 poses you can include in your exercise program, that will help you to release the upper back, shoulders chest and alleviate pain:
1. Cat Cow Stretch – Marjaryasana Bitilasana
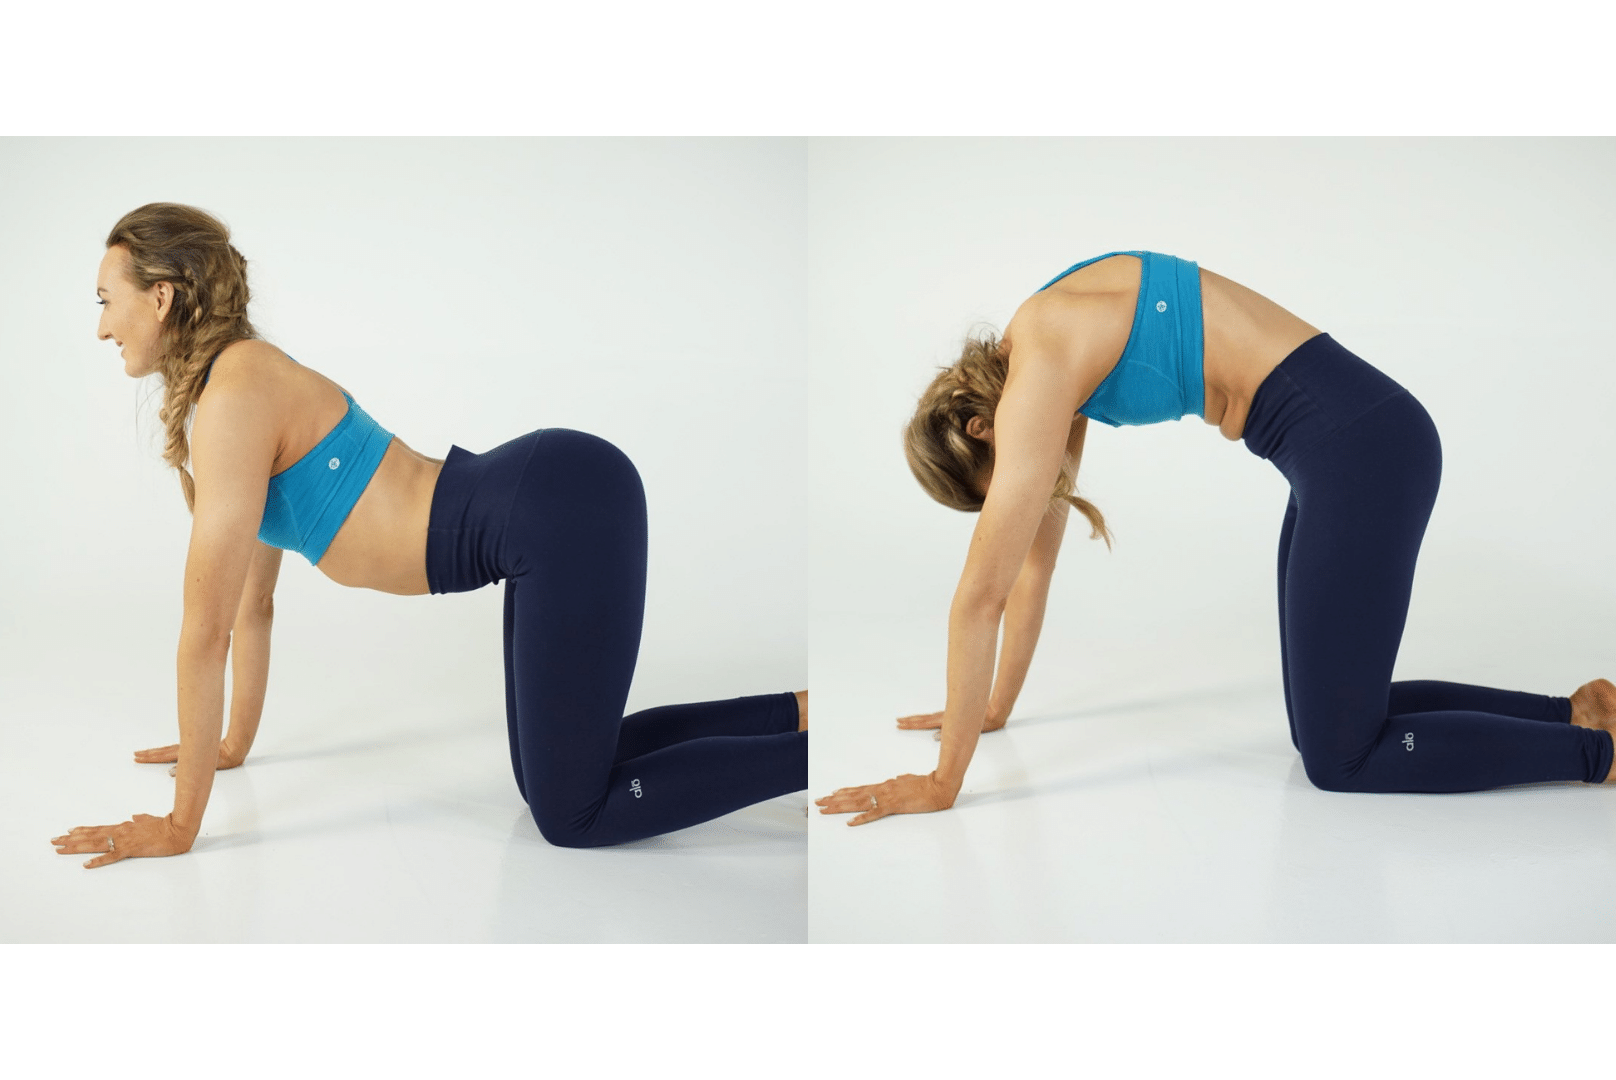
- Step 1: Start in tabletop position. Get the hands under the shoulders and knees under hips. Keep the spine neutral
- Step 2: Inhale to drop the belly down and arch the back for cow pose, lift the chin up. Pull the chest forward
- Step 3: Exhale to round the back and push into the earth with palms for cat pose, rounding the upper back
- Step 4: Repeat a few times and then return to tabletop position
Variations: Incase the knees hurt, please use a blanket under the knees. You can also combine this with thread the needle pose to add a twist in your practice to open the back and shoulders. This is a great pose to take before puppy pose to stretch the back.
Benefits: A combination of two of the best yoga poses for the spine – Cat and Cow pose, it opens up the whole spine while strengthening the arms and shoulders. It’s also great to tackle stress and can be successfully used to help with hypertension and insomnia.
2. Child’s Pose – Balasana
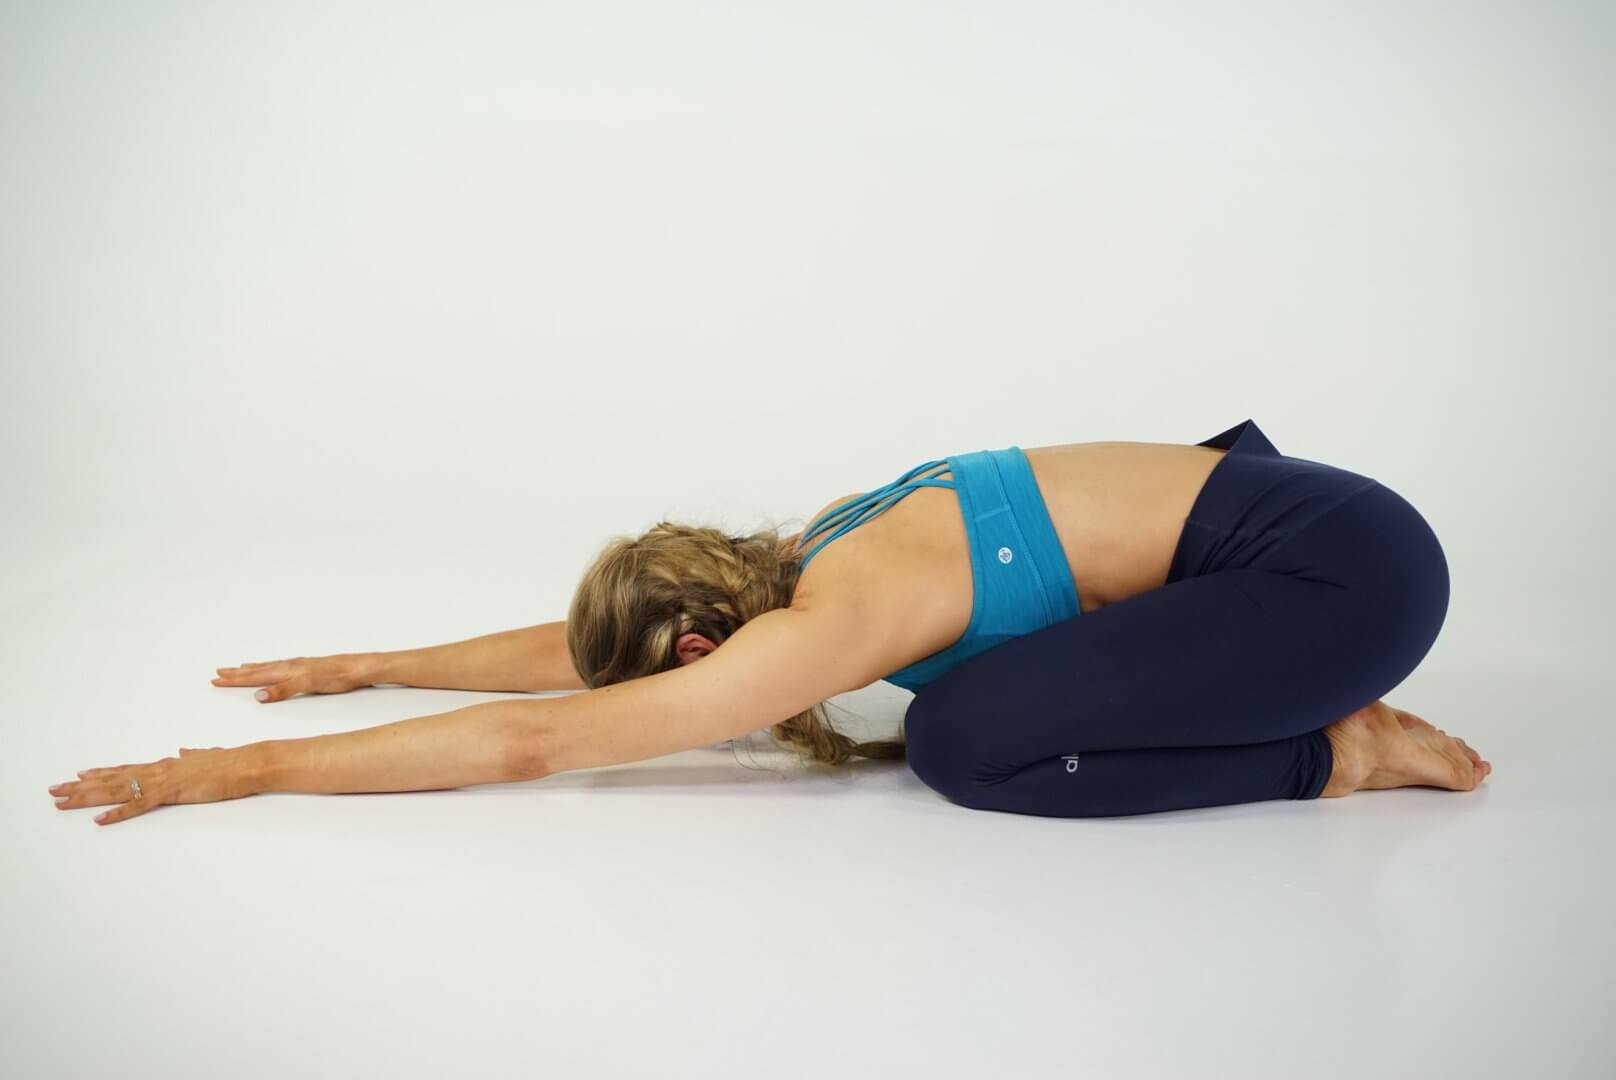
- Step 1: Start in sitting pose – Vajrasana, with big toes together and knees hip-distance apart
- Step 2: Exhale to fold forward hinging from the hips. Extend the arms forward. Ensure the hips remain on the heels.
- Step 3: Let the upper body rest on the knees and get the elbows to relax on the mat. Let the arms and the whole body relax on the floor with palms facing down
- Step 4: Stay here for a few slow breaths. To come out inhale and lift back up
Variations: In case of extreme upper back pain, walk your hands by the side of the hips and place a block under the head to rest the forehead. You can also widen the distance between the two knees and take a wide-legged child’s pose variation to relieve the lower back. In case of discomfort around the knees, place a folded blanket between your back thighs and calves. In case the feet hurt, place a blanket under the feet.
Benefits: This pose helps to stretch the hips, thighs, and ankles while relieving back and neck pain when practiced with head and torso supported. It is also beneficial to alleviate stress and fatigue by calming the mind. The pose mimics fetal position which is extremely relaxing for the whole body as it is the most natural position for the spine.
3. Baby Cobra Pose – Bhujangasana
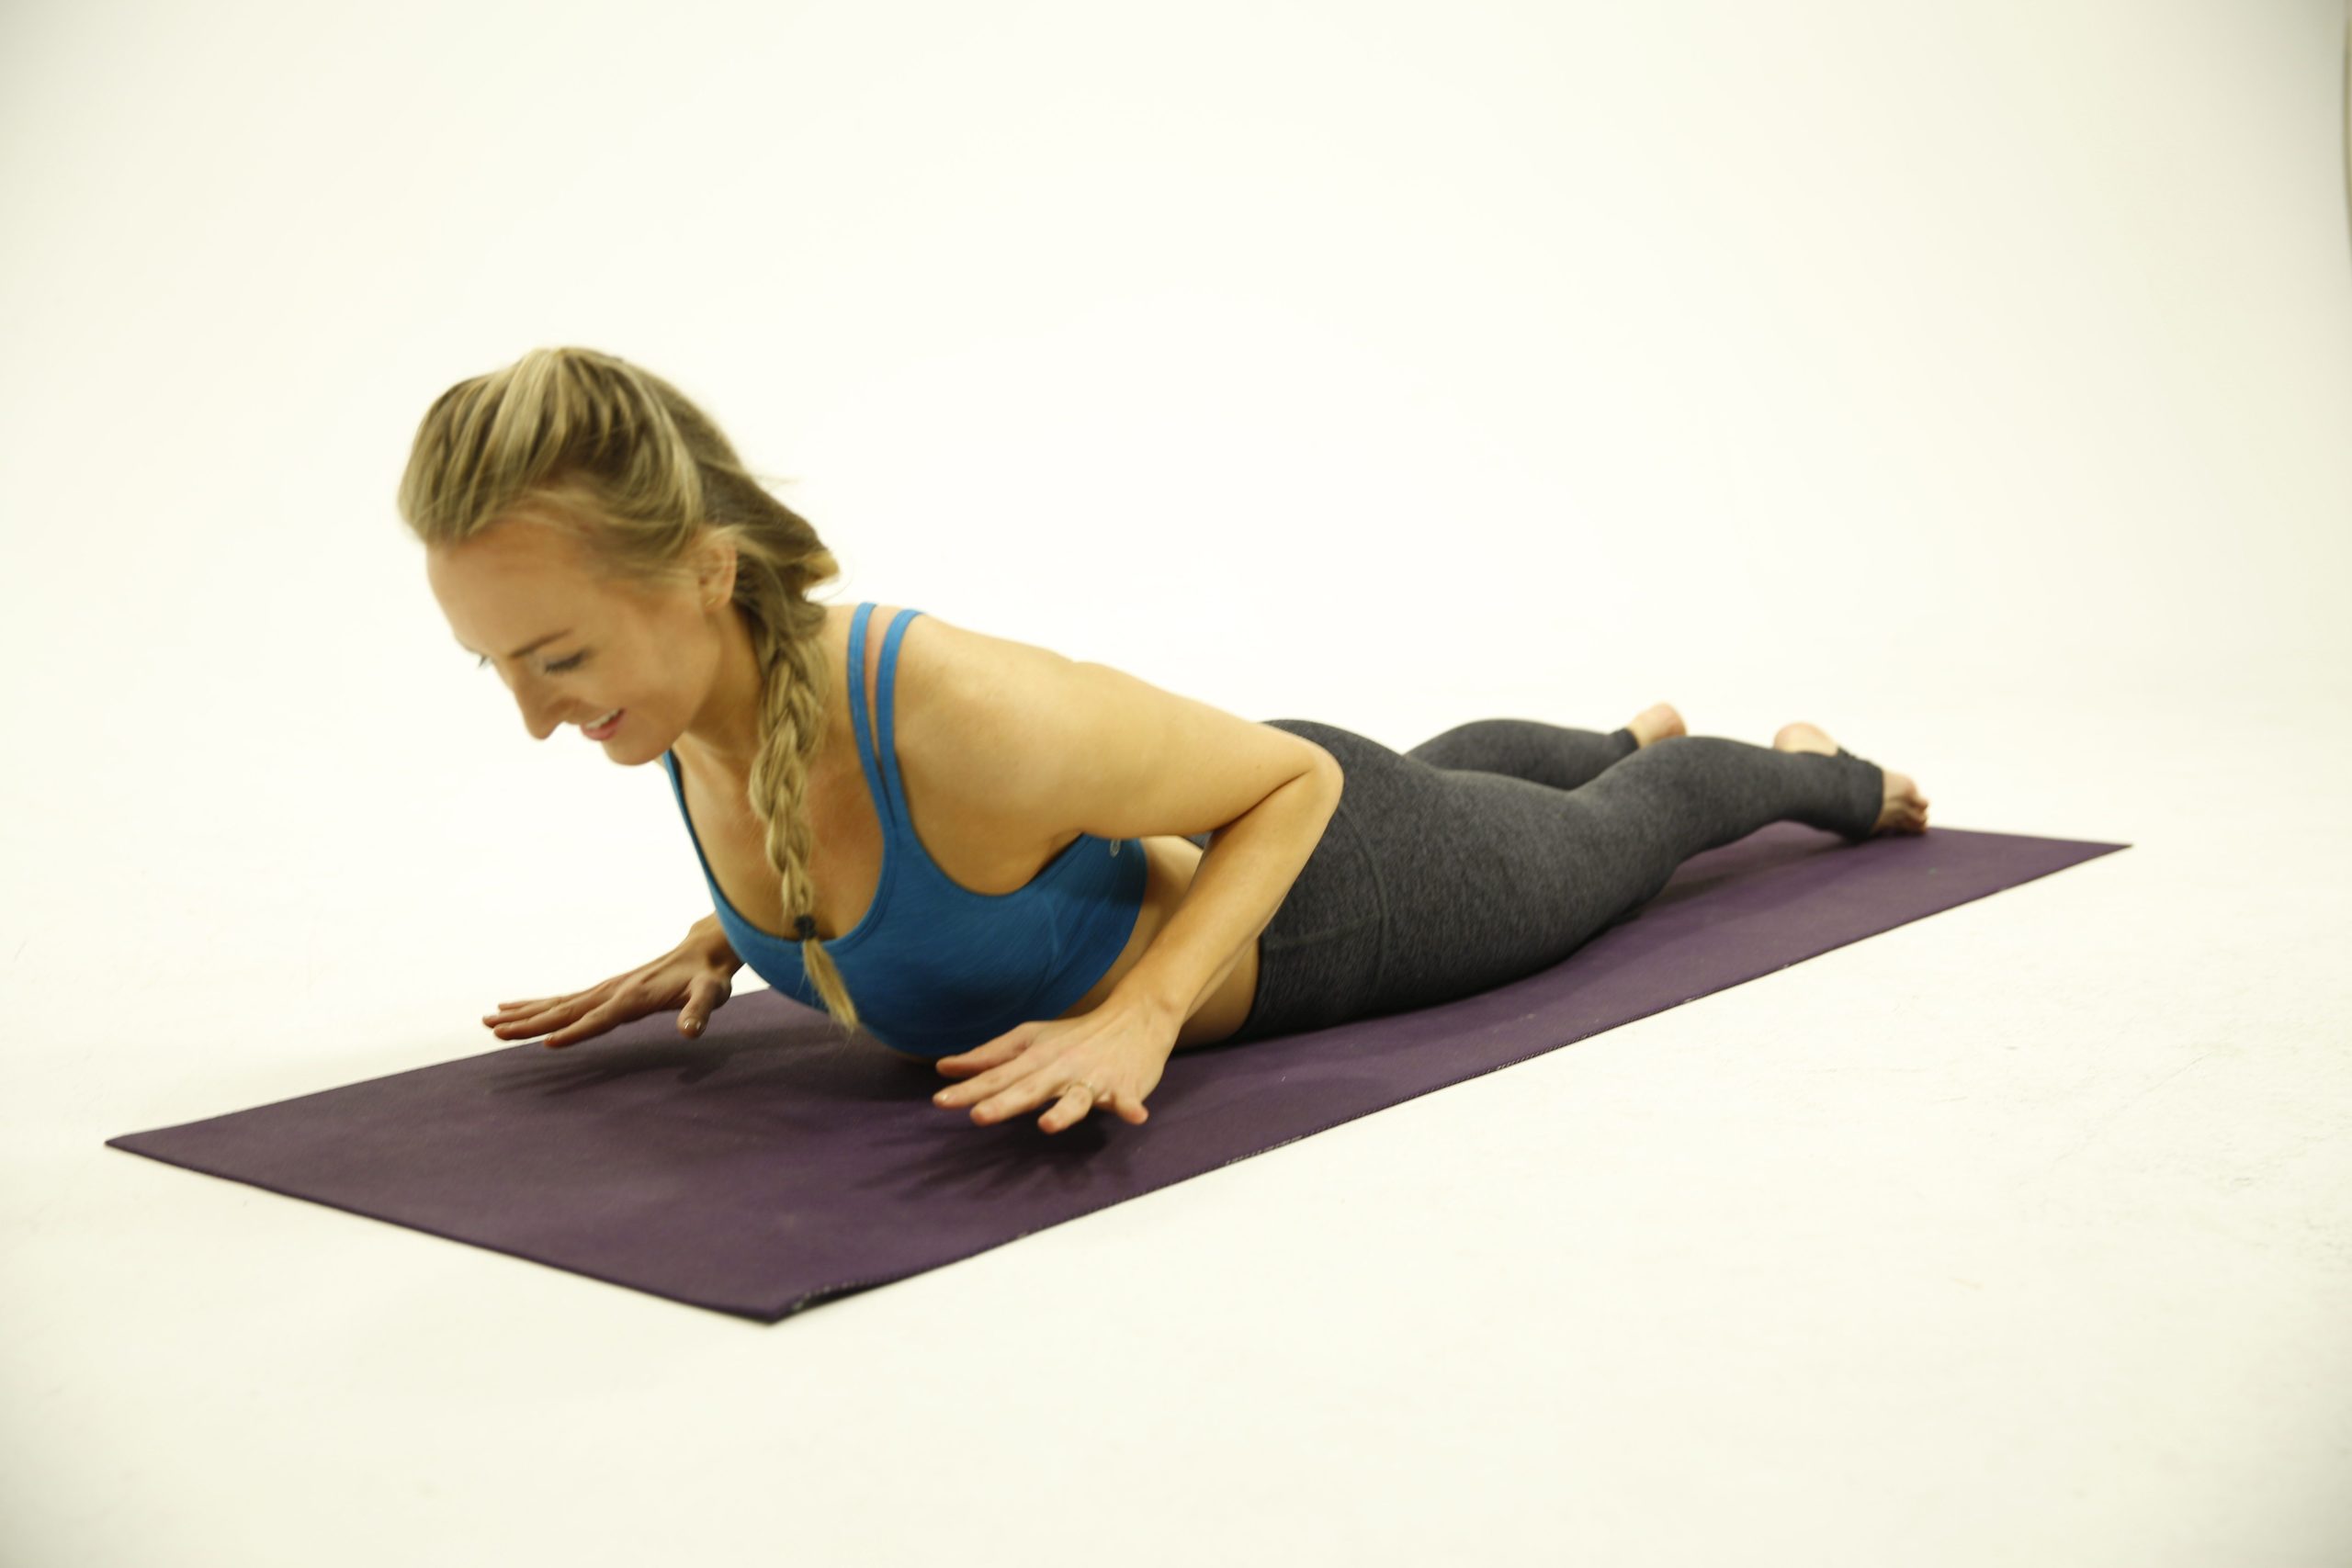
- Step 1: Start by lying down on the stomach, which hands by the side of the ribcage, feet hip-distance wide and forehead on the mat.
- Step 2: Inhale and lift the head and chest up, but only till the level of the chest. Do not go beyond this point.
- Step 3: Keep the elbows close to the body and ensure that the shoulders are relaxed.
- Step 4: Take a few deep breaths here focussing on deep inhalation as the backbend facilitates increased lung capacity.
- Step 5: Exhale to come back down.
Variations: In case of extreme upper back pain, use a cushion or bolster under the chest. This will ensure there is not too much weight on the palms. While in this pose, only lift so high that if you don’t use your hands for support you will still be able to hold yourself up in this pose using the lower and upper back muscles. You can further increase the strength building aspect of this yoga pose by interlocking the fingers behind your head as you lift up.
Benefits: This is one of the best poses to strengthen the back. It stretches the front of the chest which helps in case of respiratory conditions like Asthma. Furthermore, this pose is highly recommended for those with slip discs as it helps correct disc bulge.
4. Locust Pose – Shalabhasana
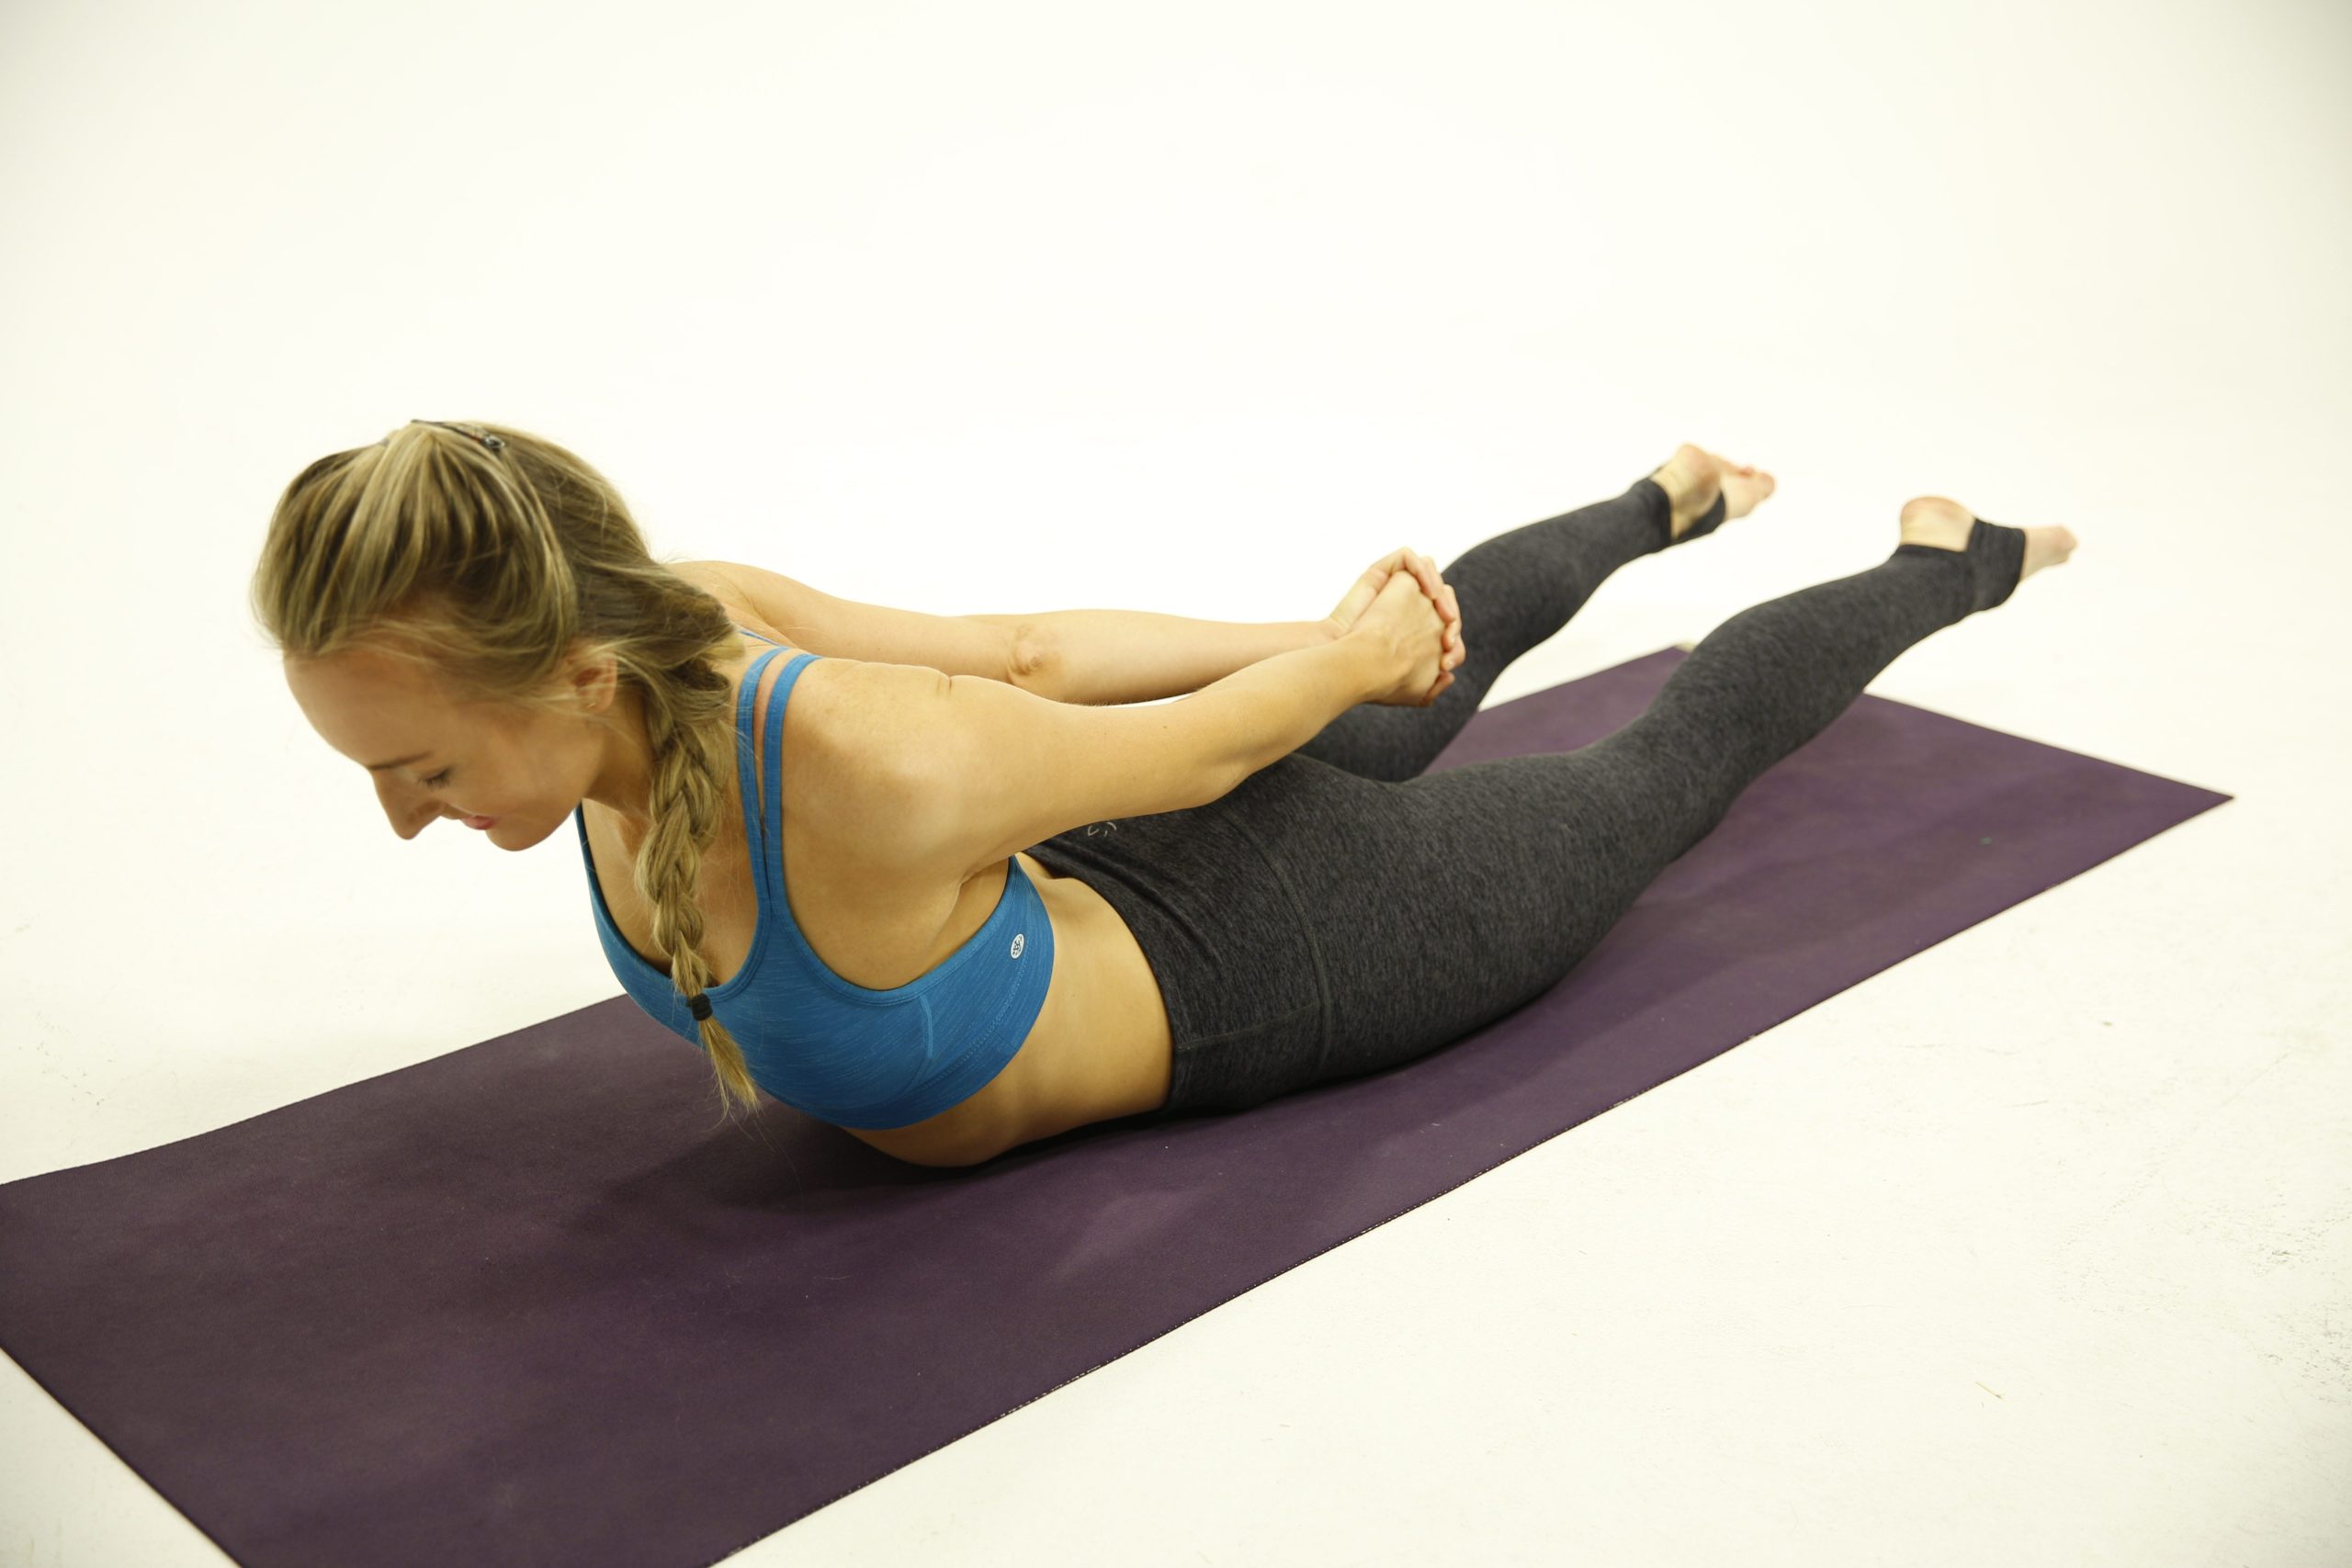
- Step 1: Begin by lying down on your stomach with your head resting on the mat and feet hip distance apart. Keep both hands on the mat next to the hips
- Step 2: Inhale and lift the head, chest, legs and arms.
- Step 3: Exhale to hold here. Look down towards the floor to keep the back of the neck long.
- Step 4: Stay here for a few breaths, focussing on the gentle movements of the abdomen as you breathe.
- Step 5: Exhale to get the body down to the starting position.
Variations: You can take many variations of this pose. If you want the pose to be more engaging for the upper back, interlock the fingers at the back of the head – similar to the variation explained in the cobra pose above. You can also extend the arms forward or hold a strap between the hands to ensure more engagement of the upper back muscles.
Benefits: This pose is excellent for strengthening the upper back muscles. It also helps to tone the muscles in the lower back, buttocks and legs. It stimulates the autonomic nervous system, especially the parasympathetic outflow. This pose can also be used to increase spinal flexibility.
5. Cow Face Pose – Gomukhasana
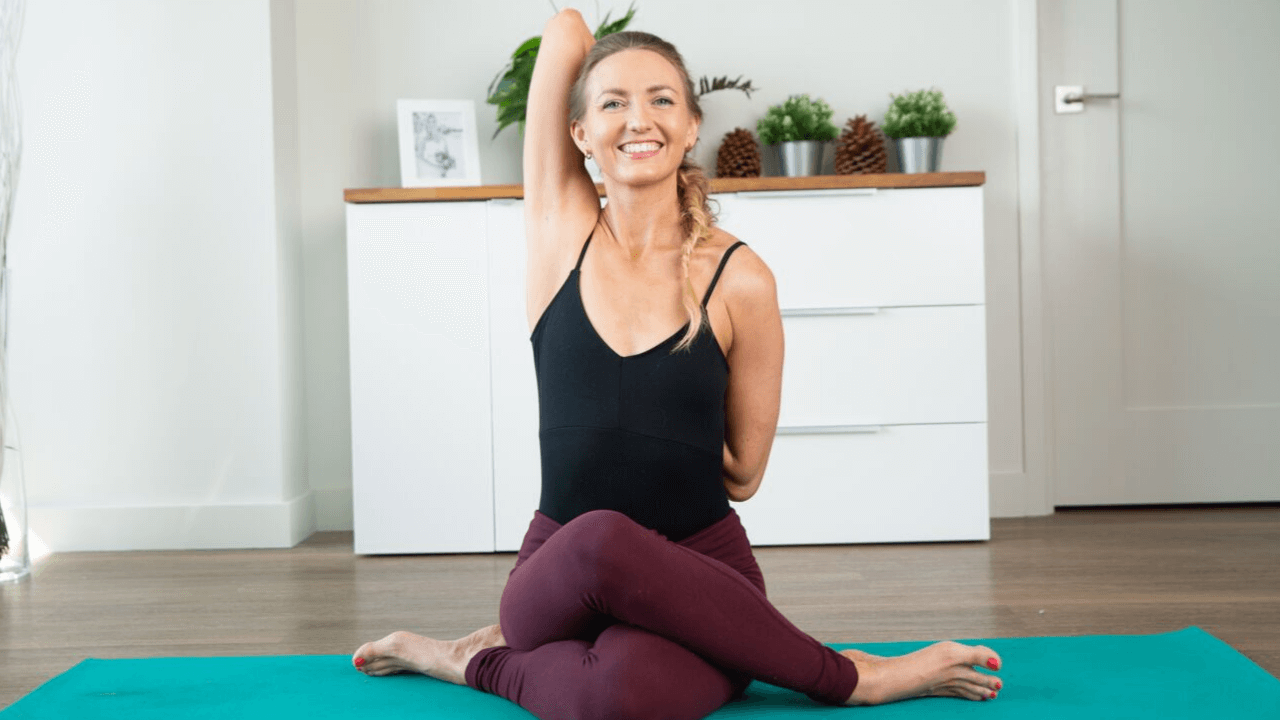
- Step 1: Start in sitting position, with legs stretched out and the spine upright in Dandasana
- Step 2: Cross the right leg over the left thigh and rest the outer edge of the right foot on the floor/mat next to the left glutes
- Step 3: Bend the left leg and place the outer edge of the left foot on the floor/mat next to the right glutes
- Step 4: Ensure that both knees are stacked one over the other as much as possible
- Step 5: Lift the left hand up and then bend the left elbow placing the palm on the back
- Step 6: Stretch the right arm to the side and bend the elbow to wrap around the back. Clasp both the palms at the back if possible
- Step 7: Pull the head back to get the back of the neck to stack over the base of the spine. Stay here for a few breaths. To release, reverse the process – first release the right arm, then left arm. Then straighten the left leg and finally right leg to return to Dandasana
Variation: If one hip lifts up or you feel lopsided, bring a thick blanket under the sit bones. If you can’t clasp your hands, then get a strap or towel to hold on to. If the knee hurts here then come out of the pose. In case you feel any pain around the shoulders while in this pose, be sure to try a prop.
Benefits: This is excellent for increasing range of motion of the muscles surrounding the neck, shoulders and upper back. Apart from that, it also helps in stretching the ankles and hips. It stretches and tones the muscles around the chest, thus it is a great posture correction pose.
6. Gate Pose – Parighasana
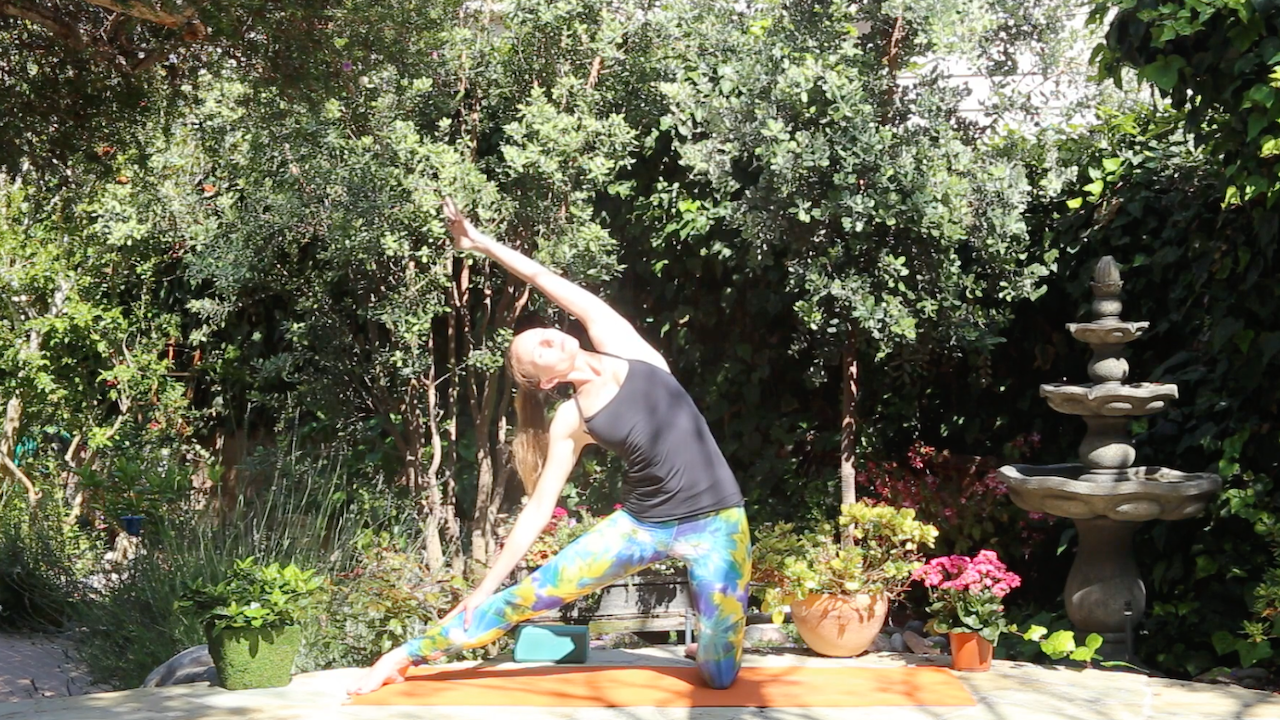
- Step 1: Facing the long side of the mat, kneel down with knees hip-width wide. Stretching the right leg out to the side, rest the heels on the mat while pointing your flexed right foot to the top.
- Step 2: Inhale to lift the left hand up and keep the right hand resting on the right thigh.
- Step 3: Exhale to bend laterally to the right side, sliding the right hand down the right leg. Stretch the extended left arm alongside the head, palms facing down.
- Step 4: Pull the left shoulder to the back and open up the chest. Turn the head to look up.
- Step 5: To get back, extend through the top arm and come back to center as you inhale. Bring the right leg in and repeat on the other side.
Variations: In case of knee pain, use a folded blanket under the knees. For stability you can also try against a wall, placing the ball of the extended foot against the wall. If it bothers the neck, you can look forward instead.
Benefits: Lateral stretches are great to stretch out the latissimus dorsi and help relieve back pain. This pose opens the sides of the upper chest and shoulders. It also stretches the calves and hamstrings apart from the spine.
7. Fish pose – Matysasana
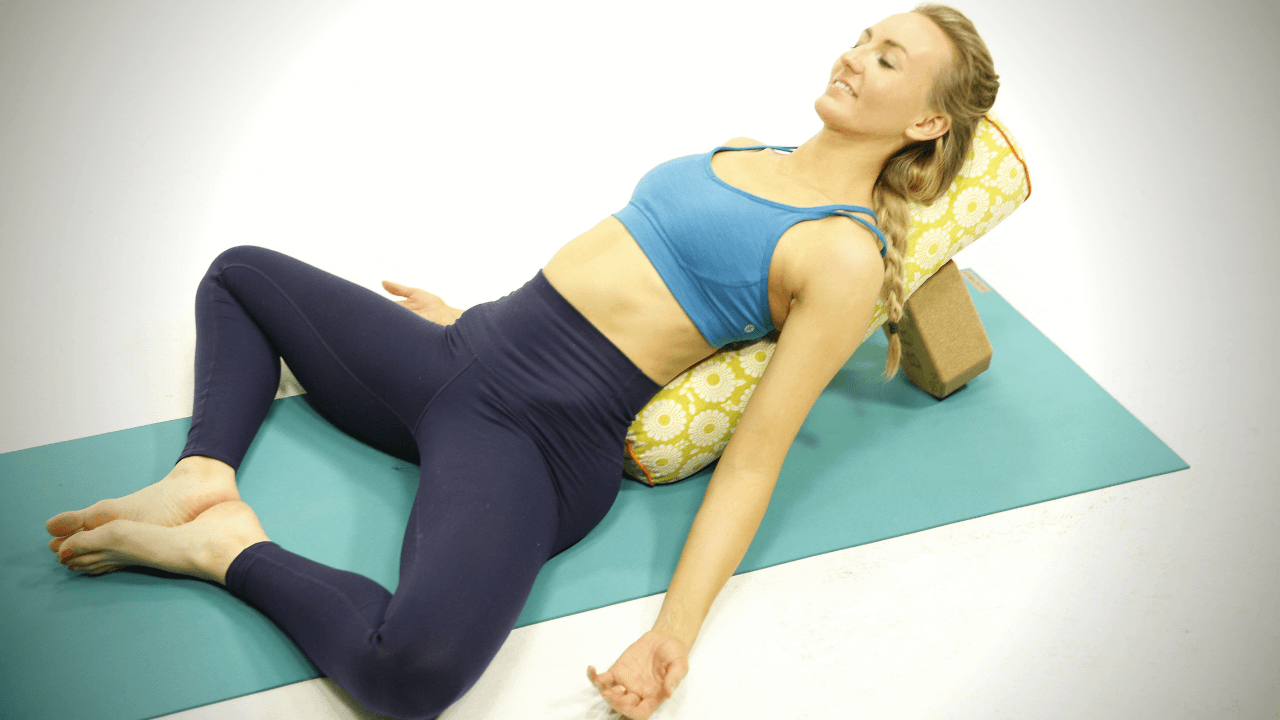
- Step 1: Start on your back, with your feet together and arms by the side of the body.
- Step 2: Place your hands under the buttocks, palms facing down
- Step 3: Inhale and lift the head up to look towards the navel, bringing yourself up on the elbows. Walk your hands closer towards one another and lift the chest up towards the sky.
- Step 4: Exhale to lower the head back and place the crown of the head on the mat.
- Step 5: Press the back of the legs and feet on the floor. Point the toes.
- Step 6: Stay here for a few breaths and be mindful to keep the chest lifted to release the upper back and middle back muscles.
- Step 7: To come out, inhale to get the head back up to look at the navel. Exhale to lie back down on the floor and relax the arms.
Variations: You can place a block or cushion on the floor where the crown of the head is resting in case the head doesn’t reach the floor. You can also place a yoga block underneath the middle back to help get the chest up.
Benefits: This pose is great for relieving tension from the neck, shoulders, upper and middle back. It also helps open up the chest and is great for alleviating respiratory ailments and back pain.
YOU MIGHT ALSO LIKE
- What is Kriya Yoga? The Philosophy and Practice
- Uddiyana Bandha: Tapping Into Your Deep Core
- 4 Reasons Hasta Bandha Is Essential To Your Yoga Practice
- Vitarka Mudra: What It Is and How Do You Use It?
- Shakti Mudra: What It Is and How Do You Do It?
- Garuda Mudra: What It Is and How Do You Use It?
- Kali Mudra: What It Is and How Do You Do It?
- Shunya Mudra: What It Is and How Do You Do It?
- Varuna Mudra: What It Is and How Do You Use It?
- Vayu Mudra: What It Is and How Do You Use It?
- Samana Vayu: The Energy of Balance & How to Access It
- Apana Vayu: The Energy of Release & Surrender
- Udana Vayu: The Ascending Wind
- Prana Vayu: The Breath of Vitality
- Vyana Vayu: The Energetic Secret to Flow
Learn how to do 11 of the most popular yoga poses correctly. Free video + PDF download.


