I know, I know. Ego Eradicator sounds like the name of a video game character or Metaverse persona or something. Surprise! It’s a Kundalini yoga pose. If you practice Kundalini regularly, you’ve probably stumbled across this Kriya at least once on your yogic path.
The full ego eradicator practice combines breath with a specific posture, chanting, and meditation. Many variations of the Ego Eradicator can be found in various Kundalini kriyas, but all of them enable us to awaken our energy, unlock our true potential, and pursue personal growth.
Ego Eradicator aligns you with your true being, “eradicating” the brain buzz (aka, your ego) that gets in the way of pure being. Try practicing this exercise with consistency, and you’ll definitely experience changes to your overall sense of vitality. The best part? Ego Eradicator opens the heart to give and receive pure love ❤️

I’ll break down the basics of this essential Kundalini yoga poses in this article. My online, all-access Kundalini Demystified course goes into the variations and practice in depth – check it out!
Benefits of Ego Eradicator
This is one of my desert island poses: If I was stuck on a pile of sand and could only practice three postures, this would be one of them. This kriya releases negativity while strengthening our electromagnetic field, increasing vital energy, and sharpening our mental focus. But how does it work? When you practice the ego eradicator, you progressively purify your mind of negative self-talk and invite light and clarity into your heart, revealing. The result is that you reveal your true essence. Ego Eradicator’s list of benefits is virtually endless! Here are the primary ones:
- Opens the heart
- Brightens and purifies your aura
- Balances your pranic body
- Expands lung capacity
- Invites deep stillness into our body and mind
- Soothes our soul from stress
- Brings the brain into a state of alertness
- Sets us free from negative self-talk
- Strengthens the diaphragm, shoulders and arms
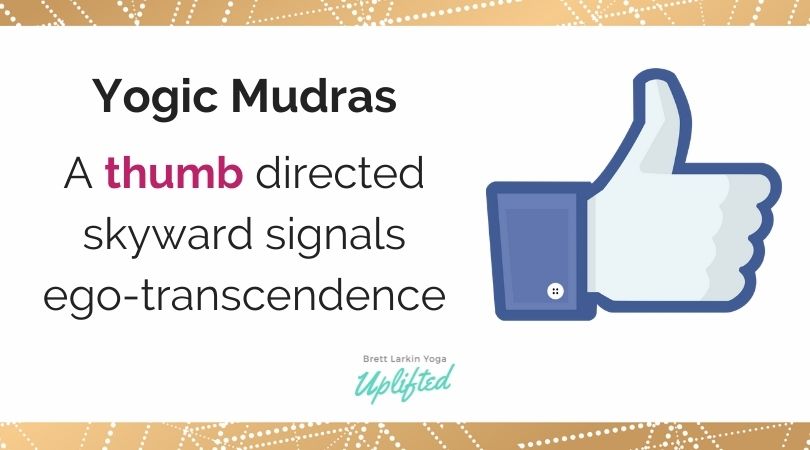
Fun Fact: in yogic mudras, or hand gestures, the thumbs are related to our ego. When you give a “thumbs up”, you’re actually making a bold statement to the universe; you aim to transcend the self-image imposed by your ego and align with your higher self 👍
How to Practice Ego Eradicator
Ego Eradicator is what I think of as a complete practice in itself. It combines a specific pose with meditation and breathwork. The Pranayama paired with the powerful posture is Kapalabhati, also known as Breath of Fire. Like Ujjayi breath, it’s known for its uplifting, deeply energizing effects.
I definitely recommend this exercise on those days when you need an energy boost. And trust me; when you dedicate yourself to this practice, you’ll feel yourself again in no time! 😉Breath of Fire is a demanding practice on its own, and in combination with the posture (arms lifted overhead), it can be a loooot – at least at first.
Level: Intermediate. If possible, beginners should be assisted either by a teacher or guided by an expert practitioner. I recommend that you should be able to complete three strong rounds of Kapalabhati before trying Ego Eradicator.
Time: 1 to 3 minutes.
Precaution: avoid practicing this technique if you’re pregnant.
Ready to eradicate your ego? This is how to perform Ego Eradicator, step by step:
- Find a quiet place where you can be undisturbed for a while
- Sit with your legs crossed in easy pose or rock pose (kneeling on the mat while sitting on the heels).
- Lengthen your spine while take a few deep breaths to settle into your seat. Relax your shoulders away from the ears.
- Close your eyes and shift attention to your third eye.
- Raise both arms overhead to form a sixty degree angle. Keep the elbows completely straight.
- Perform yogic thumbs, curling your fingers while thumbs are completely extended and point towards the sky.
- Apply jalandhara bandha, tucking your chin into your chest.
- Begin your breath of fire (watch my video below for how to do it), and sustain for 1-3 minutes.
- Return your breath to normal. To seal the practice, inhale deeply and connect the tips of your thumbs together above the head. As you exhale, spread the fingers wide and relax the arms down to the side.
Once you’ve finished, take some deep, nourishing breaths and take time to feel the fantastic, beneficial effects of this practice.
How to Perform Kapalbhati: The Breath of Fire
- Start by inhaling deeply and exhaling completely.
- (Optional) Place one hand on the belly to feel the movement of breath here, and remain aware of the bellows-like movements of the diaphragms.
- Fill your lungs half full of breath, and then breathe forcefully and repetitively out of your nose (it should sound like a panting dog LOL 🐶)
- Allow your inhale to be completely passive.
- Maintain a steady, continuous rhythm, counting up to 30 breaths.
- Pause once complete. Repeat 2-3 rounds, making sure to take a break if you feel light-headed or struggle to maintain the rhythmic, strong exhales.
YOU MIGHT ALSO LIKE
- What is Kriya Yoga? The Philosophy and Practice
- Uddiyana Bandha: Tapping Into Your Deep Core
- 4 Reasons Hasta Bandha Is Essential To Your Yoga Practice
- Vitarka Mudra: What It Is and How Do You Use It?
- Shakti Mudra: What It Is and How Do You Do It?
- Garuda Mudra: What It Is and How Do You Use It?
- Kali Mudra: What It Is and How Do You Do It?
- Shunya Mudra: What It Is and How Do You Do It?
- Varuna Mudra: What It Is and How Do You Use It?
- Vayu Mudra: What It Is and How Do You Use It?
- Samana Vayu: The Energy of Balance & How to Access It
- Apana Vayu: The Energy of Release & Surrender
- Udana Vayu: The Ascending Wind
- Prana Vayu: The Breath of Vitality
- Vyana Vayu: The Energetic Secret to Flow
Trauma-Informed, Feminine Kundalini Starter Pack [Free Download]