I remember when I was in middle school, our entire PE class was rounded up for spinal checks. We were asked to lift the backs of our shirts and to bend over so that a nurse could check our spines for scoliosis.
Though I didn’t have scoliosis, I was surprised to find that SO many of my friends did! Before that day, I didn’t even know what scoliosis was.
Yet so many people are affected by scoliosis, which can get in the way of not just good posture but also breathing and blood circulation.
And yoga can help (big time).
Yoga for scoliosis has been an effective way to improve the condition and make it easier to do day-to-day tasks without so much upper or lower back pain.
Want to know how to get started? I’ll teach you right here in this post 🙂
What Is Scoliosis?
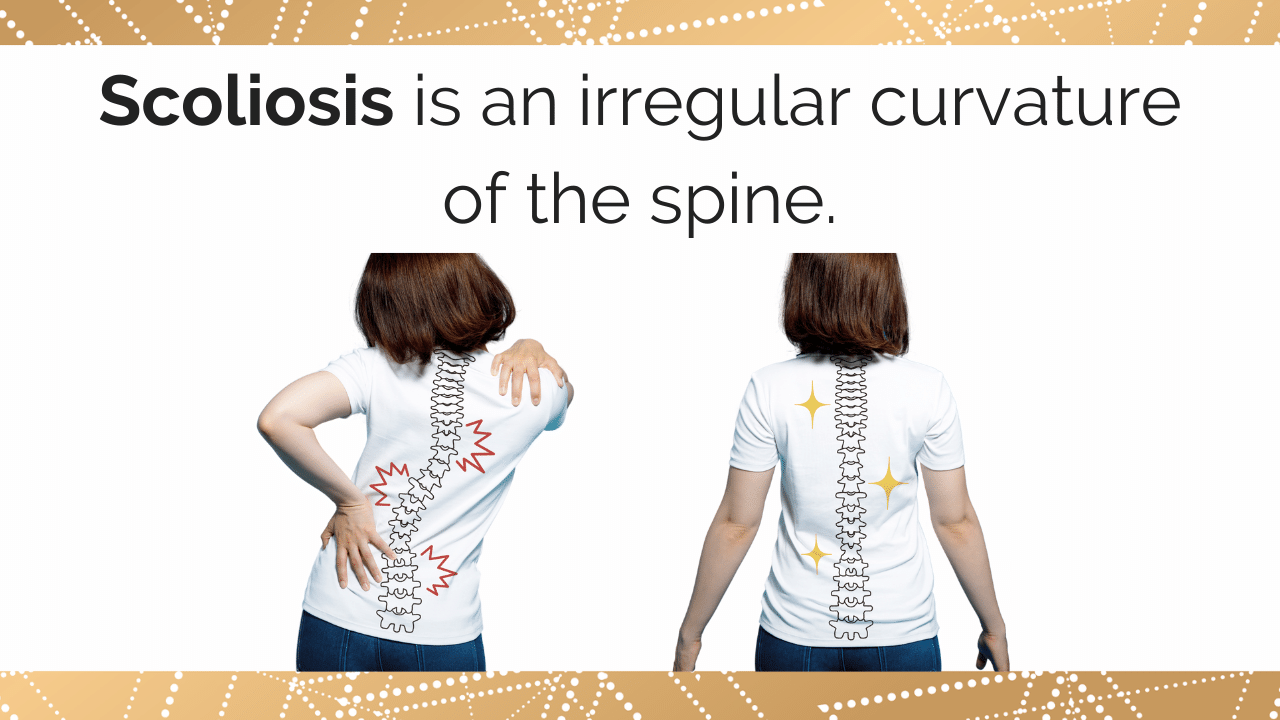
Scoliosis is an irregular curvature of the spine. Scoliosis usually manifests in an “S” or “C” shape spanning the three parts of the spine – cervical, lumbar and thoracic. Depending on the severity of scoliosis, it can cause almost no problems to need surgery. There are a variety of different potential causes for scoliosis, but in most cases the cause is unknown.
Scoliosis can even affect breathing and blood circulation due to compromised space for the lungs and heart. Movement, postural issues, and backache can also arise, due to the irregular shape of the spine.
Research has shown that Yoga exercises may significantly help the reduction of scoliotic curves in the spine when practiced correctly, in accordance with the individual’s needs.
The findings concluded that asymmetrically holding the plank daily, in order to strengthen the muscles on the convex side of the primary curve, for almost 7 months – significantly reduced the scoliotic curves in the spine.
The research suggests that if you practice Yoga exercises consistently, it can effectively be used as a treatment for scoliosis and scoliosis pain.
Which Types of Yoga Are Best For Scoliosis?
Cultivating a daily Yoga practice can help to alleviate the pain which may be experienced due to scoliosis.
Why?
Scoliosis Yoga aids in creating space for the organs to function better, along with strengthening and lengthening muscles that support the spine and body movement. Practicing scoliosis Yoga as a treatment could potentially help alleviate the irregular curvature of the spine, and provide a foundation for enhanced physical health.
When practicing Yoga for scoliosis in a guided yoga class, it is important to be aware of your specific curvature, as this provides the foundation for your teacher to understand which areas of the torso need the length, and which areas need strength.
The awareness of the alignment of the spine is important to ensure that Yoga can be used as an active treatment for scoliosis.
For example, certain Yoga poses are best performed on one side only, in order to strengthen the weaker side of the scoliotic back.
The muscles on the concave side of the curve tend to be shorter, and tighter, so it is best to work on lengthening out this area. Whereas the muscles on the convex side of the curve tend to be lengthened, and strengthening practices are more beneficial for those areas.
The best types of Yoga for scoliosis and scoliosis pain, are those which focus on providing space for the organs, deep steady breathing, combined with spinal exercises.
- Hatha Yoga – great for scoliosis due to its focus on the breath combined with strengthening but gentle and nourishing Yoga poses
- Breath Based Vinyasa Yoga – When practiced in rhythmic tune with the breath – Vinyasa Yoga can help scoliosis, as spinal exercises will provide space for the organs, and strength for the body
- Restorative Yoga – Restorative Yoga poses for scoliosis which focuses on opening the chest, and releases tension in the spine may help to alleviate pain
7 Best Yoga Poses For Scoliosis
If you’d like to get started on an at-home yoga practice that can support your body, then incorporate these yoga poses into your daily practice. Focus on strengthening the spine, especially the concave side, to help balance out the muscles in the back. And, of course, always consult with your trusted medical professional before starting any new regime.
1. Mountain Pose – Tadasana
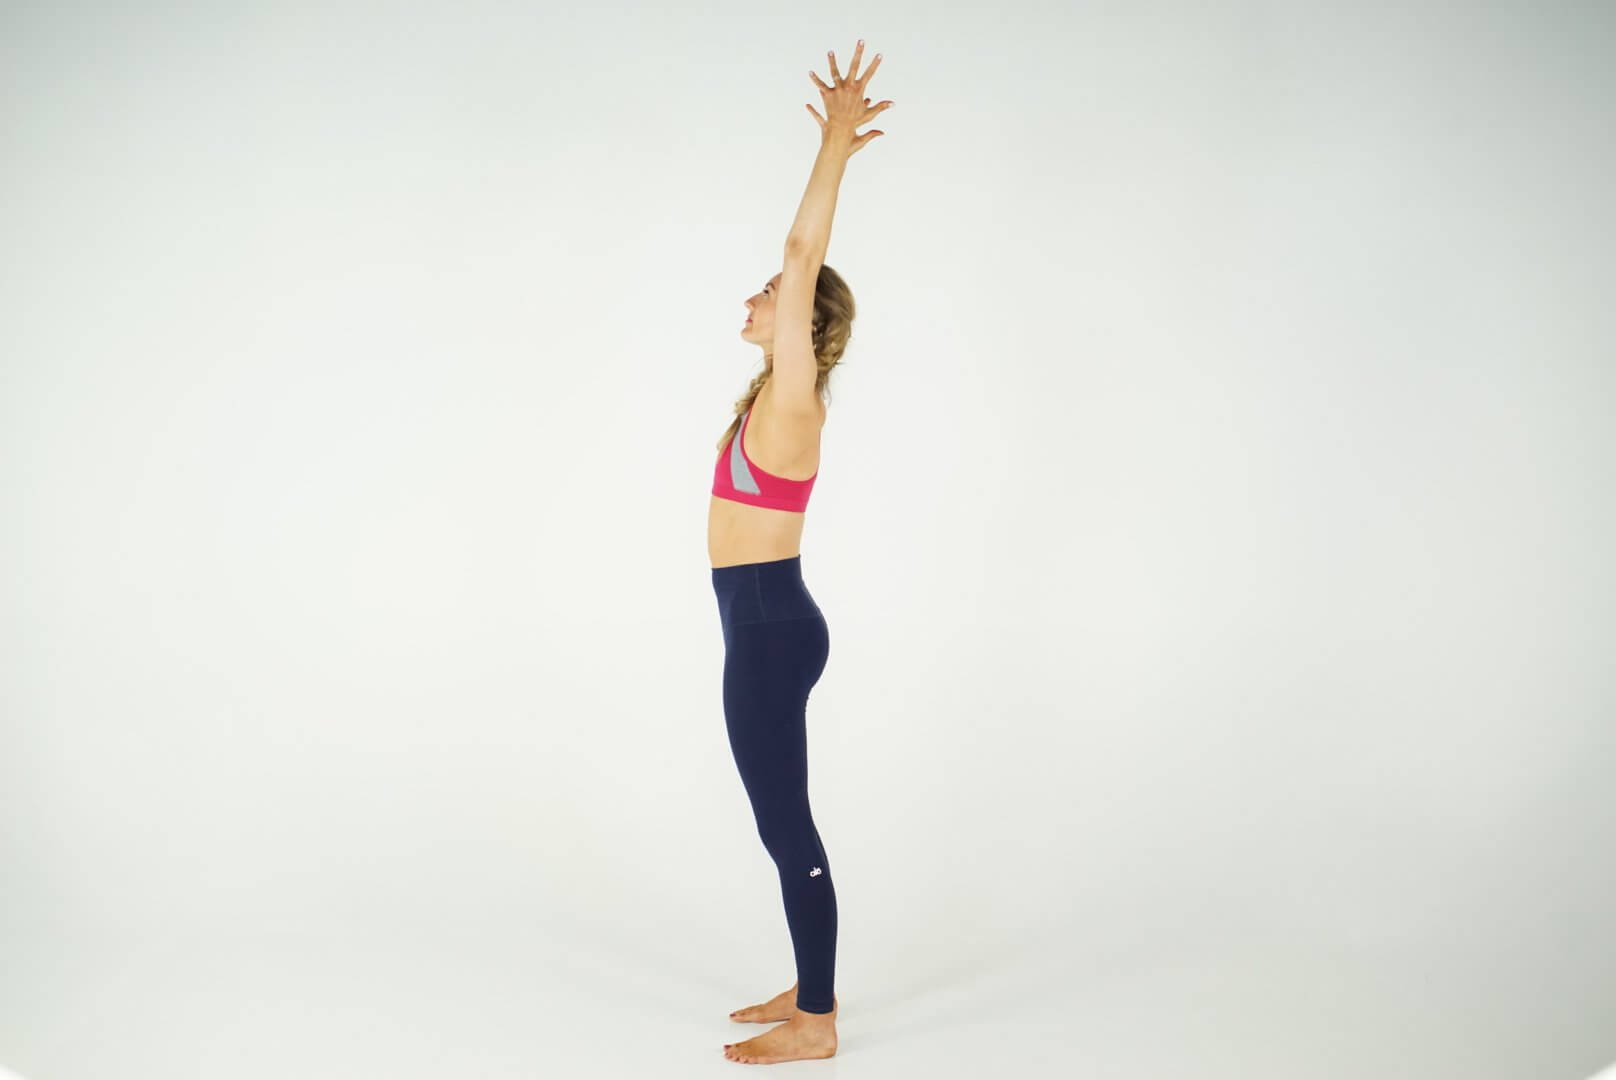
- Step 1: Stand on the Yoga mat, feet parallel and hips distance apart. Distribute the weight evenly through the feet. Draw the kneecaps upwards, engage the quadricep muscles.
- Step 2: Draw the lower abdomen in towards the spine, and neutralize the spine by drawing the sacrum downwards.
- Step 3: Inhale and stretch the arms overhead. Relax the shoulders and draw the shoulder blades together, to help create space for the chest.
- Step 4: Lengthen the spine by activating the leg muscles during the practice. Simultaneously stretch up, and gaze toward the hands.
Variation: If there is pain in the shoulders, leave the arms by the sides, palms facing forward.
Benefits: This is a gentle asana and strengthening practice. Strengthening the shoulders and spine in a restorative manner is perfect for patients with scoliosis. The practice of Tadasana should feel grounding, while actively stretching the spinal curves.
2. Half Forward Bend – Ardha Uttanasana
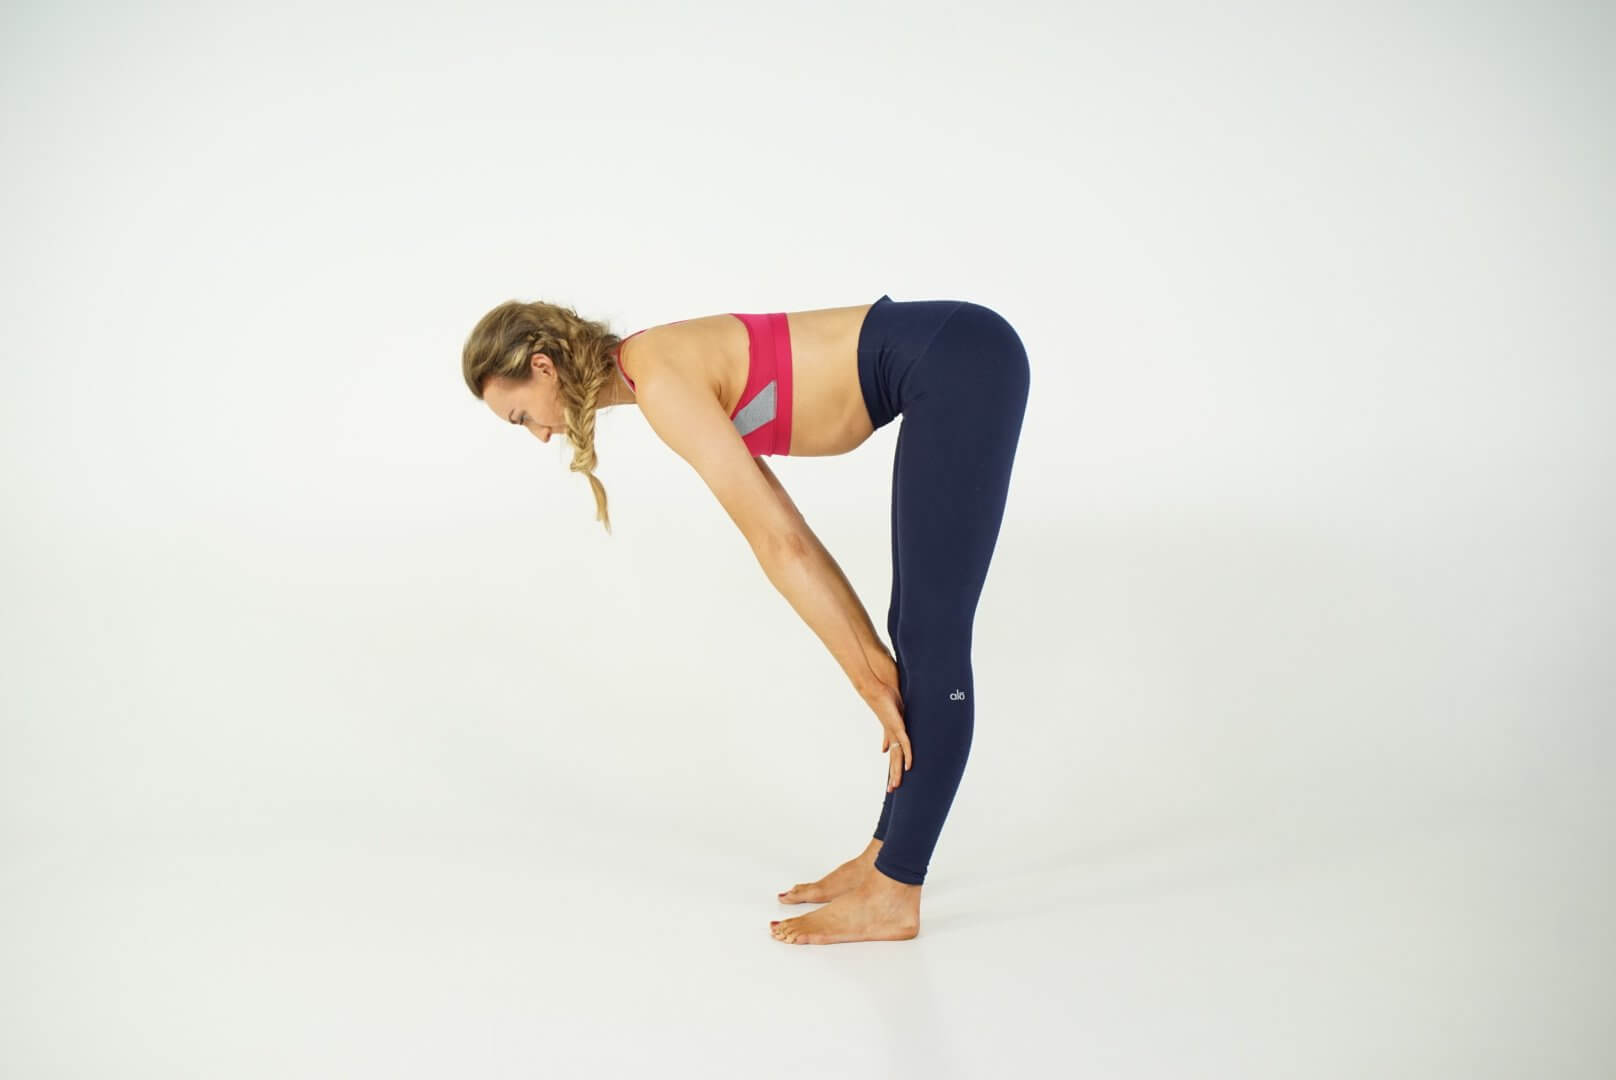
- Step 1: Stand on the Yoga mat, feet in a parallel position, hips distance apart.
- Step 2: Exhale and fold forward to a 90 degree angle, elongate the spine, draw the rib cage towards the legs.
- Step 3: Engage the core, draw the belly button in towards the spine. Activate the back muscles and lengthen through the crown of the head. Gaze is forward.
Variations: Rest your hands on the thighs, or to deepen the asana you can rest the fingertips on the Yoga mat while maintaining core activation and spinal lengthening.
Benefits: Works on the core strength, and also the muscles of the back. This is a great Yoga practice for scoliosis patients due to the gentle but strengthening alignment.
3. Downward Dog – Adho Mukha Svanasana
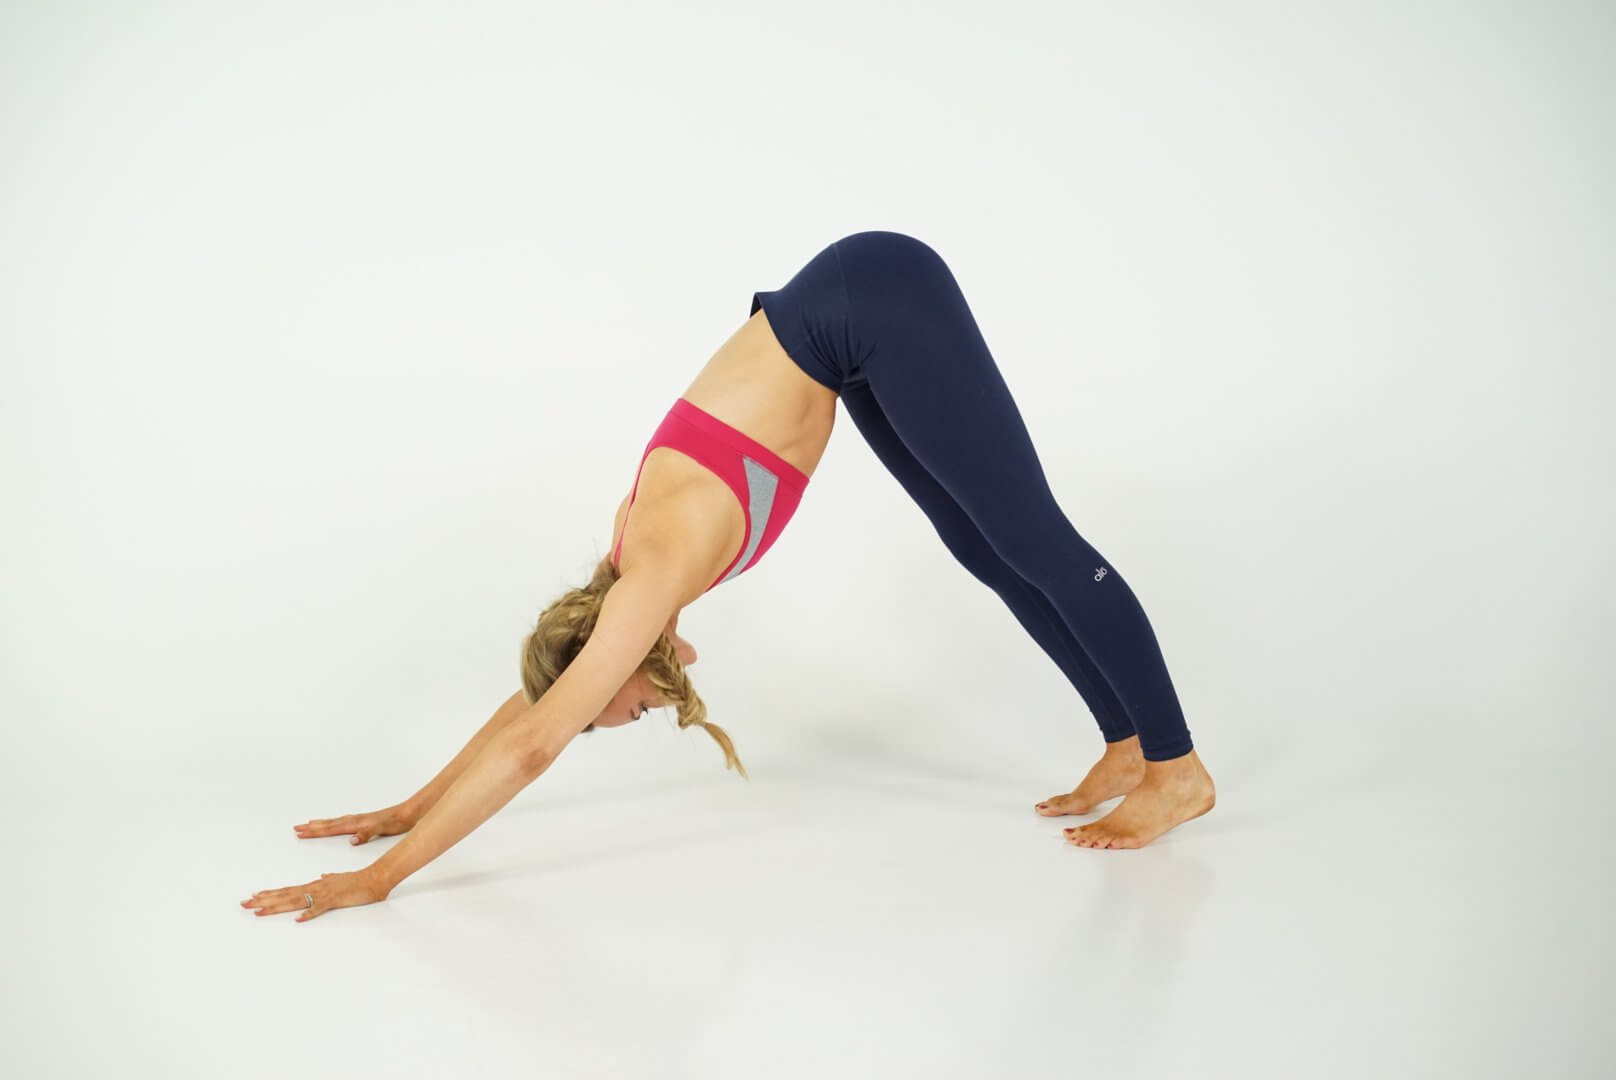
- Step 1: Stand on the Yoga mat in mountain pose, exhale into standing forward fold.
- Step 2: Plant the hands into the mat, and walk both feet backwards.
- Step 3: Feel the palms fully grounded, with the fingers spread wide. Micro-bend the knees, if it helps to elongate the spine. Relax the neck and try to gaze towards the belly button.
- Step 4: Focus on deep breathing, draw the rib cage towards the floor and lengthen the spine.
Variations: Bend the knees if it feels more accessible to lengthen the back.
Benefits: Gives space to the chest, heart and lungs which improves blood circulation and aids the breath. Activates the core, strengthens the spine, creates mobility for the vertebrae, while also adding length and flexibility for the back.
4. Bridge Pose – Setu Bandhasana
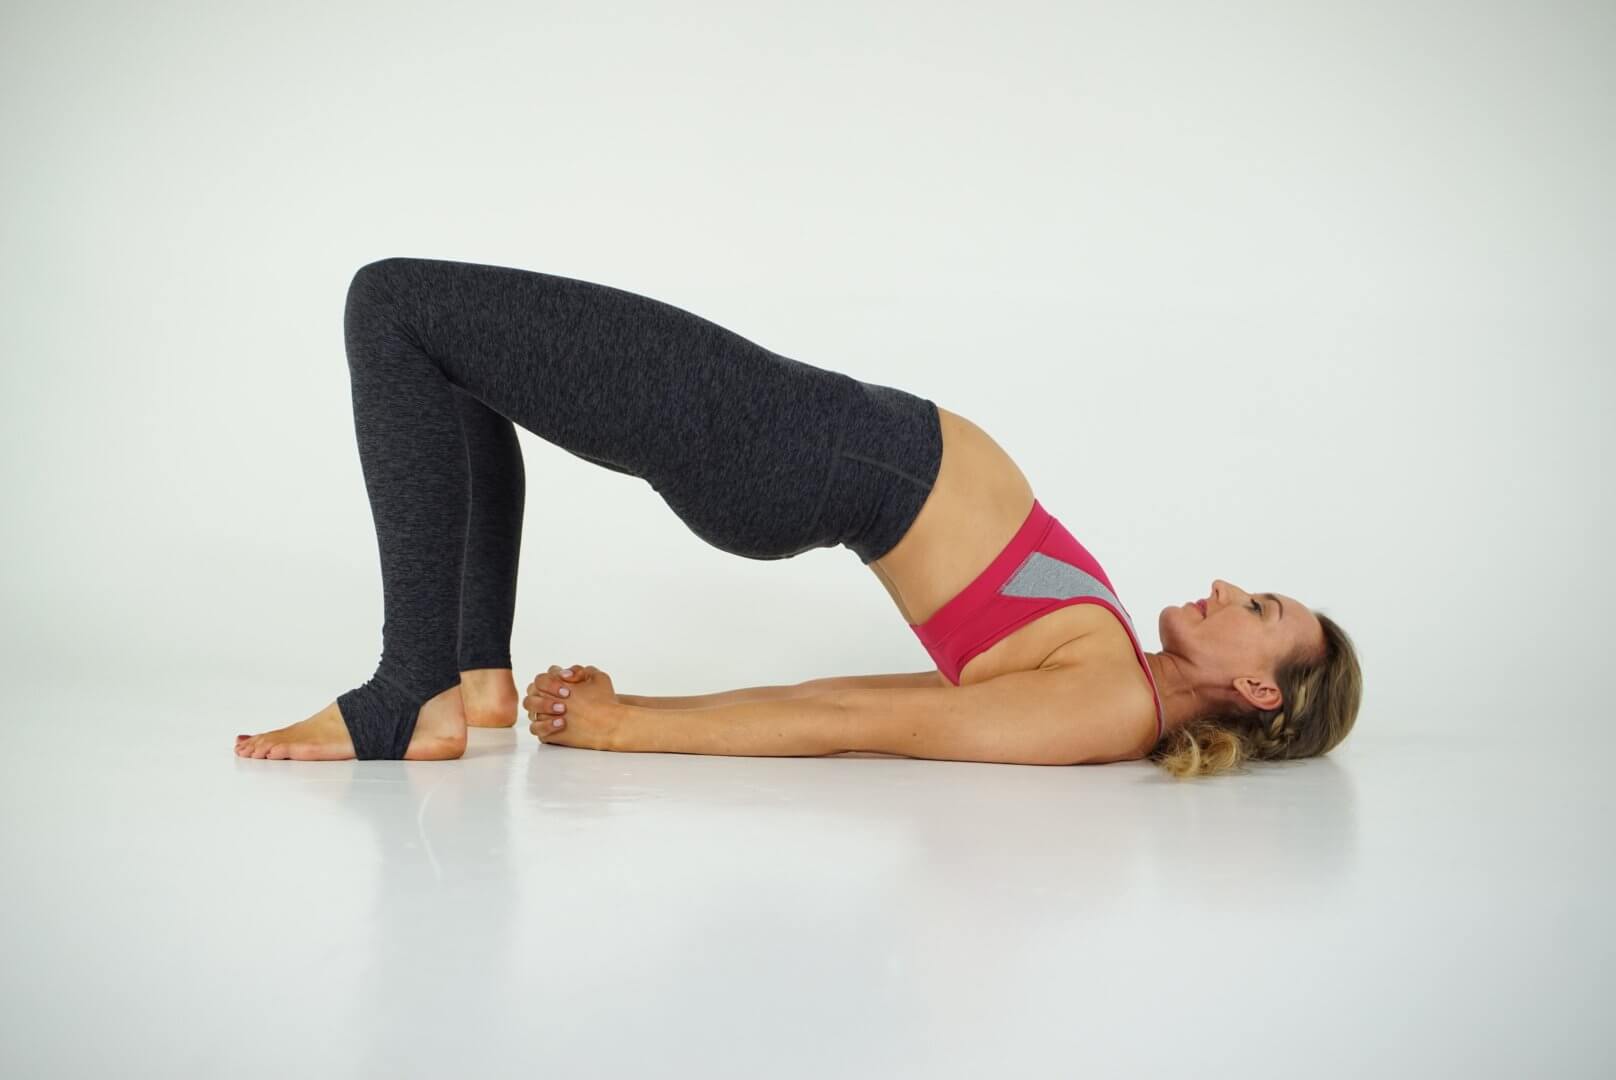
- Step 1: Lay on the Yoga mat in a supine position (on your back). Bend the knees, and place the feet hip-distance apart.
- Step 2: Keeping the arms on either side of the body, press the palms and feet firmly into the ground. Inhale and slowly lift the spine from the mat.
- Step 3: Try to lift the spine until the chest meets the chin, and draw the shoulder blades together to protect the cervical spine. Once in the posture, keep the head still to protect the neck.
- Step 4: Keep the breath even, and extended. Focus on engaging the feet, and the quadricep muscles to protect the knees. Lengthen the spine by drawing the sacrum towards the feet, ensure that the knees stay hips distance apart.
Variations: You can deepen the posture by clasping the hands behind the back, and lifting the chest toward the sky.
Benefits: Bridge pose is a great exercise for mobilizing the spine, encouraging blood flow around the vertebrae, and flexibility in the back. It is also a great core and back strengthening Yoga posture which is good for scoliosis. Setu Bandhasana encourages space for the heart and lungs, which is great to counteract the organ compression common for people with scoliosis.
5. Extended Side Angle – Utthita Parsvakonasana
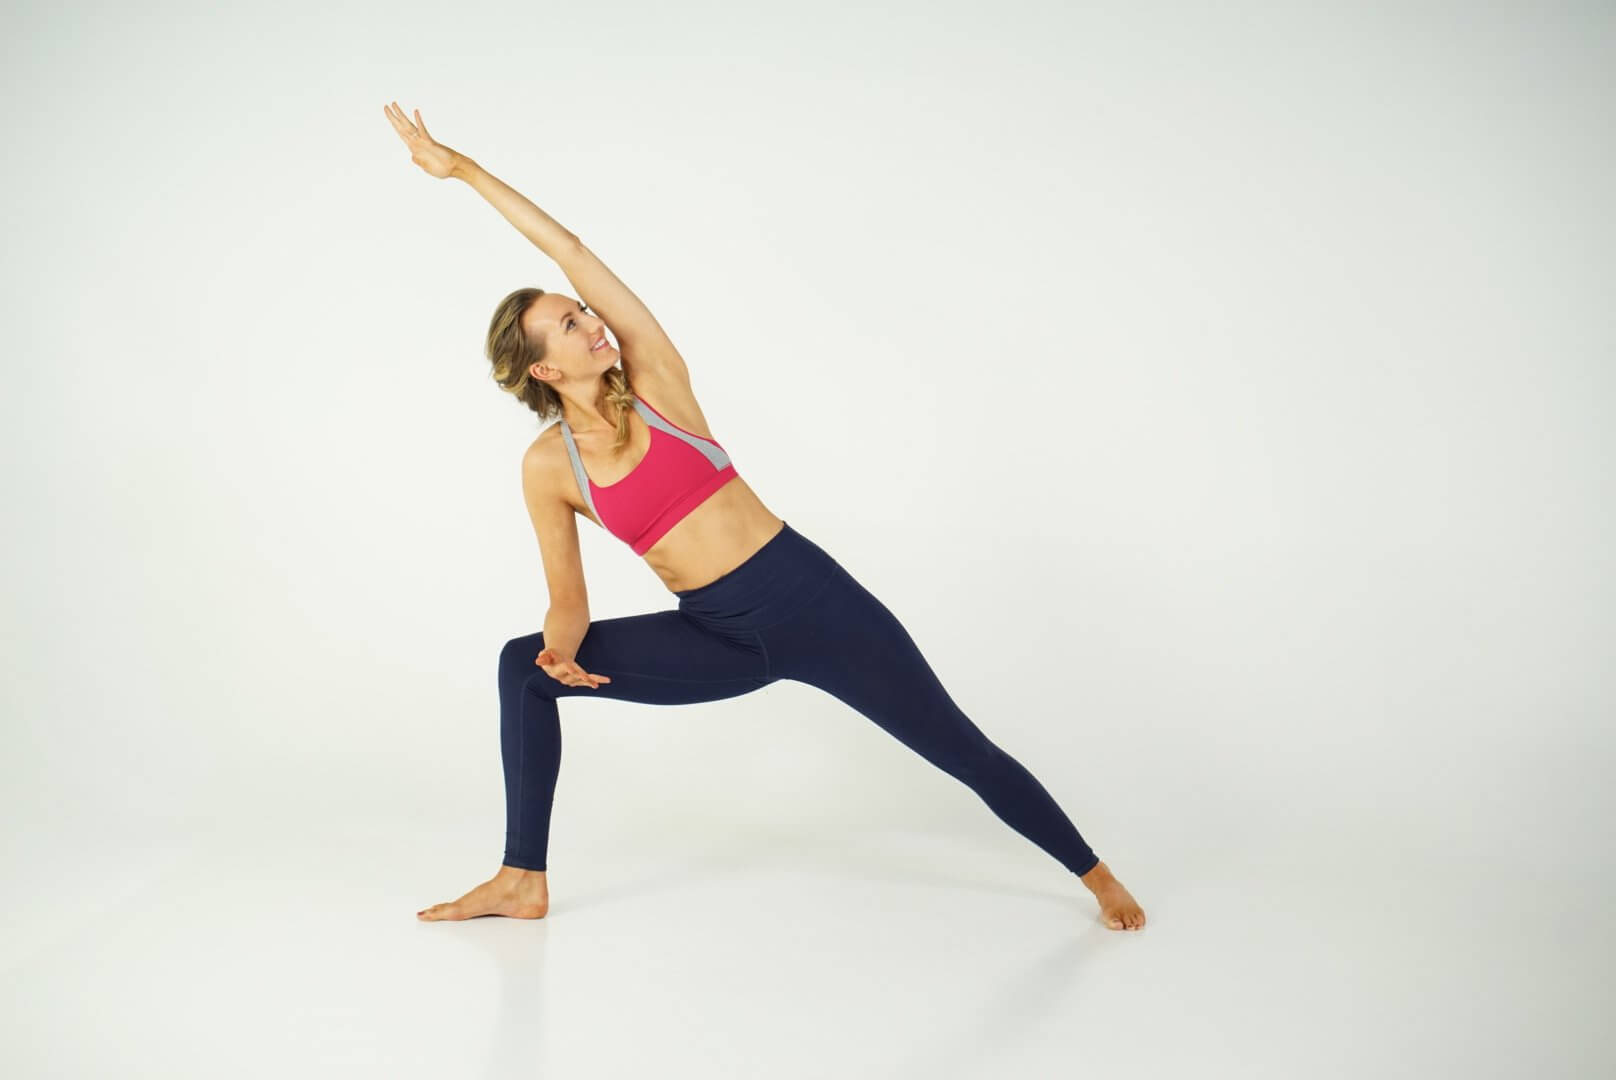
NOTE: If the concave side of your primary curve is on the left, you step the left leg back. If the concave side of your primary curve is on the right, you step the right leg back.
- Step 1: Stand at the front of the Yoga mat, and drop the correct leg back – depending on your scoliosis curve.
- Step 2: The alignment of the back foot is 45 degrees, and the front heel aligns to the middle arch of the back foot. Bend into the front knee, to get the knee directly over the ankle. If the right knee is bent, bring the right forearm to rest on the right thigh – and vice versa if the left knee is bent.
- Step 3: With an inhale sweep the other arm up and over the body, extending and lengthening so the side of the body is in a diagonal line. If it feels comfortable on the neck you can gaze up towards the hand overhead.
- Step 4: Focus on full, deep breaths. Tuck the tailbone, engage the core by drawing the lower abdomen in towards the spine, and press down through both feet and extend up through the arm.
Variation: To deepen the posture you can reach the front hand down to the floor, or get a block.
Benefits: This Yoga practice performed on one side, can be used as a treatment for scoliosis patients as we are able to stretch the concave curve, and alleviate pain or tension accumulated from scoliosis.
6. Warrior 1 – Virabhadrasana 1
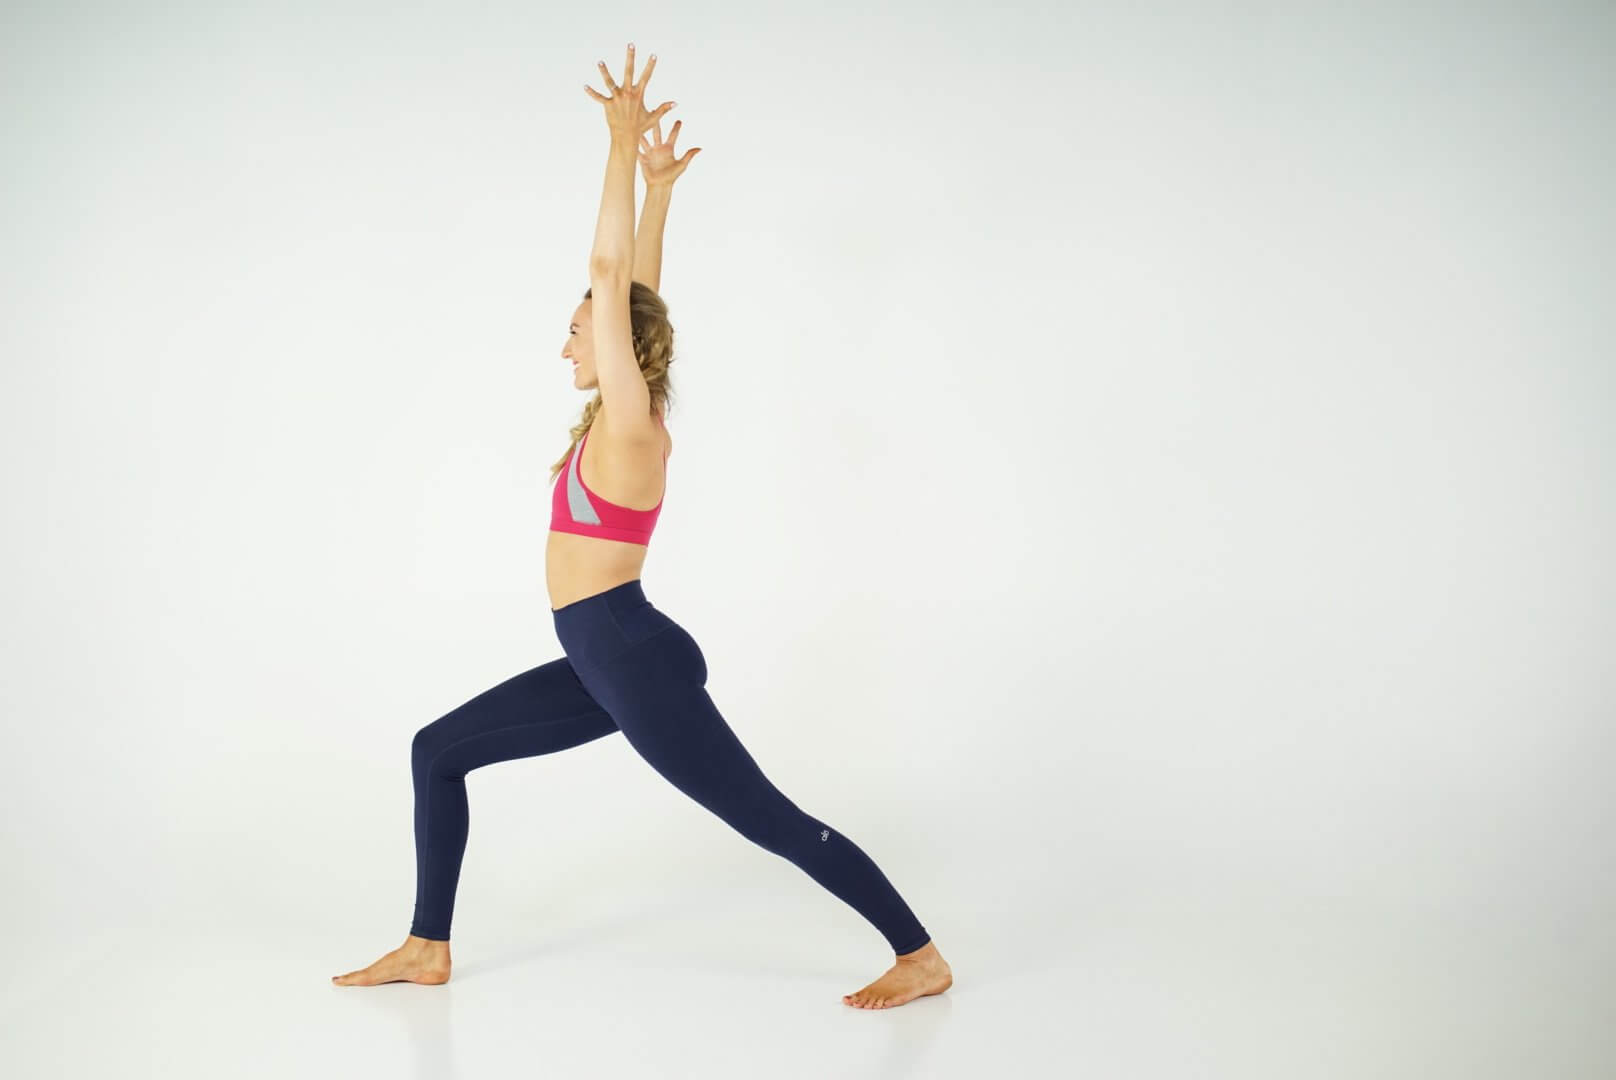
- Step 1: Stand at the front of the Yoga mat and drop the left foot back. Ensure that the left foot is at a 45-degree angle, and keep space between the heels.
- Step 2: Bend into the right knee, to get the knee over the ankle. Draw the left hip forward, and the right hip back to square off the hips.
- Step 3: Tuck the tailbone, and draw the lower abdomen in toward the spine. Inhale and stretch the arms overhead with the hands parallel. Relax the shoulders to create space. Gaze up in between the hands.
- Step 4: Elongate and deepen the breath. Focus on pressing down equally through both feet, keep the spine upright and vertical in the center of gravity between both legs, and reach up through the arms. Utilize the core and back muscles for balance. Repeat on both sides.
Variations: Create more space in between the heels to make it easier to square off the hips. Lift the heel of the back foot if there is pain in the knee.
Benefits: This exercise works on balance, length, and strength. Warrior 1 utilizes the core and legs to improve balance, while also helping to create space for the lungs to improve breath flow and blood circulation. It is common for those with scoliosis to experience compression of the vital organs, so poses that encourage stretching of the torso are highly beneficial for scoliosis patients during physical exercise.
7. Side Plank – Vasisthasana
NOTE: If the concave side of your primary curve is on the left, keep the right hand on the floor. If the concave side of your primary curve is on the right, keep the left hand on the floor.
- Step 1: Lay on the correct side. Place the hand closest to the floor on the Yoga mat, directly underneath the shoulder. Press the entire palm into the mat, and spread the fingers.
- Step 2: Prop up onto the outer edge of the bottom foot, and inhale as you lift the entire body upwards into a straight line.
- Step 3: Draw the awareness back to the breath, and ensure the breath is flowing freely. Hold the posture as long as is comfortable. Focus on pressing equally through the feet and the hand. Engage the thighs, glutes, core and shoulders to maintain the posture.
Variations: There are a variety of modifications for this pose which may help you to find comfort within the asana.
Balance on the elbow and forearm if there is pain arising in the hand or wrist.
Keep the feet together with one on top of the other, or bend the top knee and place the foot on the floor in front of the lifted knee to reduce the intensity of the asana. Or to deepen the posture you can raise the upper leg to increase the intensity.
Benefits: As a treatment for scoliosis – practice the side plank asymmetrically, and strengthen the side of the body which has the convex curve. Over time this practice can reduce the scoliosis curve in the body.
Next Steps
- If you’re interested in practical kriya yoga as a way to improve your daily life and relationships, check out my Yoga for Self Mastery course.
- Order my Yoga Life book for a practical guide to creating balance in your life through yoga.
- Check out my YouTube channel and find some yoga classes that you can try out for yourself!
Sources
Find more yoga sequences by benefit.
YOU MIGHT ALSO LIKE
- How to Teach Somatic Yoga: A Practical Guide for Instructors
- The Best Somatic Exercises for Grief: Find Healing Through Movement
- The Best Somatic Exercises for Anger Management and Emotional Release
- Yoga to Reconnect with Yourself: 5 Essential Practices for Inner Peace
- Yoga for Connection: 10 Poses to Deepen Relationships and Bonding
- Yoga To Connect With Your Body For Mind-Body Harmony
- Yoga to Connect with Feminine Energy: 5 Transformative Practices
- Yoga to Connect with Your Heart: 3 Poses for Emotional Balance
- Myofascial Release Yoga: Unlock Tension and Improve Flexibility
- 6 Hip Openers For Emotional Release
- Office Yoga: 10 Poses You Can Do Right Now
- Ayurveda Food Combining: The Key to Balanced Digestion
- Yoga For Grief: 8 Yoga Poses For Support
- Yoga for Vata Dosha: Practice Poses and Tips
- Yoga for Pitta Dosha: Practice Poses and Tips
Learn how to do 11 of the most popular yoga poses correctly. Free video + PDF download.


