Have you ever tried to teach a class on Zoom only to be frustrated with having to switch between windows so that you could see how everyone is doing?
Yeah, me too.
And same goes for A LOT of yoga teachers in my Yoga Hackers Facebook group and online yoga teacher training practicums.
So we found a sneaky little way to use TWO devices while teaching yoga online with Zoom. In this post, I’ll walk you through each step to begin using two devices to teach your online class with Zoom.
Benefits of Using Two Devices to Teach Your Online Class With Zoom
Using two devices to teach yoga on zoom is an excellent way to be able to offer your students a more personalized, high touch experience without affecting the quality of your recording. You can film yourself with one, giving your students a clear view of your instruction, and then use the other to view your students via the gallery mode.
You can also record the entire class on your computer so that you can use it again in the future.
I’m a huge fan of making the best experience for both me, as the yoga instructor, as well as my students. It’s a win-win!
Step-by-Step Instructions For Using Two Devices To Teach Yoga On Zoom
Two computers would be ideal for this, but if that is not an option, I suggest using the device with the smaller screen (i.e. phone or other mobile device) to record on while using your computer or device with a larger screen to monitor your students.
Here is a quick step by step guide to get you started:
1. Log on to Zoom and begin your meeting using the device you plan to film yourself with, leaving plenty of time to set up and test your recording device before your class begins.
2. Once you have your filming device set up, ensure that the screen is on “Speaker View”.

3. To maintain this view on your recording device, click on “Manage Participants” in the bottom menu of your Zoom screen.
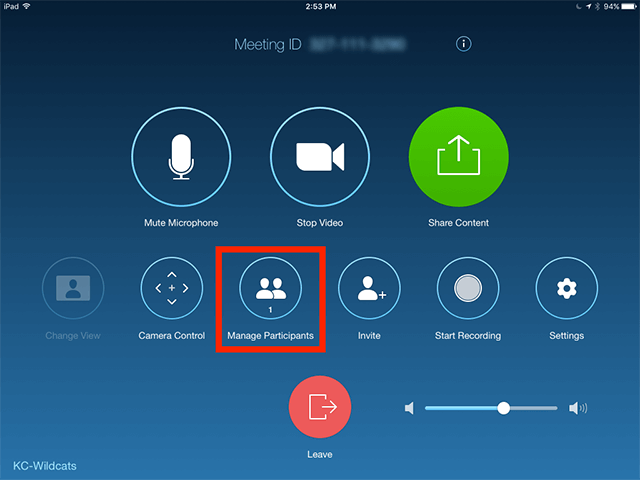
4. Next, hover over your name, click “more” and select “Pin Video” or “Spotlight Video”.
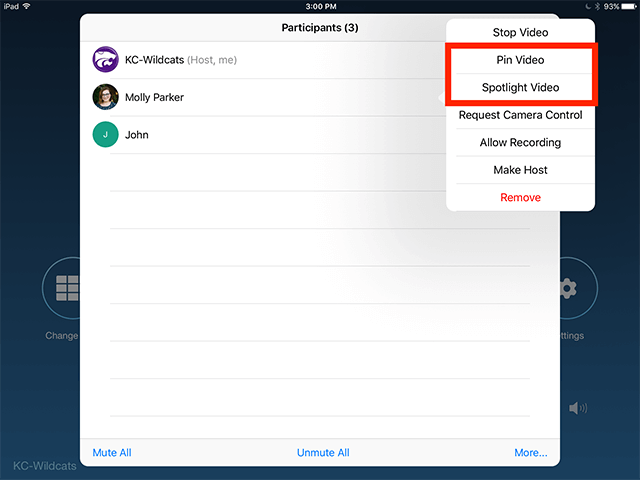
5. Now, log into the meeting from your second computer or larger mobile/visual device and click “Gallery View” at the top right corner of the screen to see all of your participants. Be sure to place your larger device in a space you can easily access during the class. Mute yourself and turn your camera off on your viewing device. If you don’t, you’ll get this awful, screeching feedback.

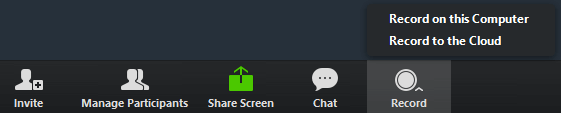
6. When you are ready to begin your class, look for the record button in the bottom toolbar of the device that has enough space to save the recording. Click record and choose where you would like to record. If the device you are using to record has the space, I highly recommend always recording to your computer.
As you teach your class you can monitor the screen of your visual device to offer your students a more interactive class experience while creating a high-quality reusable product.
Read Next: My Exact Tech Tools For My Million Dollar Online Yoga Platform
YOU MIGHT ALSO LIKE
- What Is YACEP? (Yoga Alliance Continuing Education Provider)
- How to Handle a Student Injury in Yoga Class
- How to Teach Yoga in Schools
- How to Teach Yoga to Athletes
- How to Teach Restorative Yoga Classes
- How to Teach Prenatal Yoga (What You Need to Know)
- How to Teach Chair Yoga (Guide for New Teachers)
- How to Get Hired at a Yoga Studio (What Studios Look For)
- How to Find Your Yoga Teaching Niche: A 3-Question Framework for Building a Signature Program (and Why Generic Vinyasa Doesn’t Sell Anymore)
- The Real Economics of Yoga Teacher Training in 2026: What It Costs, What You’ll Earn, and When the Math Actually Works
- Yoga Teacher Training as a Mid-Life Wellness Sabbatical: Why More Women Are Using YTT to Reset Their Nervous System (Not Change Careers)
- How to Teach Trauma-Informed Yoga
- How to Get Your First Yoga Teaching Job
- How Do I Log Continuing Education Hours with Yoga Alliance?
- How to Make a Living as a Yoga Teacher (Without Burning Out)
Sneak Peak into My 300-Hour YTT - FREE Videos, Info Session, Bonuses!